 English
Campaigns #
A marketing campaign consists of a series of activities to promote a product or service through different channels. Prisma Campaigns prioritizes the campaigns that you define as follows:
Campaigns that are relevant to the customer, regardless of the channel. The system will determine which campaign (or campaigns) it should present based on previous knowledge about your customers. For example, if they have a significant balance in their banking account, they may not need a loan, and therefore it would not be practical to send them a campaign that offers one. Instead, the campaigns that offer products or services more consistent with their circumstances will take precedence.
The messages that the system delivers to the customers (depending on age, gender, and so forth) that are more applicable to them.
We will now explain how to carry out the creation of campaigns. We will also explain how to use the Media Library to manage the assets you will use in them.
Campaign Creation #
We can create a new campaign by clicking New Campaign inside of the Campaigns menu. The process begins with a form where we need to provide the following information:
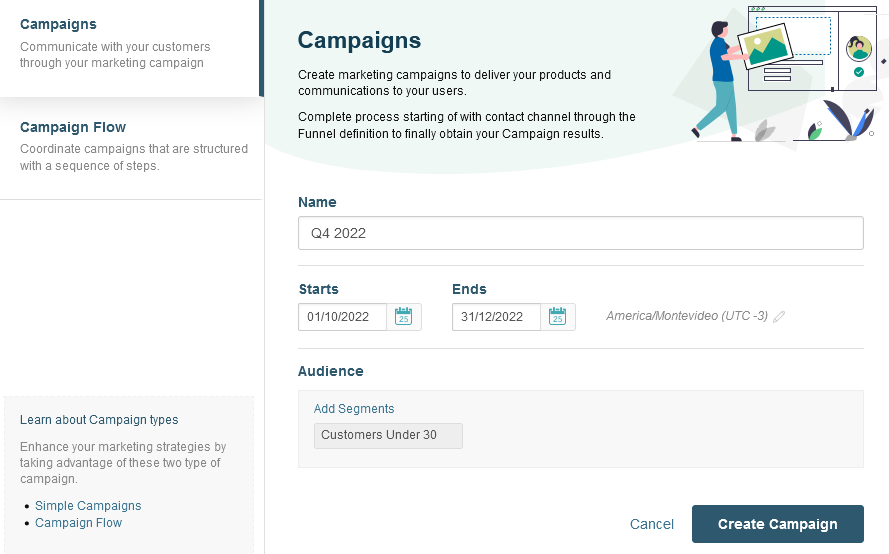
Campaign name.
Start (Starts) and end dates (Ends). After the latter, the campaign will no longer be active for any of its configured communication channels.
Time zone. The default time zone is set globally in the platform configuration (Company Preferences under Settings). However, you can choose a different one according to the campaign’s target audience.
Associated segments (Segments). It is possible to associate a campaign with one or more segments, none (No Segment) or all (Everyone). These last 2 cases deserve a more detailed explanation:
No segment causes the campaign to not apply to any customers. This option is used while creating a new campaign when the target segment has not yet been defined. Of course, you can modify this parameter at a later date.
Everyone: the campaign will apply to all customers, including the anonymous ones. The main use for this alternative consists of public campaigns.
Once the information has been entered, click Create Campaign to save the campaign.
The basic information of the campaign (name, start and end dates, time zone, and associated segments) can be edited at any time by clicking the pencil icon to the right of the end date.
Campaign Settings #
In the campaign configuration -through the Settings tab as shown below-, you can edit any of its settings as explained in the sections that follow.
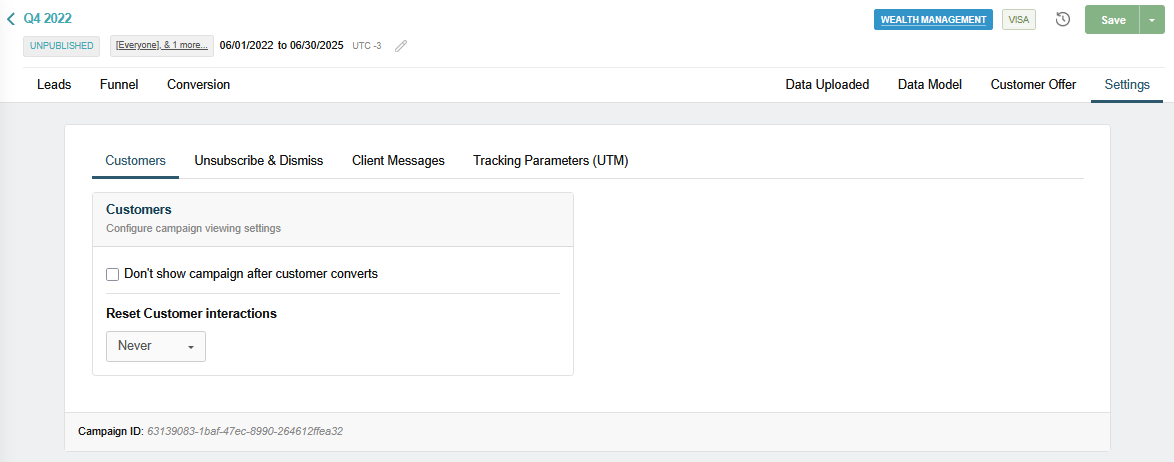
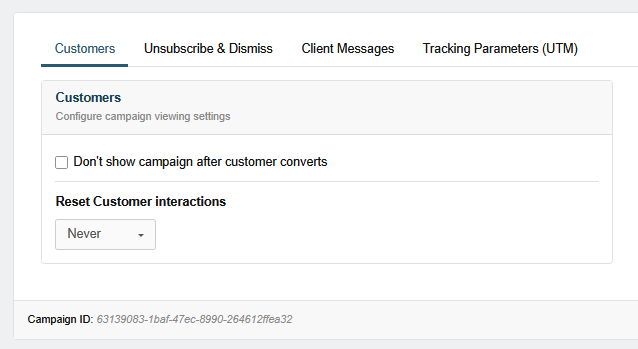
Customers #
This section allows you to define how the campaign is presented to customers and how their interactions are managed.
- Show after conversion: Specify whether the campaign should continue to be shown to a customer after they have converted.
- Reset interactions: Choose if and when to reset previous customer interactions (such as conversions or dismisses), allowing the campaign to be presented again. It is important to note that all interactions can be reset, or you can choose between previous conversions and dismisses.
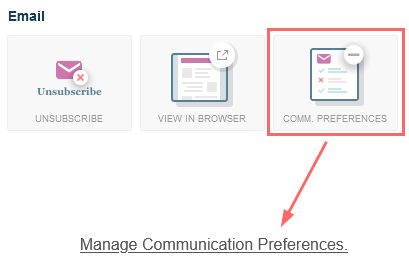
Unsubscribe & Dismiss #
This section governs how customers can opt out of communications and manage their preferences, as well as how they can dismiss campaigns. You can configure the unsubscribe link to control the scope of unsubscription when a customer clicks it. To display the following options, you need to create a landing page (see Settings/Landing Pages).
- Unsubscribing only from the current campaign, from a specific category or group, from both category and group, or from all communications.
- Defining whether the unsubscription applies to all outbound channels or only the channel through which the customer was contacted.
To display the communication preferences:
Include the
{{plugin.communication-preferences}}in the desired location of another landing page where you want to display them: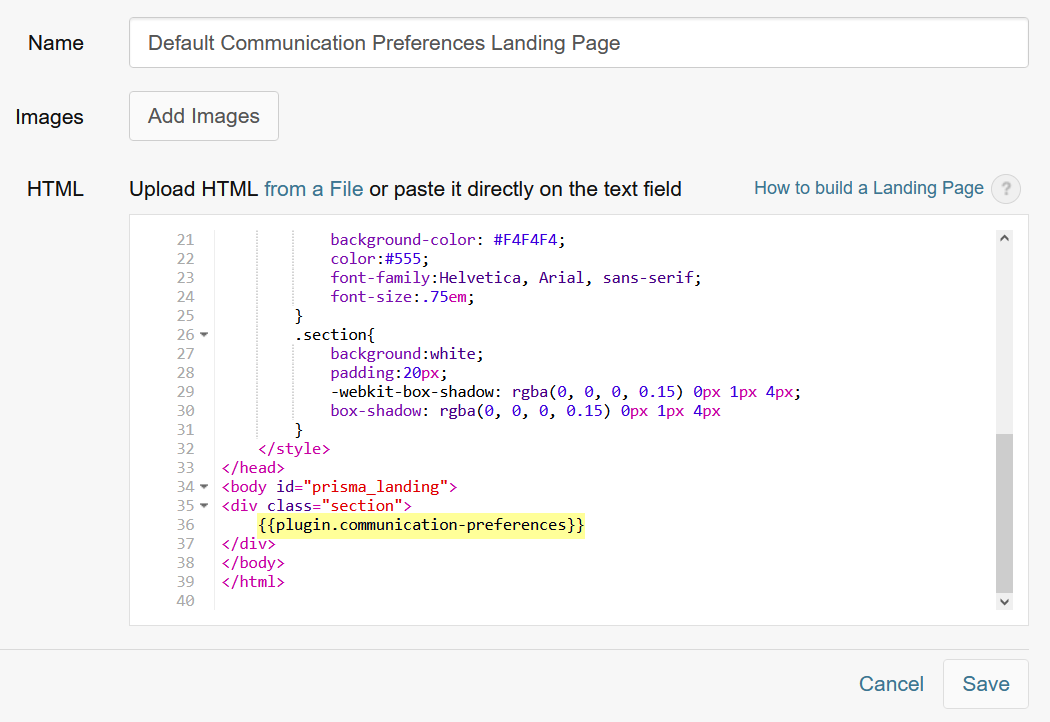
In the campaign, add the link to communication preferences using the associated component from the designer. Alternatively, manually add
{{campaign.communication-preferences}}in the href attribute of an a tag in a text component. Without this link, the plugin will not work.
For advanced use, the plugin can be rendered inside an iframe using a URL with parameters for domain, app token, customer ID, and optional campaign or style customization as you can read in Giving Customers Control Over Their Communication Preferences
- Choose the communication preferences landing page in the campaign settings (Default Communication Preferences Landing Page in the below example).
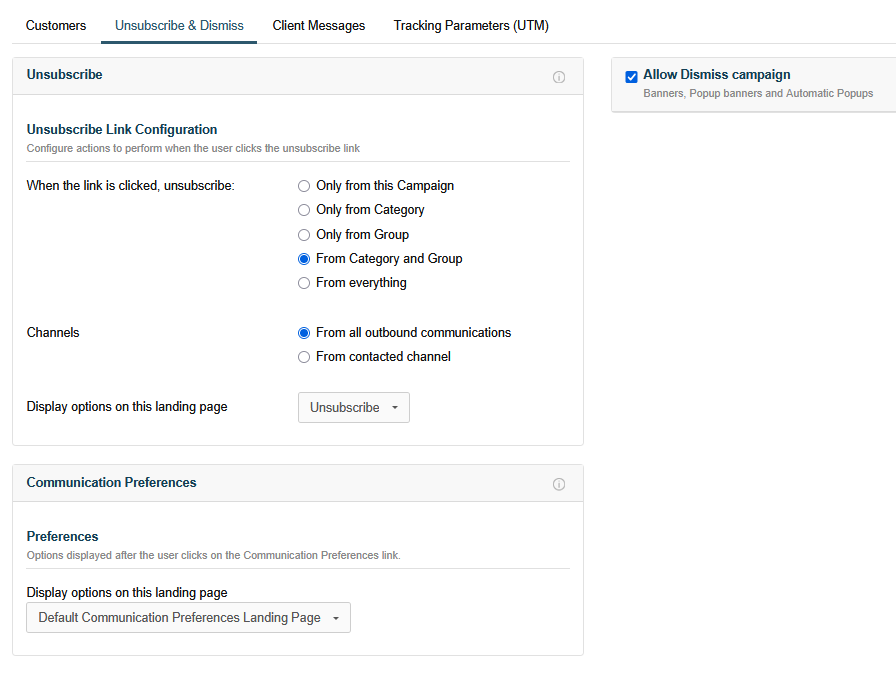
When the Allow Dismiss campaign checkbox is enabled, customers can control their experience by disregarding the banners, popup banners, and automatic popups without fully unsubscribing. If they choose to do so, the dismissal will be reset after 3 months, allowing for the campaign to be shown again. This makes it possible for your customers to reconsider the previous decision in the case that their needs, personal circumstances, or interests change.
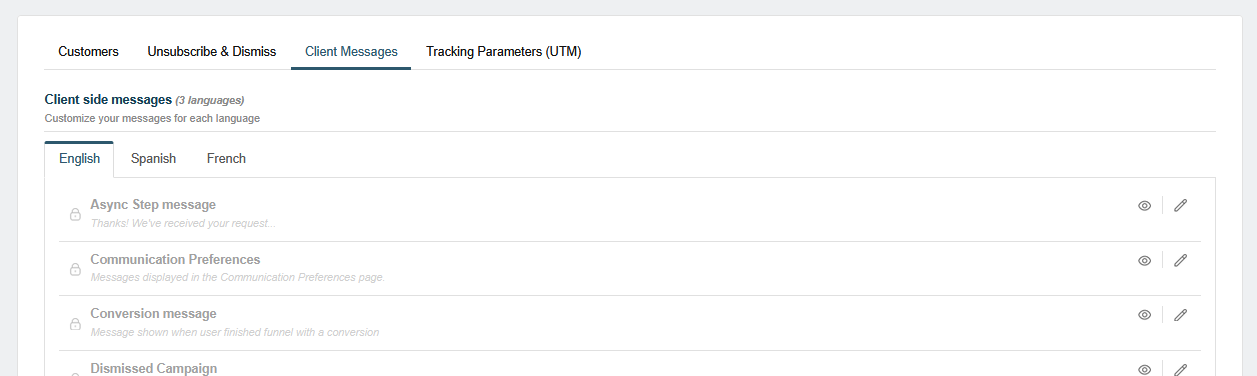
Client messages #
This section allows you to override default client-facing messages for the campaign in three languages (English, Spanish, and French) from the global configuration. For more information, please refer to the Language and Client Messages section in this manual.
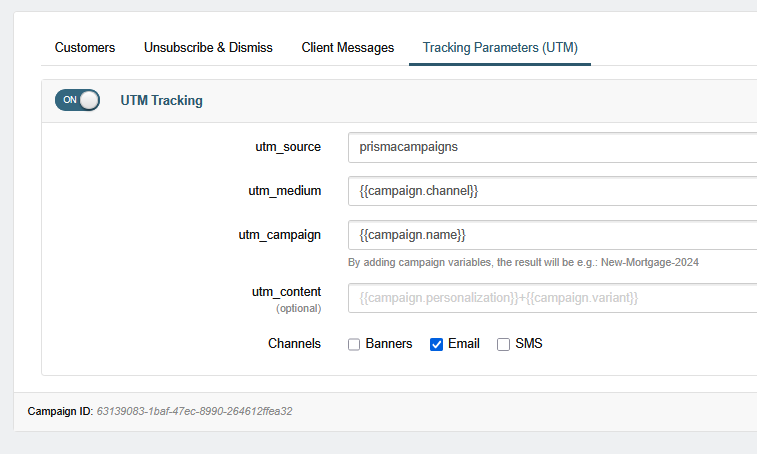
Tracking Parameters (UTM) #
Prisma Campaigns supports the use of UTM parameters in the external links of your outbound communications. The purpose of this resource consists of tracking marketing efforts across channels to analyze its effectiveness later. UTM parameters can be enabled or disabled for each campaign, and you can define default values for new campaigns at the system level.
- UTM Parameters: These include
utm_source,utm_campaign,utm_medium, andutm_content, which help identify the origin, campaign name, medium, and content variant for each interaction. - Default Preferences: System-wide defaults for UTM parameters can be set in Settings/Link Tracking Setup. These defaults are applied to new campaigns but can be overridden for individual campaigns.
- Campaign-level Configuration: For existing campaigns, UTM tracking can be toggled on or off in the campaign settings. When enabled, you can specify or customize the UTM values, using both static values and Prisma Campaigns variables (e.g.,
{{campaign.name}},{{campaign.channel}}). - Best Practices: Since UTM parameters are case-sensitive, use lowercase consistently for accurate tracking.
Campaign Steps #
The campaign steps consist of three well-defined sections:
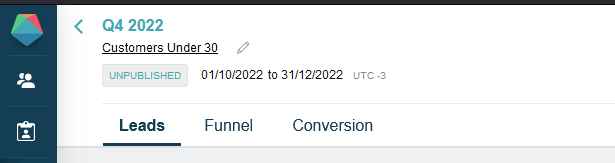
Leads
Funnel
Conversion
Next, we will discuss each of them in more detail.
Lead Generation #
In Leads, you get to choose the channels to run the campaign and customize the message for each one. For example, if the configured channels for a given campaign are Email and SMS, you may want to send a different message for each channel.
Some of the predefined channels are:
Banners
Email
SMS
Push Notifications
Referral Links (Social Networks)
- Other
Business Events
Although some of these channels might not be available in the current version of Prisma Campaigns, they are all included in the plans for future development.
Funnel #
The campaign funnel starts when a person becomes interested in a campaign through any input channel. It is worth noting that the actions configured as part of the campaign funnel are independent of the customer’s point or channel of entry to the campaign. In other words, the series of steps the customer will follow is the same regardless of where the lead originated (a banner, email, or SMS). However, these steps will appear in a format that is appropriate for the device in question.
Funnel Settings #
To configure the funnel, we must follow the following steps from this tab:
Choose the outbound message template. You can use the default landing page or create others through Settings/Landing Pages as explained in the Landing Pages section in this manual.
Choose the visual aspect (Theme). You can use the default or create a new one from Color Themes in Settings as detailed in Color Themes.
If Show on every step is enabled, the customer will be able to see how many of the steps set up in the conversion funnel he or she has already completed.
When several users start a funnel simultaneously, it may cause an overload on your server resources. To prevent this situation, you can enable a virtual queue with a maximum number of simultaneous users. To do this, you need to check the Limit number of concurrent users checkbox and enter how many matching customers you want to allow. As a result, Prisma Campaigns will handle the indicated number of funnel executions and place subsequent requests on hold. It is also possible to restrict the time a customer can spend in a funnel run. The image below shows that the campaign will allow only 20 concurrent people and will wait 180 seconds before assuming that a customer has left the process. Thus, a place will become available in the queue if a person is not progressing through the funnel.

You should consider this feature if your server resources cannot support multiple simultaneous runs. Under this scenario, the limitation in your infrastructure or the processing capacity of the funnel will influence the decision.
Funnel Steps #
Regarding the funnel outline, you should begin by clicking on the Flow Steps tab and examining the options available under User Interactions. The steps and conditions are designed by dragging and dropping the desired components into the editing area.
If you want to display a web page in a given funnel step, you can use the designer built into Prisma Campaigns. This tool allows you to create functional web pages that you can adapt to all types of devices. For more information, please refer to the Designer section in this manual.
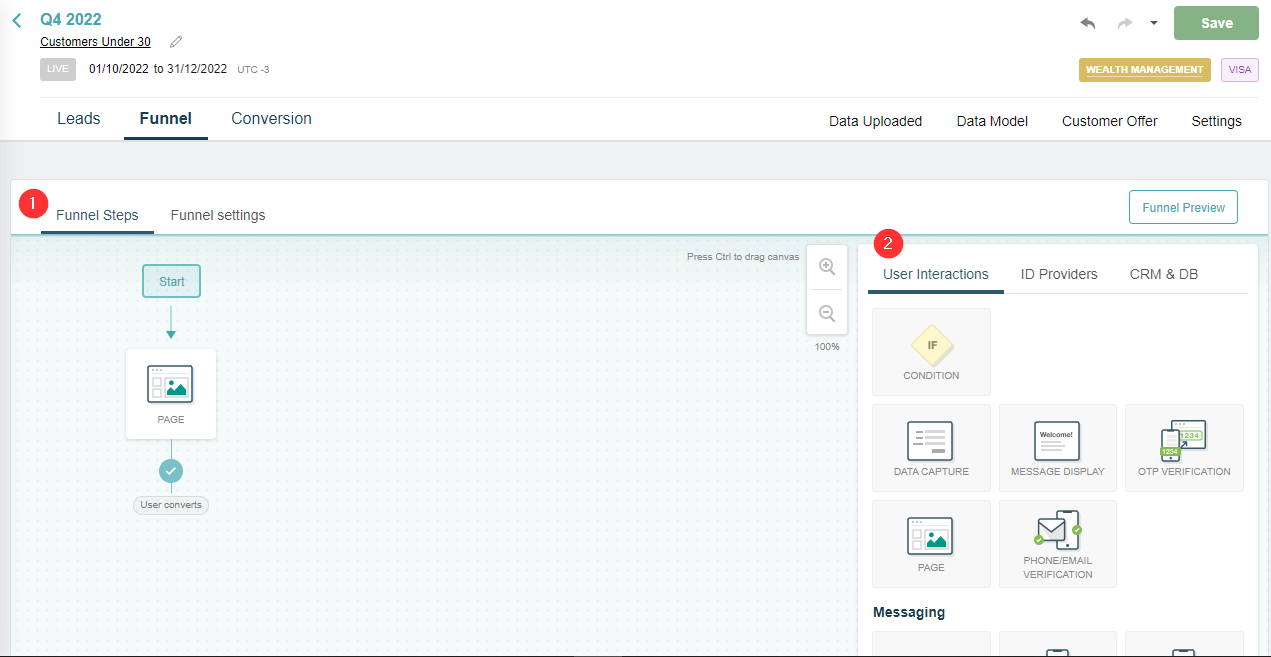
As shown in the above image, the actions that you can perform in a new funnel step are the following:
- User interactions
- CONDITION: bifurcate funnel based on conditions
- DATA CAPTURE: capture information from the customer
- MESSAGE DISPLAY: display a message
- OTP VERIFICATION: OTP (One-Time Password) verification
- PAGE: show a page
- PHONE/EMAIL VERIFICATION
- Messaging
- Push notification
- SMS
- Integration
- Docusign
- Export to PDF
- Page redirect
- Web service
To configure the components that take part in the funnel, proceed as follows:
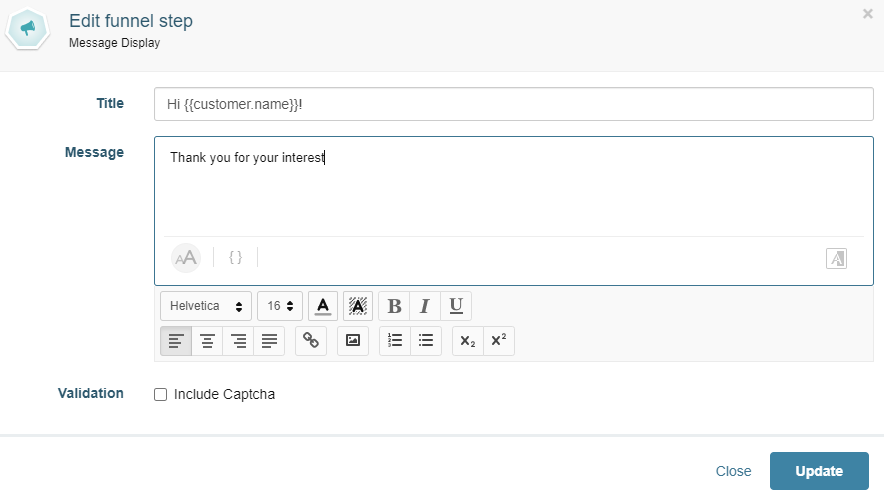
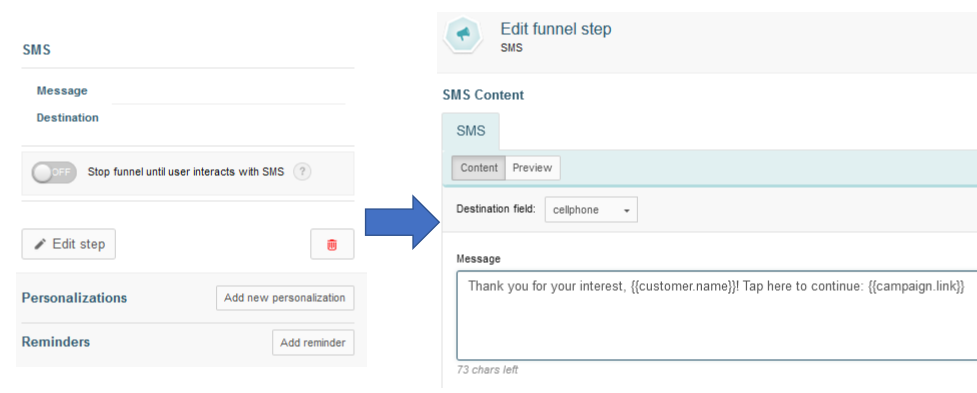
When you click on the Edit step button, a window will appear and allow you to set the appearance and content of the component. For example, MESSAGE DISPLAY requires a title, a body, and optionally a captcha-based validation.
After saving the changes, you will see the content you have added so far:
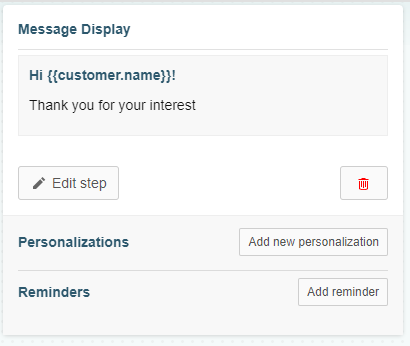
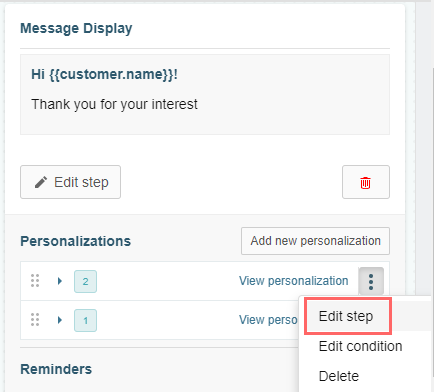
While configuring the funnel, you can set up conditions before determining one or more steps. For example, you can display the same base message to everyone with different additional content based on the customer’s gender or current balance. You can add as many actions (steps or conditions) as you wish, each of which will represent a defined stage in the funnel.
To achieve this goal, you must press Add new personalization and choose one or more conditions as many times as necessary. To edit each customization with a particular message, we will use the Edit step button in the configuration of each one:
In the image below we can see a funnel step with a personalization based on the customer’s gender. To show a personalized message, Prisma Campaigns analyzes (from bottom to top) if the person is a woman or a man. In both cases, the individual’s name (represented by the use of the variable
{{customer.name}}will be displayed.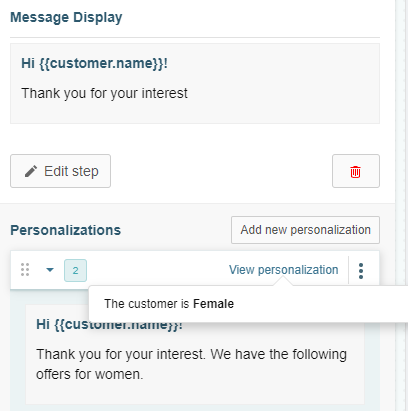
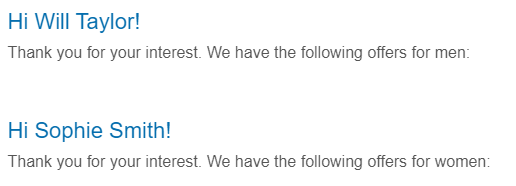
When your customers launch the web portal while this campaign is active, they will receive one of the two messages depending on whether they are male or female. The message will include a greeting with the person’s name and a particular text based on gender.
Optionally, we can add a reminder via email, SMS message, or push notification in case the customer has not completed the step in question. Prisma Campaigns will send out the reminder once the indicated time is completed.
To connect one funnel step to the next, click on the bottom edge of the component and drag and drop to the midpoint in the top edge on the next step.
Other Examples: Redirects, Sms, and Forks #
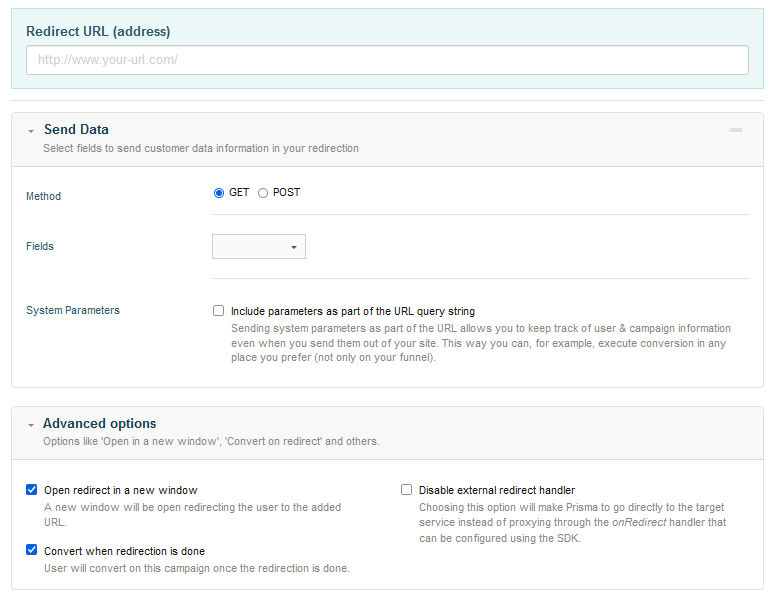
The image below illustrates how to add a page redirect. To begin, choose the destination URL and indicate whether it should open in the same window or a separate one. Also, select the HTTP method and optionally the user-related data to include in the redirection:
If the new step consists of sending a message via SMS, provide the following:
Instead of customizing a step as in the previous example, you can make a fork based on a condition. For instance, if the customer is female, you can show her a farewell message. Otherwise, you can ask for more information:
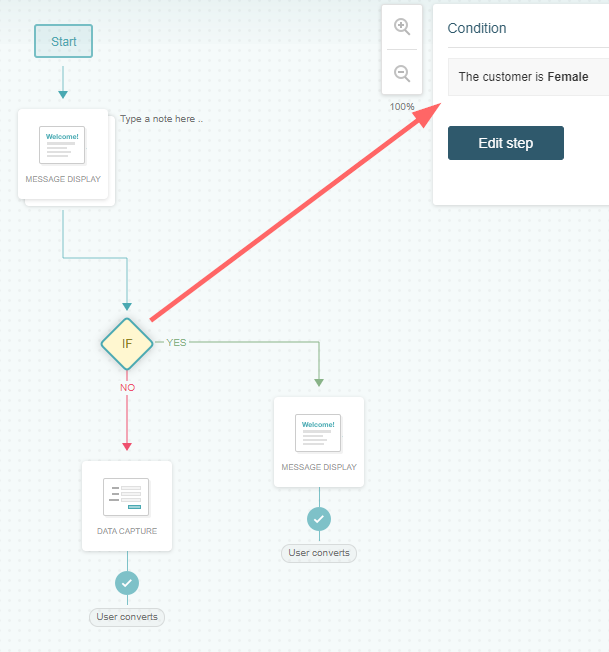
It is important to emphasize that you can always make a fork in the funnel using a condition without necessarily adding a series of defined steps.
Data Capture #
As explained previously, data capture is one of the available actions for the funnel configuration. Through a fully customizable form, you can ask customers to enter information. For instance, if you want to find out if they already have life insurance coverage, you may consider presenting the question Do you have life insurance? as shown below. To respond, they can check (or uncheck) a selection box.
To include the field in the data capture, click Done. Once you have finished adding all the necessary fields, hit Update to return to the funnel area.
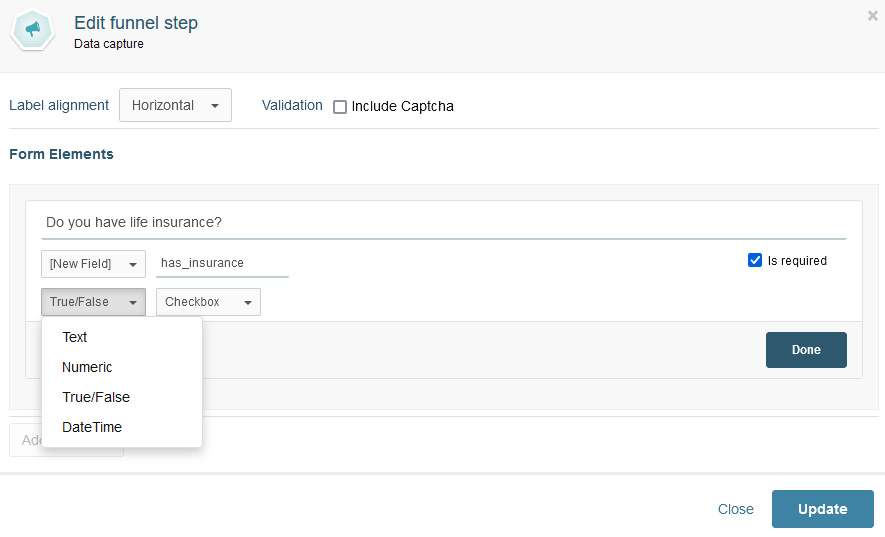
Fields created during this process are campaign-specific, and not part of the global customer model. Besides a true/false field, Prisma Campaigns allows the use of text, numbers, or dates:
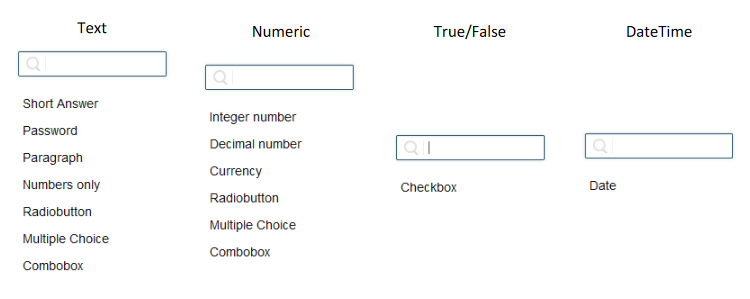
As shown in the above image, each data type provides at least one type of control:
- Text
- Short Answer
- Password
- Paragraph
- Numbers only
- Radiobutton
- Multiple Choice
- Combobox
- Numeric
- Integer
- Decimal
- Currency
- Radiobutton
- Multiple Choice
- Combobox
- True/False
- Checkbox
- DateTime
- Date
These controls help ensure that each piece of data corresponds with the type of the associated field, that does not exceed the specified length, and that dates are entered correctly.
Conversion #
In Conversion, you will see the actions you want the customer to take once they have converted (for example, after completing a registration process or purchasing an additional service or product).
When the customer converts, there are four predetermined actions to be performed. Although Export raw data to CSV file will always be available, the other options depend on the integration with the external systems.
Export CSV creates a .csv file with data about interactions with the customer. If a given individual qualifies for the target segment but has not been reached through the campaign, the file will not include any records for that person. Otherwise, there will be only one row.
Send to call center
Send to CRM
Update BackOffice
If Export CSV is enabled, you must choose which fields you want to export. The initial list includes all those that are associated with the channels configured on the campaign. Thus, you do not need to select all the relevant fields individually, but you can still add others or remove those that are not required. From the left section, you can add each group as a whole, partially, or dismissed altogether. After you pick an item, it will appear on the right-hand list with the others.
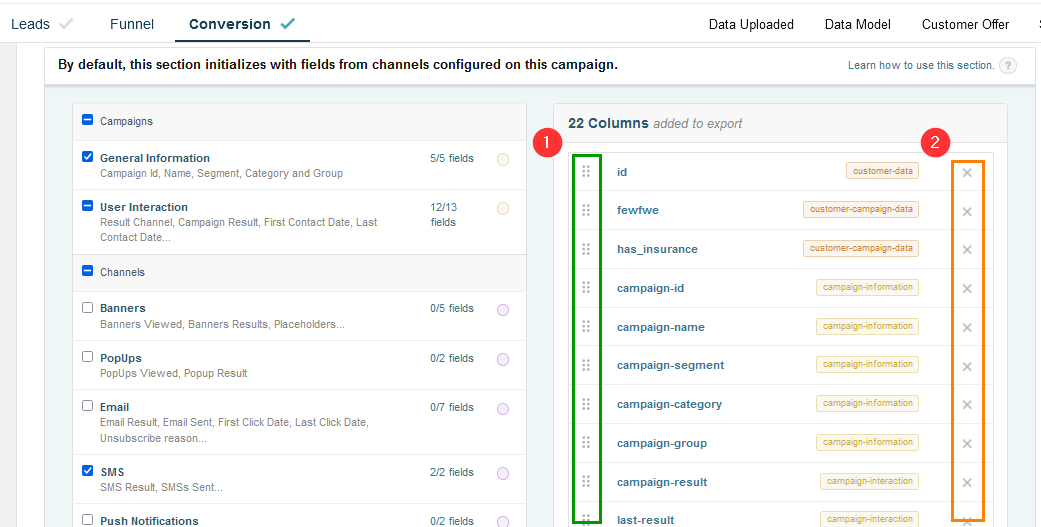
The above image shows the following:
23 fields will be part of the export file.
Inside Campaigns (left), a group called General information was selected in its entirety (5 fields out of 5), whereas in User Interaction 12 out of 13 were chosen.
It is possible to reorganize (1) or remove (2) the selected fields in the list by dragging and dropping them in the desired position or clicking on the corresponding item, respectively.
Since these changes belong to the campaign configuration, they must be saved before they take effect just like any other modification.
For further information on the existing fields, see References / Export Fields.
In a separate chapter (Analysis) we will see that the campaign results export file will contain this exact set of fields.
Channels #
In simple terms, channels are the means by which a client is reached in a campaign. Prisma Campaigns provides several channels out of the box (with the most used being web banners, pop-up windows, email, SMS, and push notifications) and other custom solutions that can be integrated or extended according to the current needs of the company. Each channel has its own distinguishing features and a variety of entry points to generate leads. By nature, some channels are incoming and others are outgoing, depending on who begins the interaction (the client or the company, respectively).
The next step in the creation of a campaign consists of the configuration of the desired channels, as explained below.
Banner Creation and Settings #
A banner is a form of online advertising displayed in a web page.
The following steps are required to configure a banner:
Define placeholders (see chapter 2 “Basic configuration” for further details).
Get the Javascript integration code (see details in Chapter 2 of “Basic configuration”) and replace the necessary parameters to match the Prisma Campaigns installation and the data that is managed by the tool.
Paste the Javascript code obtained in the previous step inside the destination page:

For demonstration purposes only, the above image displays a hard coded 1 in CUSTOMER_ID. It is important to keep in mind that in a production environment, CUSTOMER_ID should contain the name of the field used as unique client identifier.
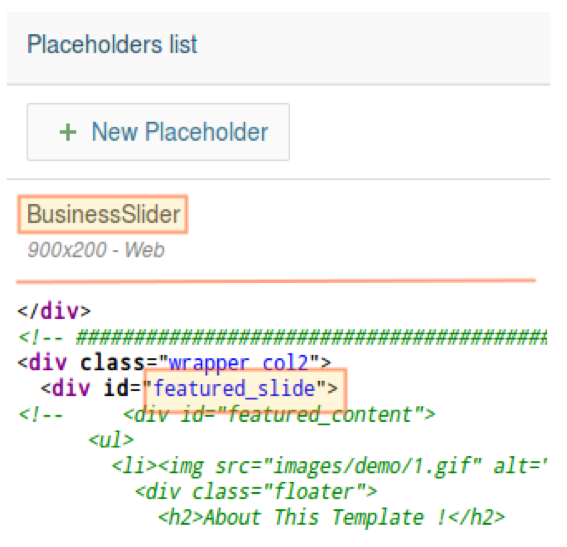
In addition, it is worthy and well to note that the integrations vector must include
the name of the placeholder that was created to display the banner (BusinessSlider)
the section ID within the HTML code where it will be shown (featured_slide)
Once these settings are defined, we can proceed to create the banner itself from CAMPAIGNS → Leads → Banners, as we will explain next.
Banner Creation #
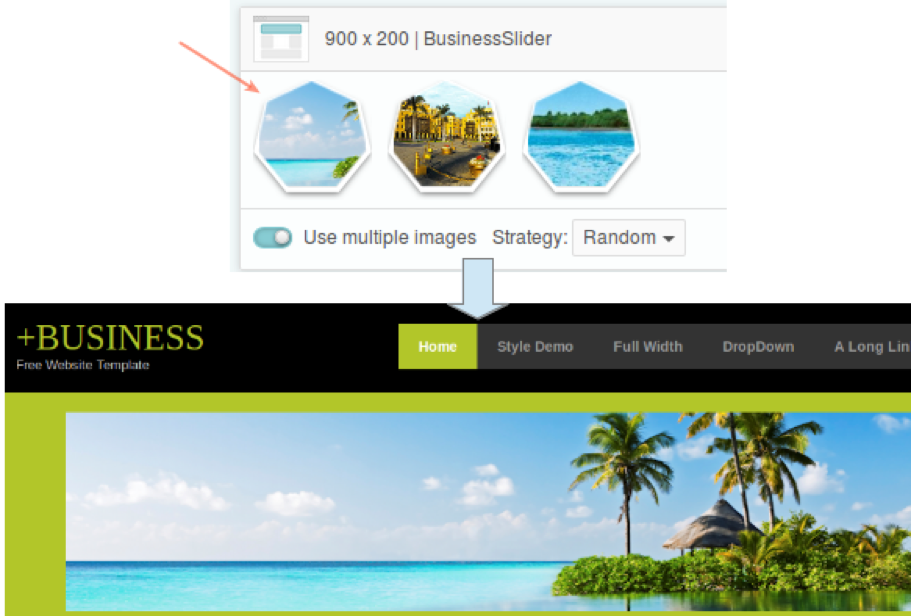
First and foremost, the Banners should be enabled within Leads before you can create a web banner. Next, click Add banner and assign it a name and placeholder. In addition, you need to indicate if you wish an image-only banner (no text) or an html one (if the latter, you can still include images). Finally, it is possible to add other images and to specify if all of them should be included into the banner and which strategy should be utilized: Random or Optimized (where Prisma Campaigns will use A/B testing techniques to determine which image is more likely to cause customers to convert).
The following image illustrates a banner using a placeholder named BusinessSlider and showing one of three images randomly.
Some considerations to take into account for Image Banners:
The images must be equal to or larger than the size of the placeholder and respect the aspect-ratio (aspect ratio) of the same. Otherwise, Prisma Campaigns will not allow your upload.
It is possible to personalize images by adding personalized text on top of them. In this case, Prisma Campaigns generates a new image dynamically respecting the format of the original and including the text configured by the user.
The banner is fully actionable by default, therefore the entire area of it acts as a link.
Some considerations to take into account for HTML Banners:
Important To activate the funnel from the HTML Banner, call this Javascript function:
<a href="#" onclick="prisma.startFunnel.call(this)"> Open </a>The banner HTML can work with a complete HTML structure or with minimal tags (inserted between
<div> </div>tags). In the case that the code is from a complete HTML structure, it will always be displayed using an iframe (thus avoiding style and code problems on the page where it will be displayed).To execute a campaign Dismiss from the HTML Banner, it is necessary to have the functionality in the campaign turned on and call the Javascript function from the banner as follows:
<a onclick="prisma.dismissCampaign.call(this)"> Dismiss </a>In case that it is displayed in a Banner Popup, you can close the popup by adding a button with the following Javascript function:
<a onclick="prisma.closePopup.call(this)"> Close </a>. Banner Popup shows a close button by default, so to avoid two close buttons you must turn on ‘hide close button’ in the placeholder configuration.
Additionally, through the integration you can:
Display the banner within an iframe or embedded in the page itself, adding isolated: true or false, respectively.
In cases where the placeholder is a Banner Popup and the banner is HTML, it can be added in the integration
adaptToContent: trueso that the popup containing the banner is not displayed with measures, but it adapts to the size of the HTML Banner. This is to control your measurements depending on the size of the screen.
Some restrictions apply on the length of the HTML code and the size of the image files. Visit the limits section for more information.
Pop-up Window Creation and Settings #
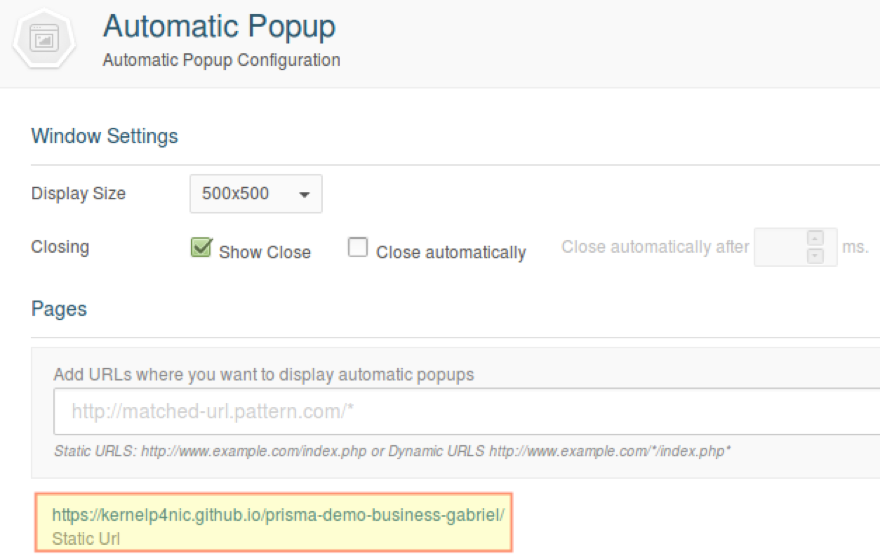
Also within Leads, we can create a pop-up window that appears automatically when the customer visits a particular page within the website. To configure the window and its behavior, click on Automatic Popup and indicate the following:
Window (display) size.
Whether the window should close on its own after a certain time, or if a close method should be provided.
The URL where the window should appear.
To add messages to be displayed and / or the steps that the customer will be prompted to perform, please refer to the Funnel section in this chapter. In any event, it is important to keep in mind that pop-up windows require a landing page that contains the campaign funnel (by calling
{{plugin.funnel}}). Additionally, further steps where customers can enter their email address or phone number (to name a few examples) are also necessary.
The use of {{plugin.funnel}} allows to execute the campaign funnel from a page that may also include images or HTML content. For example, the following HTML code displays the title My Bank inside h1 tags, an image file called logo.png, and then the campaign funnel. In this case, the funnel consists of an email data capture form:
<body></body>
    MyBank
    <img src="logo.png">
    {{plugin.funnel}}
<body></body>

It is worthy and well to clarify that the campaign funnel is started when a pop-up window is launched. Thus, if the funnel has not been previously defined, the pop-up window will be blank.
SMS #
To configure the SMS channel, it is necessary to activate the corresponding option and to click New SMS. Next, you can toggle between the content and preview tabs as illustrated below. The former allows you to enter the actual message (with a maximum of 160 characters) where you can include customer and campaign variables, and campaign data as well.
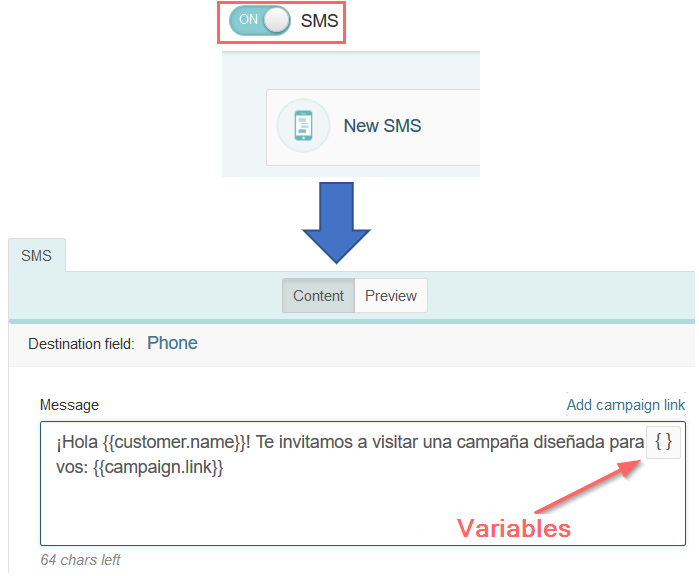
The above image also shows that Phone is used as the destination field. It is important to note that in this particular example, Phone is the name of the field where mobile numbers are stored inside the data model:
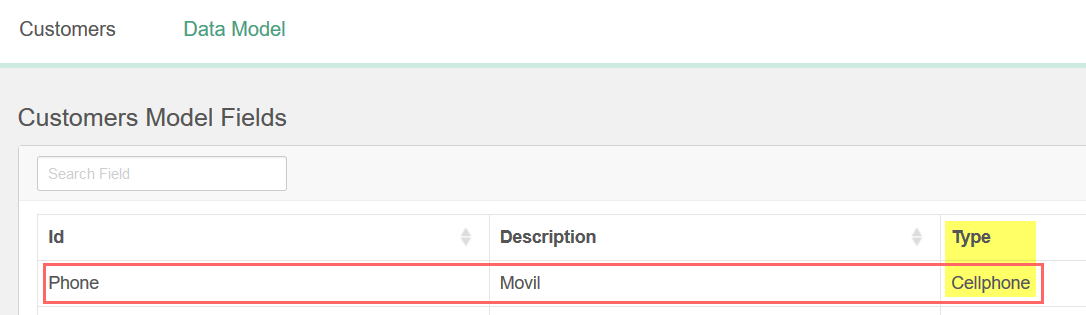
On the other hand, cellphone represents the data type used by Prisma Campaigns to store the client’s mobile number.
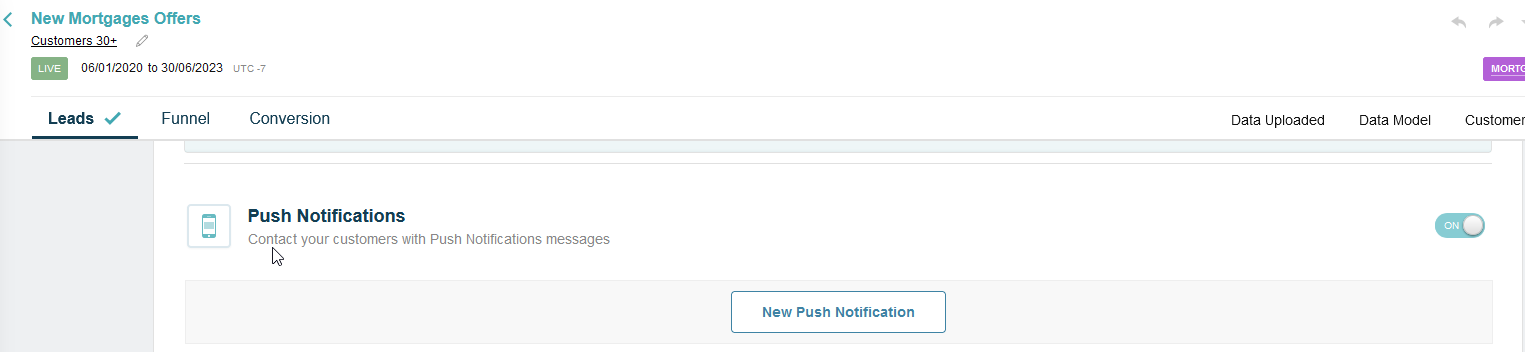
Push Notifications #
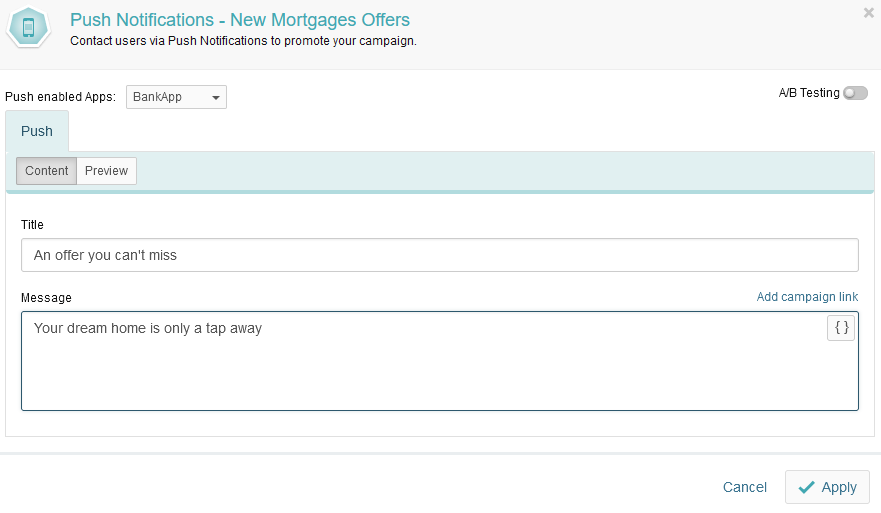
To use push notifications in a campaign, follow the steps outlined in Push Notifications Setup in this manual. Next, you will need to enable the Push Notifications channel inside of the campaign of interest and click New Push Notification:
Finally, choose the application from the list, enter the notification title and content, save the changes, and publish the campaign:
Direct Mail #
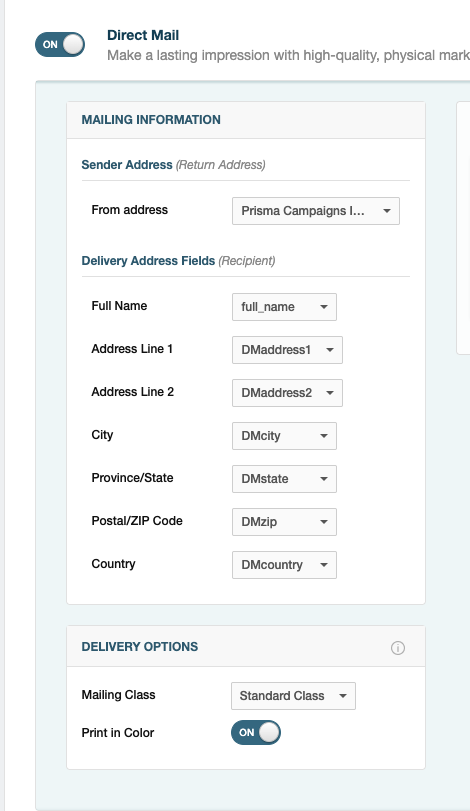
Direct mail allows you to send personalized physical communications to your customers (postcards, letters, and folded self-mailers). This channel is more effective to reach customers that prefer or respond better to traditional mail. It allows you to create a lasting impression and improve awareness about your brand through a powerful visual impact.
To incorporate direct mail into your campaigns, enable the Direct Mail switch under Leads and select a sender from your configured return addresses. You will need to specify which customer fields contain the recipient’s information, such as name and address, from your data model.
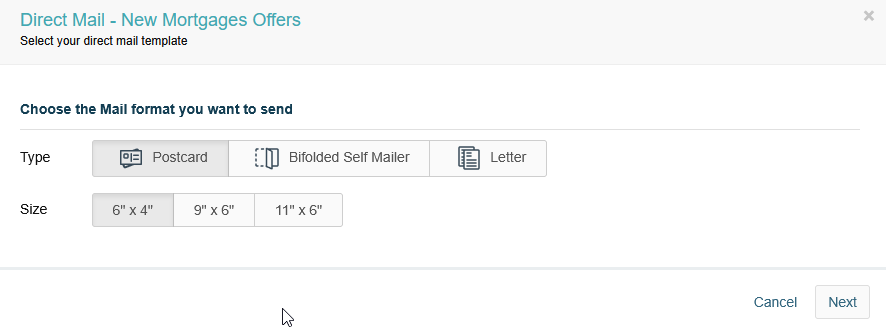
Then, create your message by selecting a template and customizing it with your campaign-specific content:
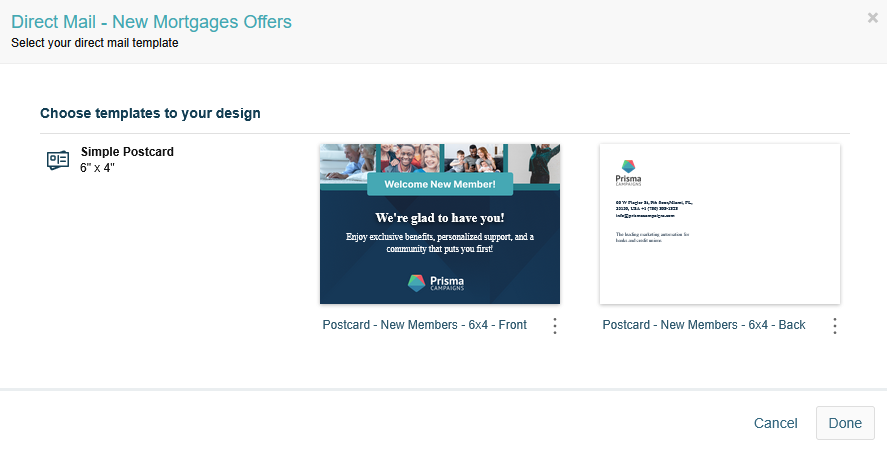
Once your design is complete, save the changes and publish the campaign.
It is important to highlight that the actual sending of communications is carried out from Orchestration. Thus, after completing the instructions above, you will need to schedule a blast in Orchestration/Schedule Blast. Later, you can view the results for the campaign in question as explained in Analysis.
Creating and Configuring Outbound Email Content #
To send a campaign to your customers via email, you should have previously configured an outbound email server as outlined in the Basic Settings chapter under Email Settings.
It is important to highlight that this section only explains the step-by-step procedure to configure the email message. The actual sending of communications is carried out from Orchestration. Thus, after completing the instructions below, you will need to schedule a blast in Orchestration/Schedule Blast. Later, you can view the results for the campaign in question as explained in Analysis.
In the image below we can see the screen where we configure the sending parameters, available translations of the message, the actual content and a personalization targeted at a campaign subsegment (customers who have used the web channel previously). The areas marked as 1, 2, 3 and 4 serve those purposes, respectively.
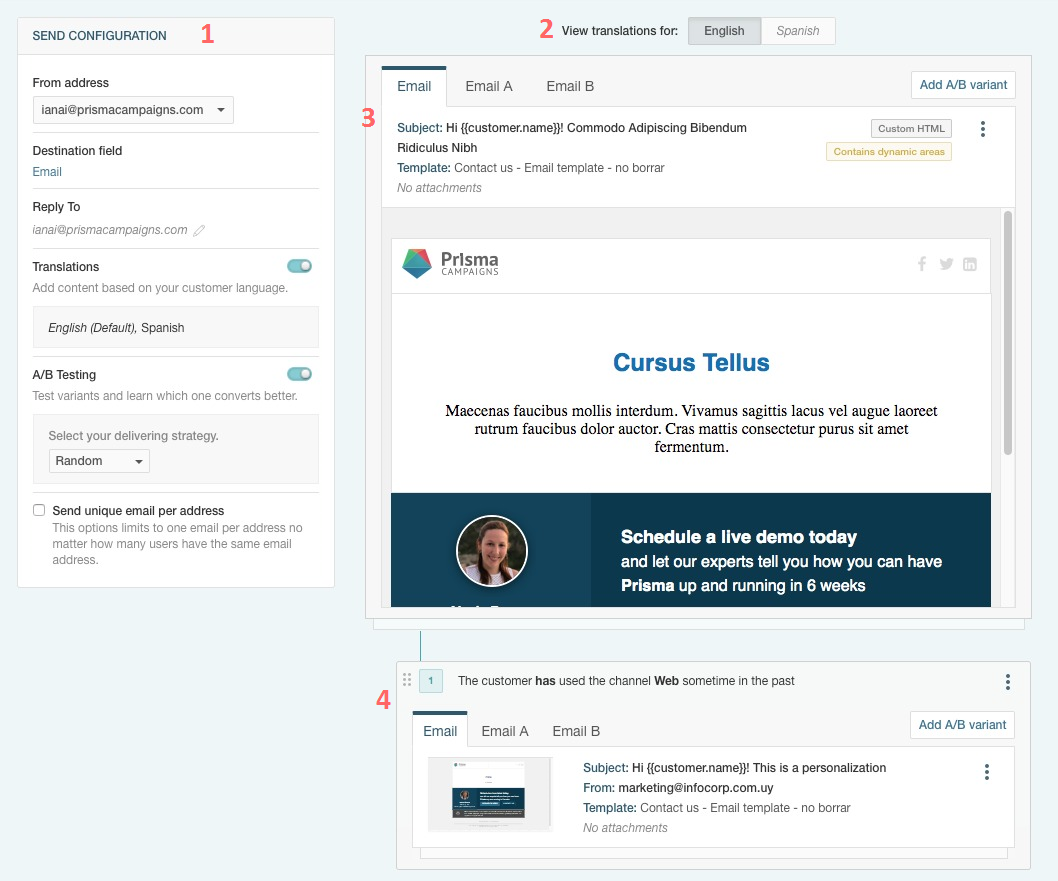
From address is one of the addresses that are configured under Mailboxes in Settings/Mail setup.
Destination field allows choosing which field in the data model contains the customers’ email addresses where the tool will send the messages to.
Reply to lets you specify an address where the customers’ responses will be sent to. By default, Reply to is identical to From address but can be edited by clicking on the pencil icon next to it. In that case, you will have to choose a field from the customer data model that contains an email address (for example, the broker of each client).
If you are planning on sending the communication to customers who speak a different language, you can turn on the Translation switch. This will create an exact copy of the email body and open the designer to enter the translated text. In the example above, there are two available translations (English -the default- and Spanish). To toggle between the two, click the corresponding buttons shown in 2.
By enabling A/B Testing, it is possible to add two or more alternatives to perform multivariant tests. Said another way, you can create two or more email designs and then analyze which one produced a higher conversion rate. The image above also shows that the main message and the personalization include three alternatives for A/B testing, which you can see in tabs labeled Email, Email A and Email B.
As described in Personalizations below, the values of From address, Destination field, Reply to and Send unique email per address of the default configuration can be changed if needed.
Next, it is necessary to enable the Email channel under Leads in the campaign and click New Email as illustrated below:
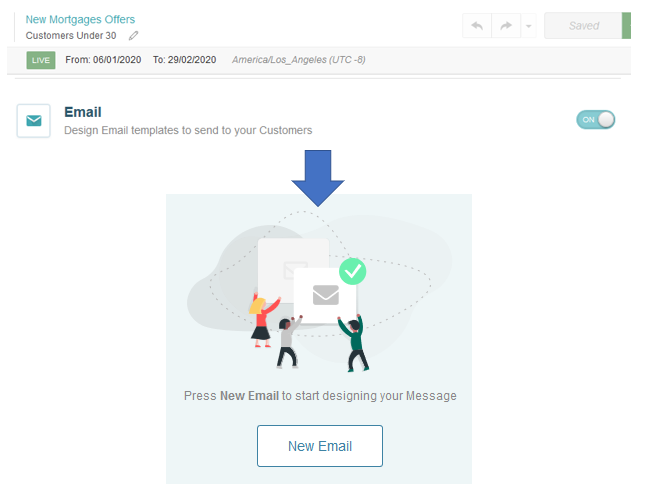
Prisma Campaigns provides the following alternatives to create a new email message:
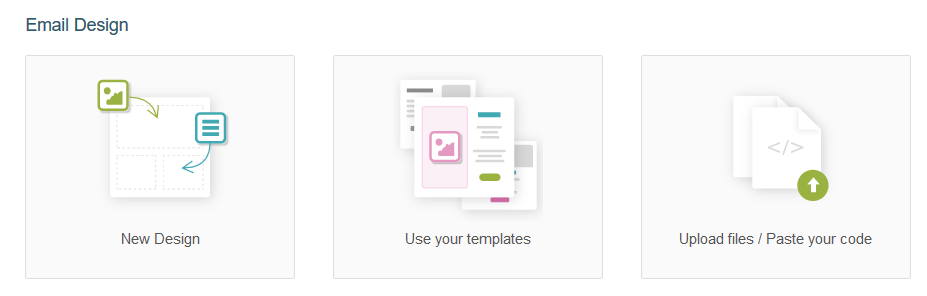
New Design (from the ground up)
Use your templates (self-explanatory)
Upload files / Paste your code (customized HTML code)
It is the responsibility of the Prisma Campaigns user to personalize the message content based on the given business needs. In each of the alternatives mentioned above, you can use variables such as
{{customer.name}},{{system.current_date}},{{campaign.link}}(to name a few examples) - both in the body and the subject of the email.
Before proceeding with the creation of the message itself, it is required to enter the subject and optionally add attachments. When we click on the corresponding textbox, the variable selection menu will become available. In the image below, we observe the use of the {{customer.name}} variable (which represents the customer’s full name) along with the text don’t miss this chance to buy your own home and an attached file named policies.pdf.
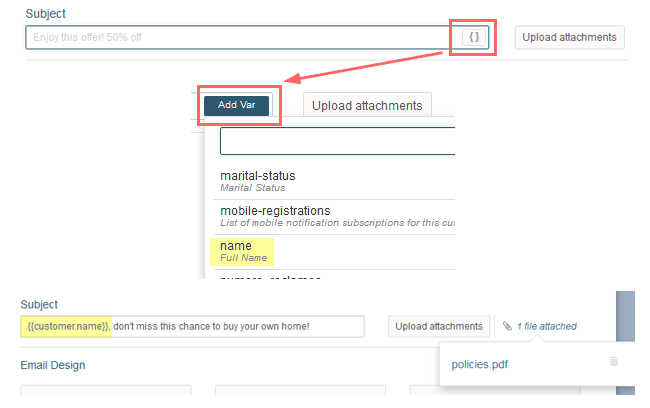
Regardless of the alternative that we selected to create the message, the Create button will take us to the screen where we will begin to draft the message body based on the chosen option.
New Design #
The email designer includes a wide variety of components that can be dragged and dropped onto the editing area to give the email the desired appearance and functionality.
The Designer section in this manual illustrates the use of the specific components of this tool (Unsubscribe, View in Browser, and Communication Preferences), the dynamic ones (buttons, images, and text), and the generic ones (titles, labels, rich text, images, buttons, links (hyperlinks), horizontal lines, and HTML fragments).
This option facilitates the production of a professional-looking message using an easy-to-use editor and selecting a template from a list of predefined options. Some of them have special occasion styles (birthdays, general communications, promotions, to name a few examples), while others include the basic skeleton of an institutional message. After choosing any of the templates, we must click the Yes, Replace now button to proceed with editing.
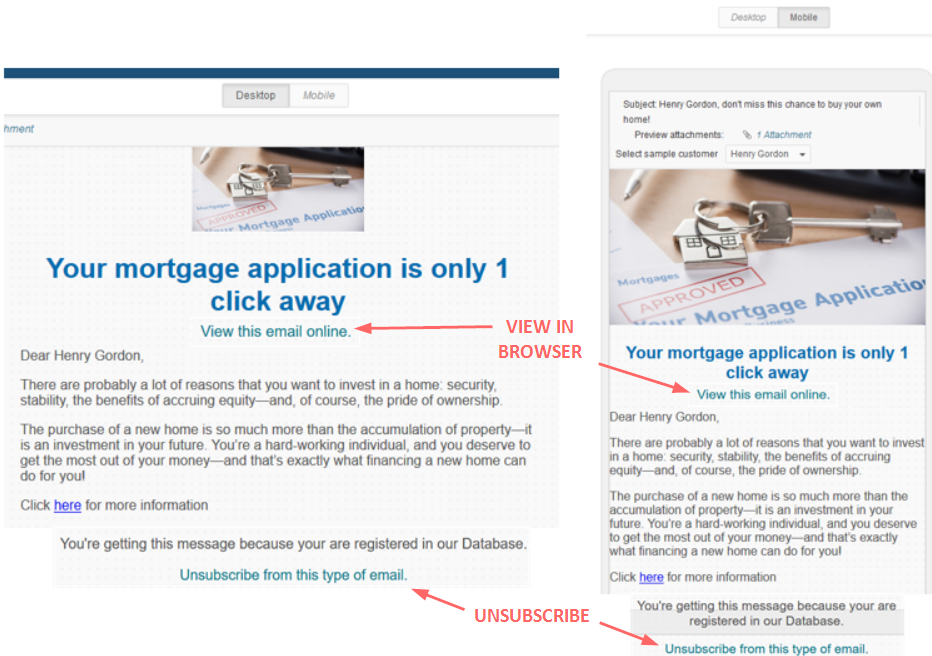
The following image shows the preview of an email body that includes the Unsubscribe and View in Browser components in both desktop and mobile modes:
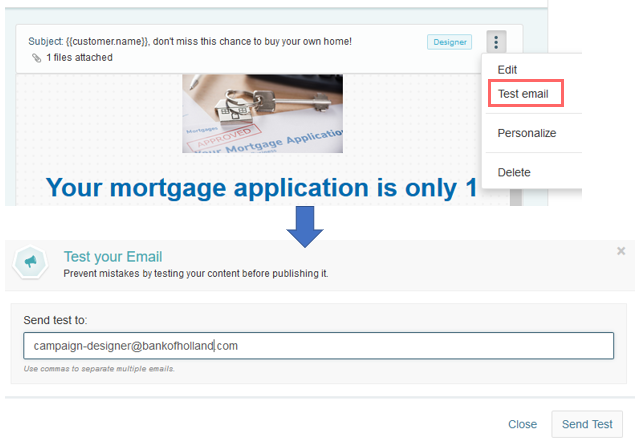
Once we are satisfied with the current design, we will click Create to save the changes. This step will take us back to the campaign configuration where we will need to confirm and publish the changes. Before doing this, it is recommended to send a test message to prevent any involuntary errors from being sent to the customers who are recipients of the campaign in question:
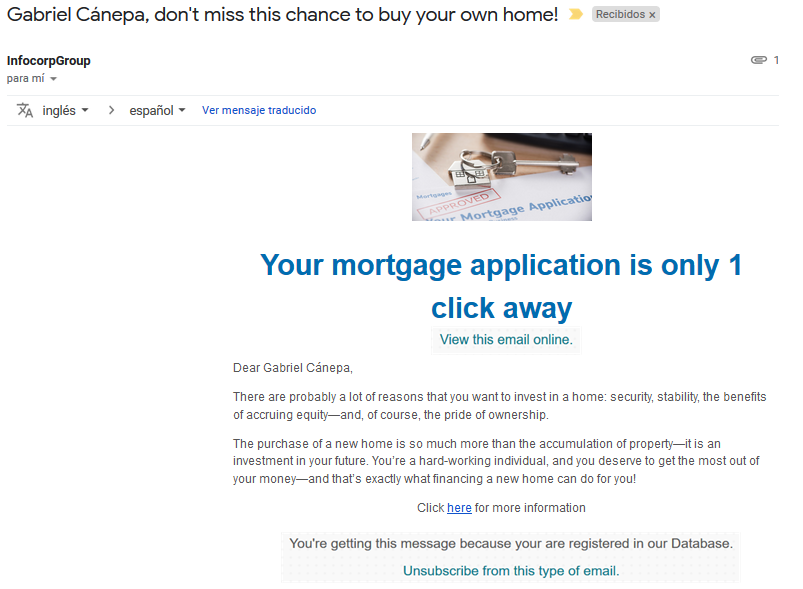
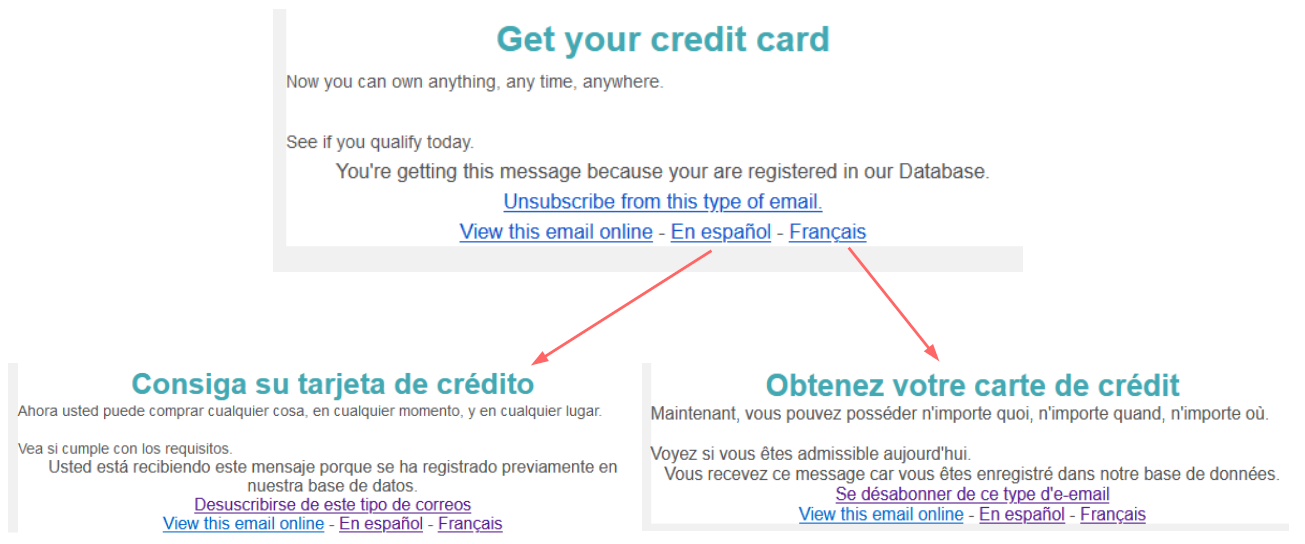
The result should be similar to the following. It is of special interest to observe the View this email online links below the title and Unsubscribe from this type of email at the bottom of the message body.
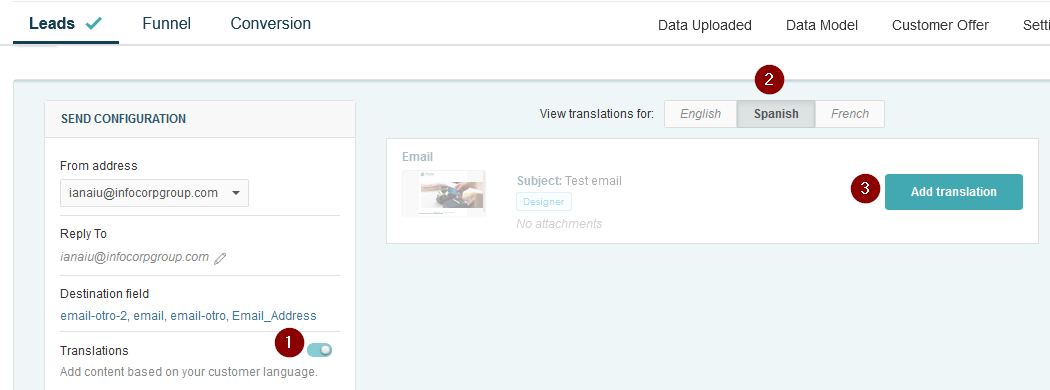
Additionally, if your target audience consists of Spanish and/or French-speaking customers, you can enable translations in the email sending configuration. This allows adding the message content in those languages, in addition to English, to be viewed in a browser. In this way, your customers will be able to view the message and interact with the campaign in their native languages.
To accomplish this goal, click on the Translations switch, then the Spanish tab, and finally the Add translation button:
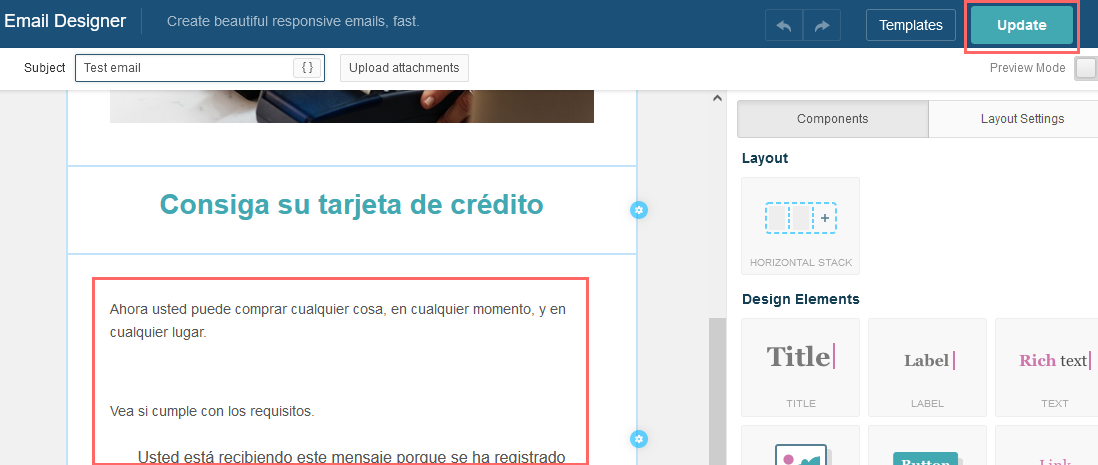
When the designer opens the current template, make the necessary modifications and click Update as before:
As the next step, ensure that the href attribute of the links to view the message in the browser points to {{email.webview}} and {{email.webview:es}} for the default (English in this example) and Spanish versions, respectively. Finally, repeat the process for French using {{email.webview:fr}} if required.
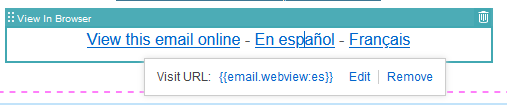
In all cases,
{{email.webview}}depends on the default language selected from Settings/Languages in your instance of Prisma Campaigns.
The following image shows the message that your customers will receive in the web browser (default language and translations):
If everything is in order according to your expectations, publish the campaign with the latest changes.
Using Your Own Templates #
This alternative enables you to utilize any of the HTML templates previously created in Settings/Email Templates and add dynamic variables and fields. Among other things, this allows pointing to the campaign funnel from the email body using the {{campaign.link}} variable. By including that link in a template that you can reuse in several campaigns, it will always redirect the customer to the funnel of the campaign in question without the need to make changes in the template for each case.
To illustrate, let us consider the use of a template named Limited Time Mortgage Offers in the following image. Under the template name, we can see that it consists of custom HTML and contains dynamic areas:

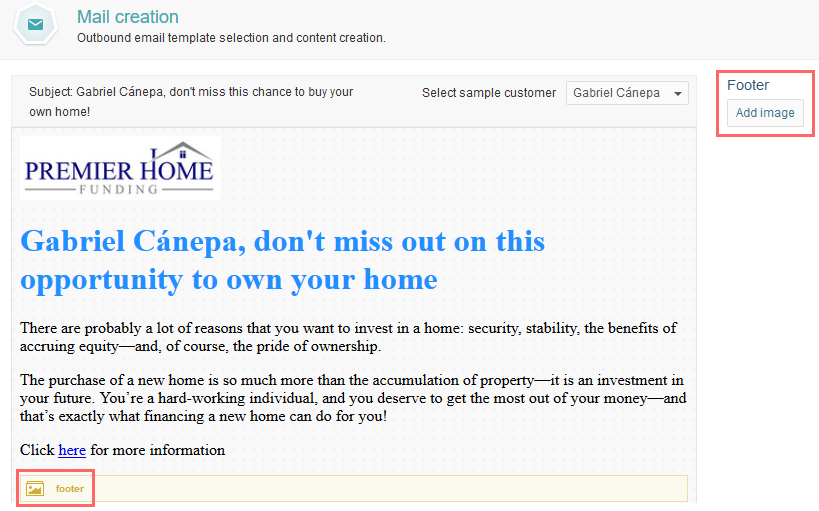
When you click Create, you will see the message preview for a given client and the menu to add content to the dynamic areas of the template. In the particular case shown below, the area defined by {{image.footer}} will host an image that you can select using the Add image button:
After adding the image and saving changes, the result in the channel configuration (inside the campaign) should be similar to the following:
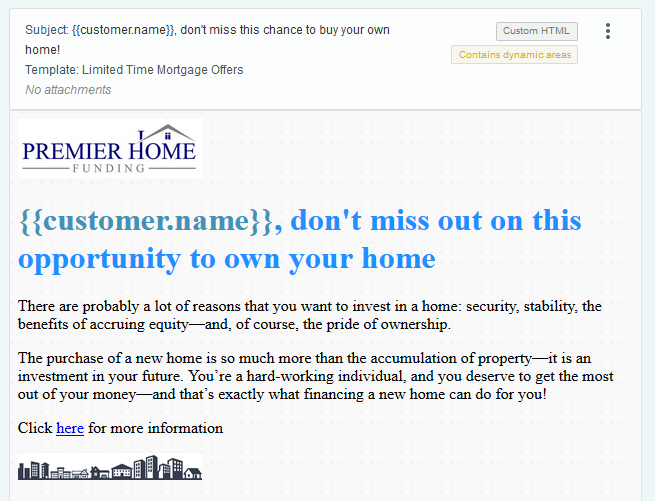
In the image above, it is important to highlight the template name and the same characteristics we observed earlier (custom HTML and the presence of dynamic areas). As we can expect, instead of the name of a given client, here we see the {{customer.name}} variable (which will take different values for each customer). On the other hand, {{image.footer}} displays its content because it is a template constant that is not customer-specific.
If you wish, you can send a test email to verify the look and feel of the message by clicking Test email as in the previous design case.
Custom HTML #
This option makes it possible to upload an HTML file without creating a template before and to add attachments if necessary. It is a better fit for cases that will not require any personalization or that you will not reuse in the future. Also, it is particularly useful when the campaign has a custom design (not shared with others) and thus does not warrant the creation of a new template.
Email Personalization #
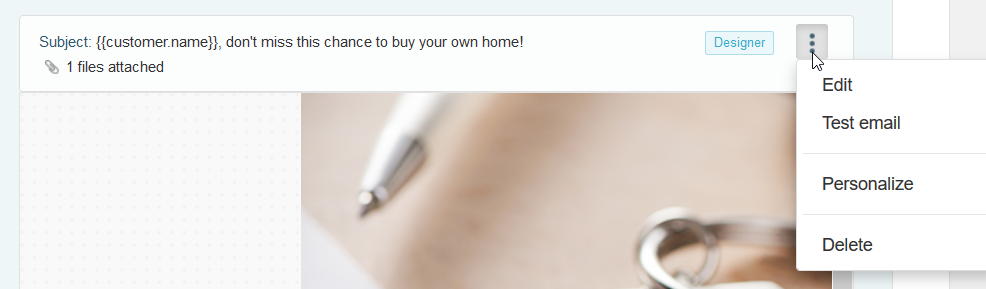
After creating the new message, you can personalize it to send a different message to those customers who meet one or more conditions. To do so, expand the menu of the newly created email and click Personalize as shown below:
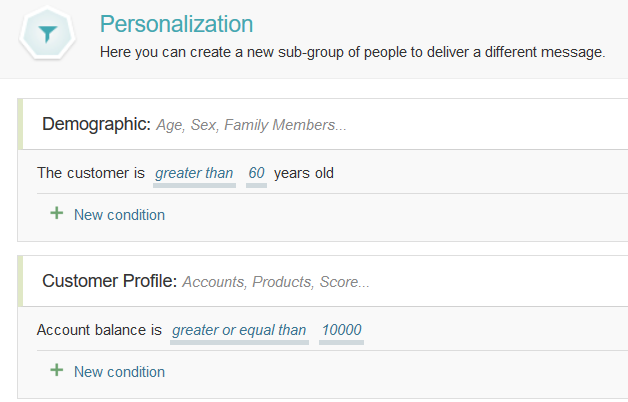
The next step consists of adding one or more conditions that describe the customers to whom the modified message will be sent. For example, the following image shows a personalization oriented to individuals greater than 60 years old whose balance is greater than 10000:
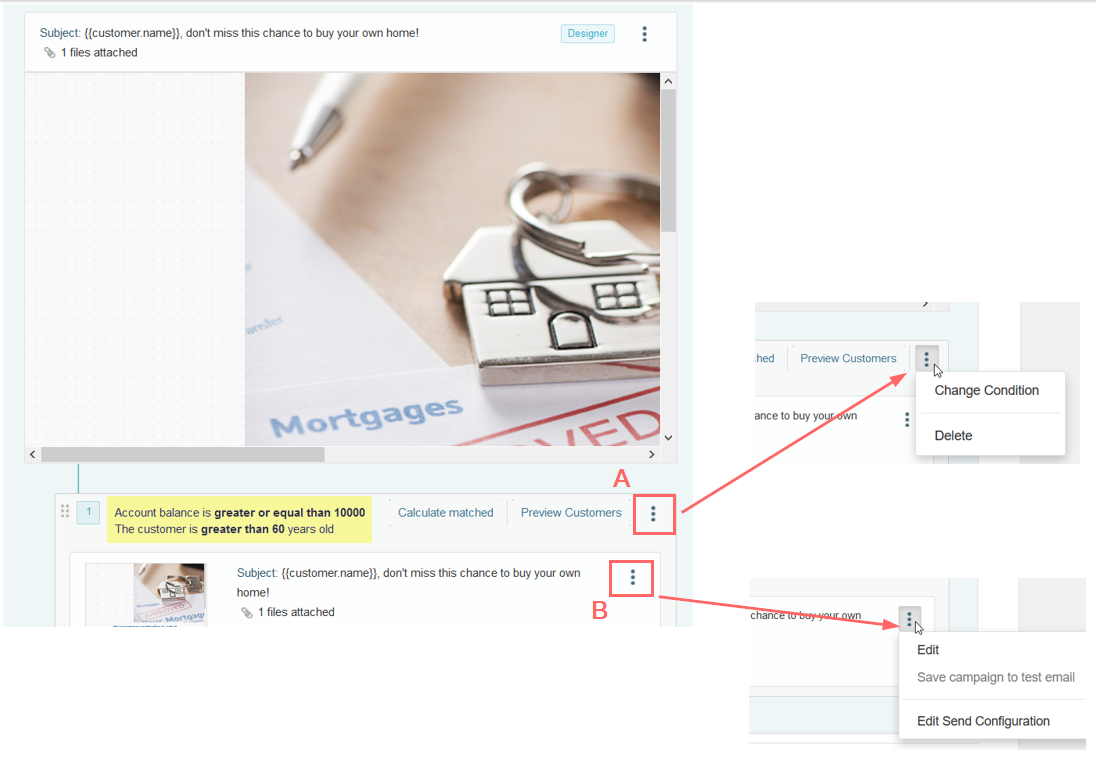
Once you confirm the changes, below the original message you will see the list of conditions in use. To view the percentage of customers who meet those conditions and their personal information, you can click Calculate matched or Preview Customers, respectively. Additionally, the menus marked as A and B provide access to further configuration options:
In A, you can edit the conditions used in the personalization and also delete it.
B provides a method to edit the format of the message itself in the same fashion as the main one (Edit) and to modify the sending configuration:
This last item deserves special attention because it allows overriding the email channel’s main configuration for the current campaign. This means that you can set different sender, destination, and reply-to addresses. Besides, you can indicate if you will send a single email for each address or individual messages to each client who used the same.
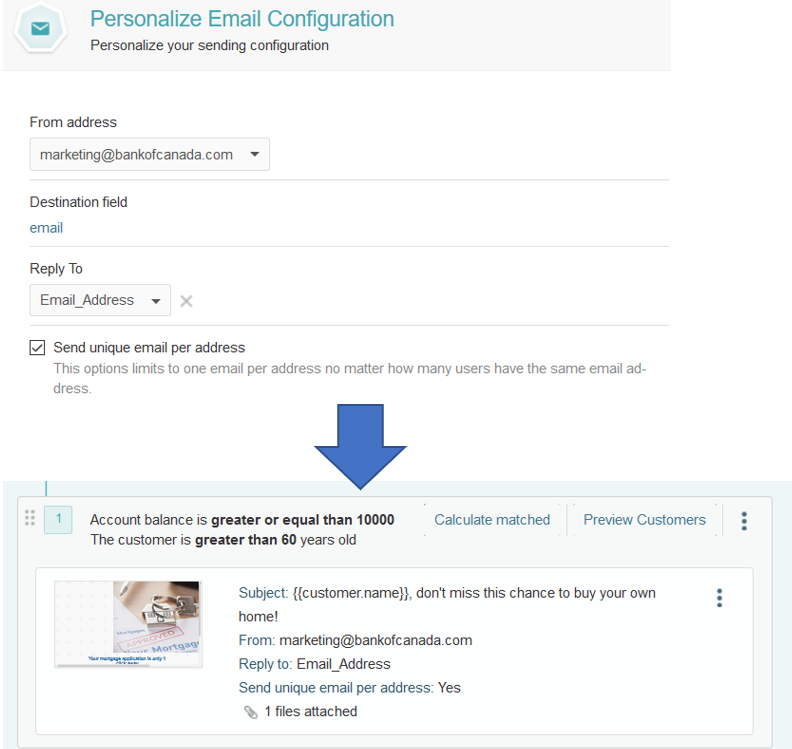
The image above shows the change made in the personalized email configuration. The tool will send messages using marketing@bankofcanada.com as the sender, while the reply-to address will come from the Email_Address field (found in the client data model) for each person.
Some restrictions apply on the length of the HTML code and the size of the files (images and attachments) used to compose an email. Visit the limits section for more information.
Referral Campaigns #
Campaign links are public URLs that point to the conversion funnel of a particular campaign or a landing page related to it. This facilitates the interaction with the campaign by sharing it and accessing it from any device with Internet access. Also, it allows the application to identify the most effective reference source through an unique identifier related to the campaign.
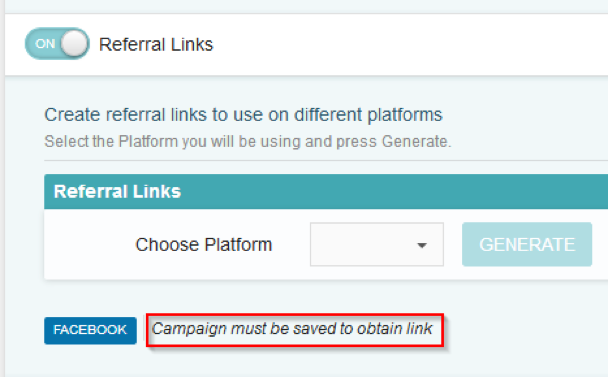
Note: To obtain a link, activate the Referral Links channel, generate the URL, save and publish the campaign.
Creating Campaign Links #
To generate a referral link, the first step consists of selecting the proper platform and then clicking GENERATE as shown below. If the campaign has not been saved yet, a reminder to do so will appear: Campaign must be saved to obtain link.
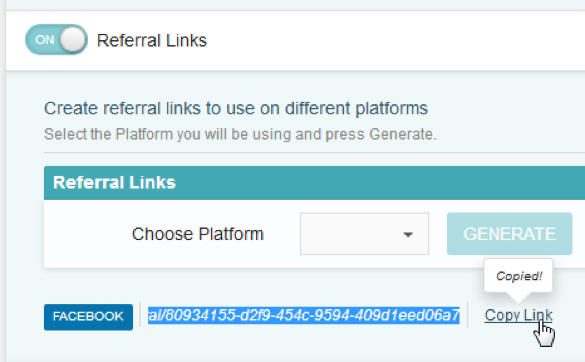
After saving the changes, the reminder will be replaced by the newly created link.
Note: In order to make this link work, you need to publish the campaign.
To copy it, click on Copy Link. It is important to clarify that this link is now associated with the corresponding platform (Facebook, in this example). Any access to this public URL and the resulting conversions will be recorded in the campaign analysis, and will impact the statistics of the channel itself.
Once the link for a given platform is available, we cannot create a separate one for the same platform. In the above example, this means that Facebook will not be available in the platform drop-down list after having generated the link earlier. However, you can still delete the previous link and create a new one if needed.
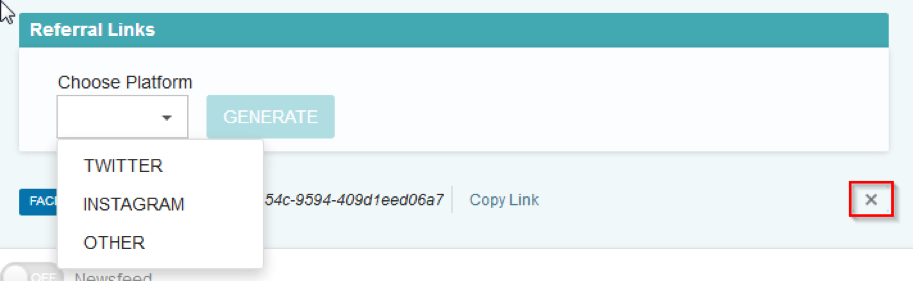
If you want to generate a link for a platform that is not preset in the drop-down list, you can choose OTHER and add it manually as you can see in the following image. In this case, we are adding a new platform called SMS:
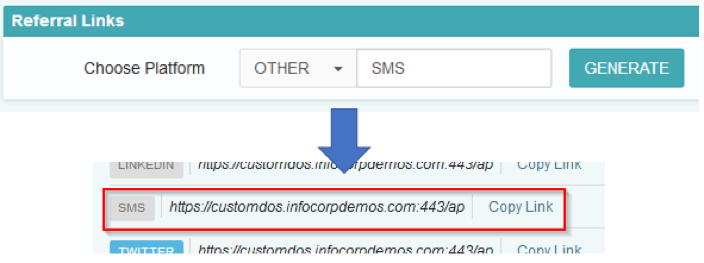
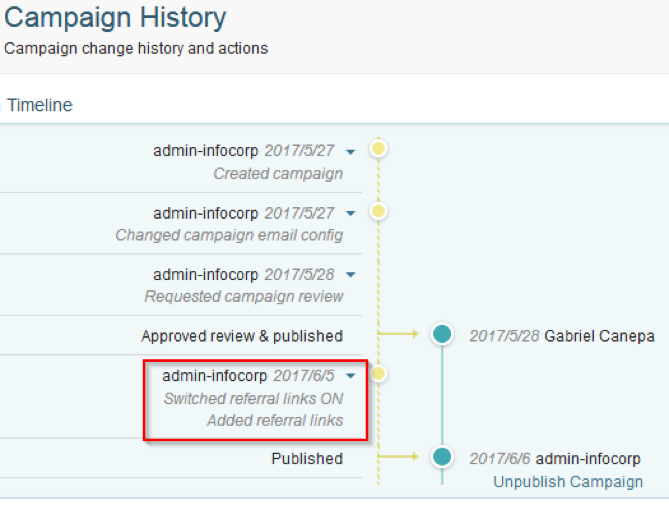
The name chosen for the platform will be shown in the campaign analysis within Referral Links Statistics, as explained in the next section. After following the above steps, the campaign history will indicate that the channel has been activated and that a campaign link was generated:
Referral Links in the Campaign Analysis #
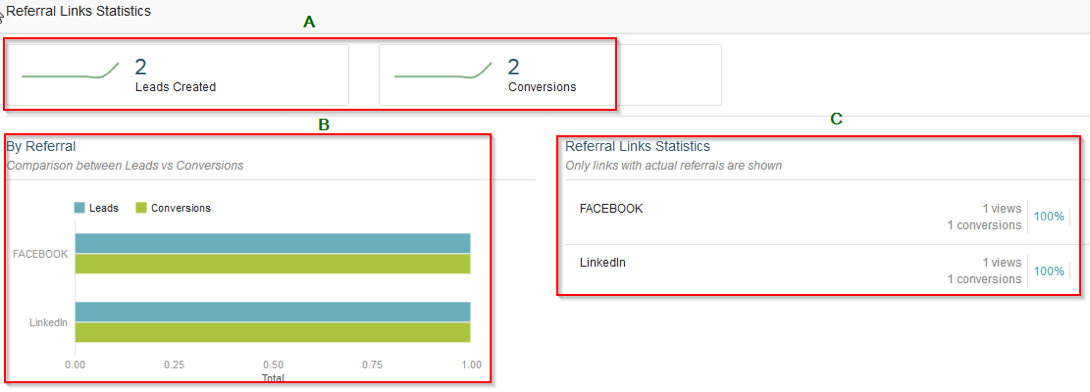
Within Referral Links Statistics there are three separate sections that are indicated as A, B, and C. In the image below we can see that interactions were made both through the Facebook and LinkedIn links created earlier.
A the number of leads and conversions resulting from those leads, along with both curves. This section summarizes the results of all links taken together, unlike the next two (B and C), which discriminate by platform.
B displays a comparison between leads and conversions using bars of different colors.
In C we see the number of conversions and funnel visualizations and the ratio between those metrics.
Unlike what happens with the rest of the channels, Referral Links Statistics only shows leads and conversions instead of reach. Instead, the reach attained by the campaign links is available in the channel where they are being used.
Business Events #
When a business event occurs, it is possible to react accordingly. This allows you to trigger a campaign funnel when a customer purchases with a credit card, requests a loan or retrieves money from an ATM, to name a few examples. As opposed to referral links, a business event requires that 1) the customer belongs to the segment used in the campaign, and 2) the funnel does not implement a user interface in its first steps because nobody will view it.
It is valid to add a user interface after the initial funnel steps are executed. For instance, an event can a) invoke a web service, which in turn b) sends the customers an email with offers tailored to their circumstances. At this point, they may confirm if they are interested or not by clicking on a link in the message. In this example, steps a and b occur in the backend and the customers are not involved until they take action.
To enable this functionality inside of a campaign, turn on the switch and choose the business event you desire from the drop-down list. Next, click ADD:
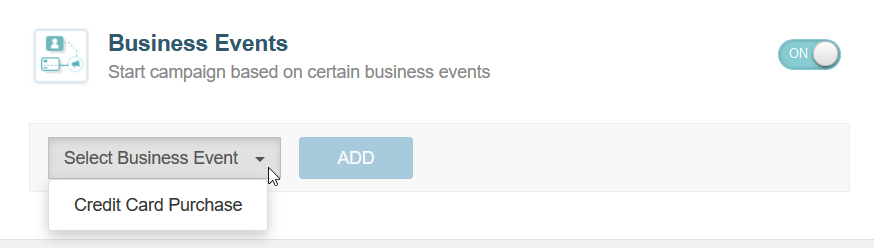
The list above includes the events that are listed inside each application in Settings/Applications as explained in the corresponding section of this manual.
To apply the modifications, click Save in the upper-right corner and publish the changes.
If you want to learn how to trigger your Campaign through a POST request, visit API Rest - Business Events
Campaign Data #
By using campaign data we can extend the client model with data that applies to a specific campaign only. Examples of this can be a promotional interest rate offer or special discounts on certain products. On the contrary, global data such as name, age, city of residence or account balance apply equally to all campaigns. In other words, the use of campaign data helps us avoid crossing data between campaigns and allows to keep the client model clean.
More details on the list of allowed fields and available data types can be found in the corresponding section in this manual.
Next, we will explain how to upload data to use in a given campaign.
Uploading Campaign Data #
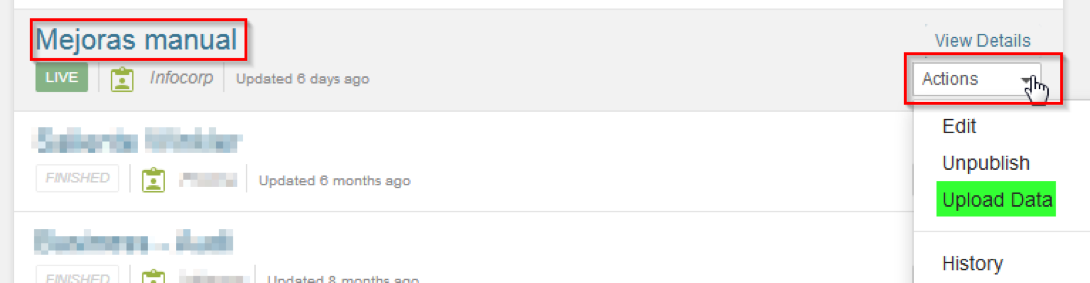
To upload data for its use in a given campaign, click on Upload Data in the Actions dropdown menu:
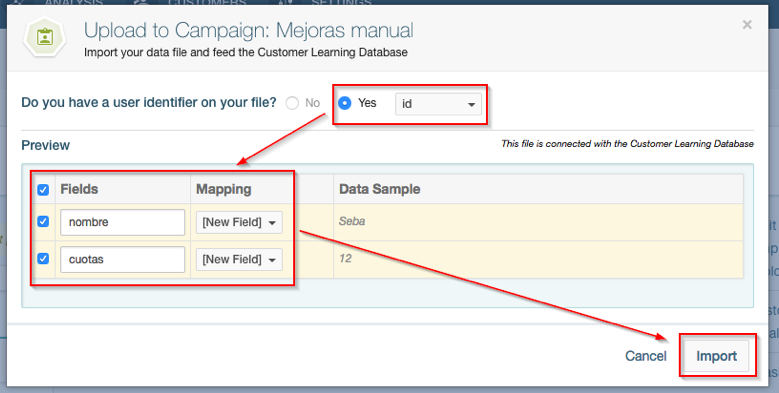
When you are prompted to do so, choose the file that contains the list of fields that we want to relate to the campaign. In the below example, the file is named mejoras.csv and contains the fields id, nombre (name), and dues (cuotas). After uploading the file, it is mandatory to indicate which field will be used as the client identifier (id in this case). The next step consists of mapping the remaining fields using either of the following methods:
- Map it as a new field by choosing the default New Field option and clicking Import:
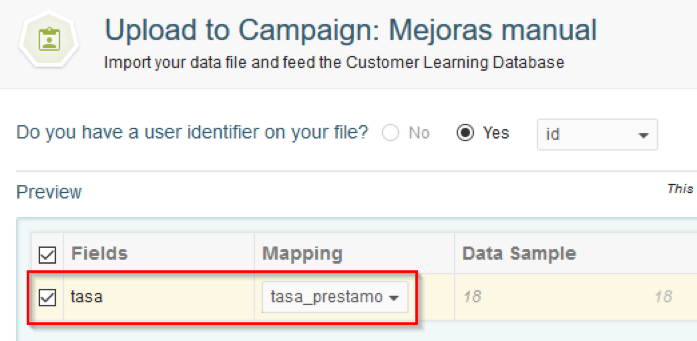
- In the event that you wish to replace a field on the campaign customer model, you can select it from the dropdown list to make the association. In the image below we can see a separate example, where id was again selected as client identifier and tasa (rate) was mapped with the existing field tasa_prestamo (loan rate). If the file includes id values that already exist in the campaign, the corresponding values in tasa_prestamo will be updated using those present under tasa.
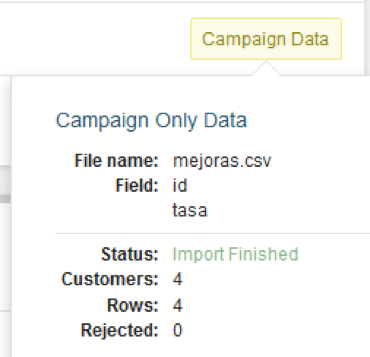
After a few seconds (depending on the number of records to be imported), you may check the status of the operation by pressing Campaign Data, which is located on the right-hand side of the campaign settings section. Using the above example to illustrate, you can see that fields id and tasa were properly imported along with the associated records:
The newly added records are available in table format inside Campaign Data, whereas Data Model shows the campaign data model. Although these two views are similar to the global client list and data model, their use is restricted to a given campaign and are only valid in its context.
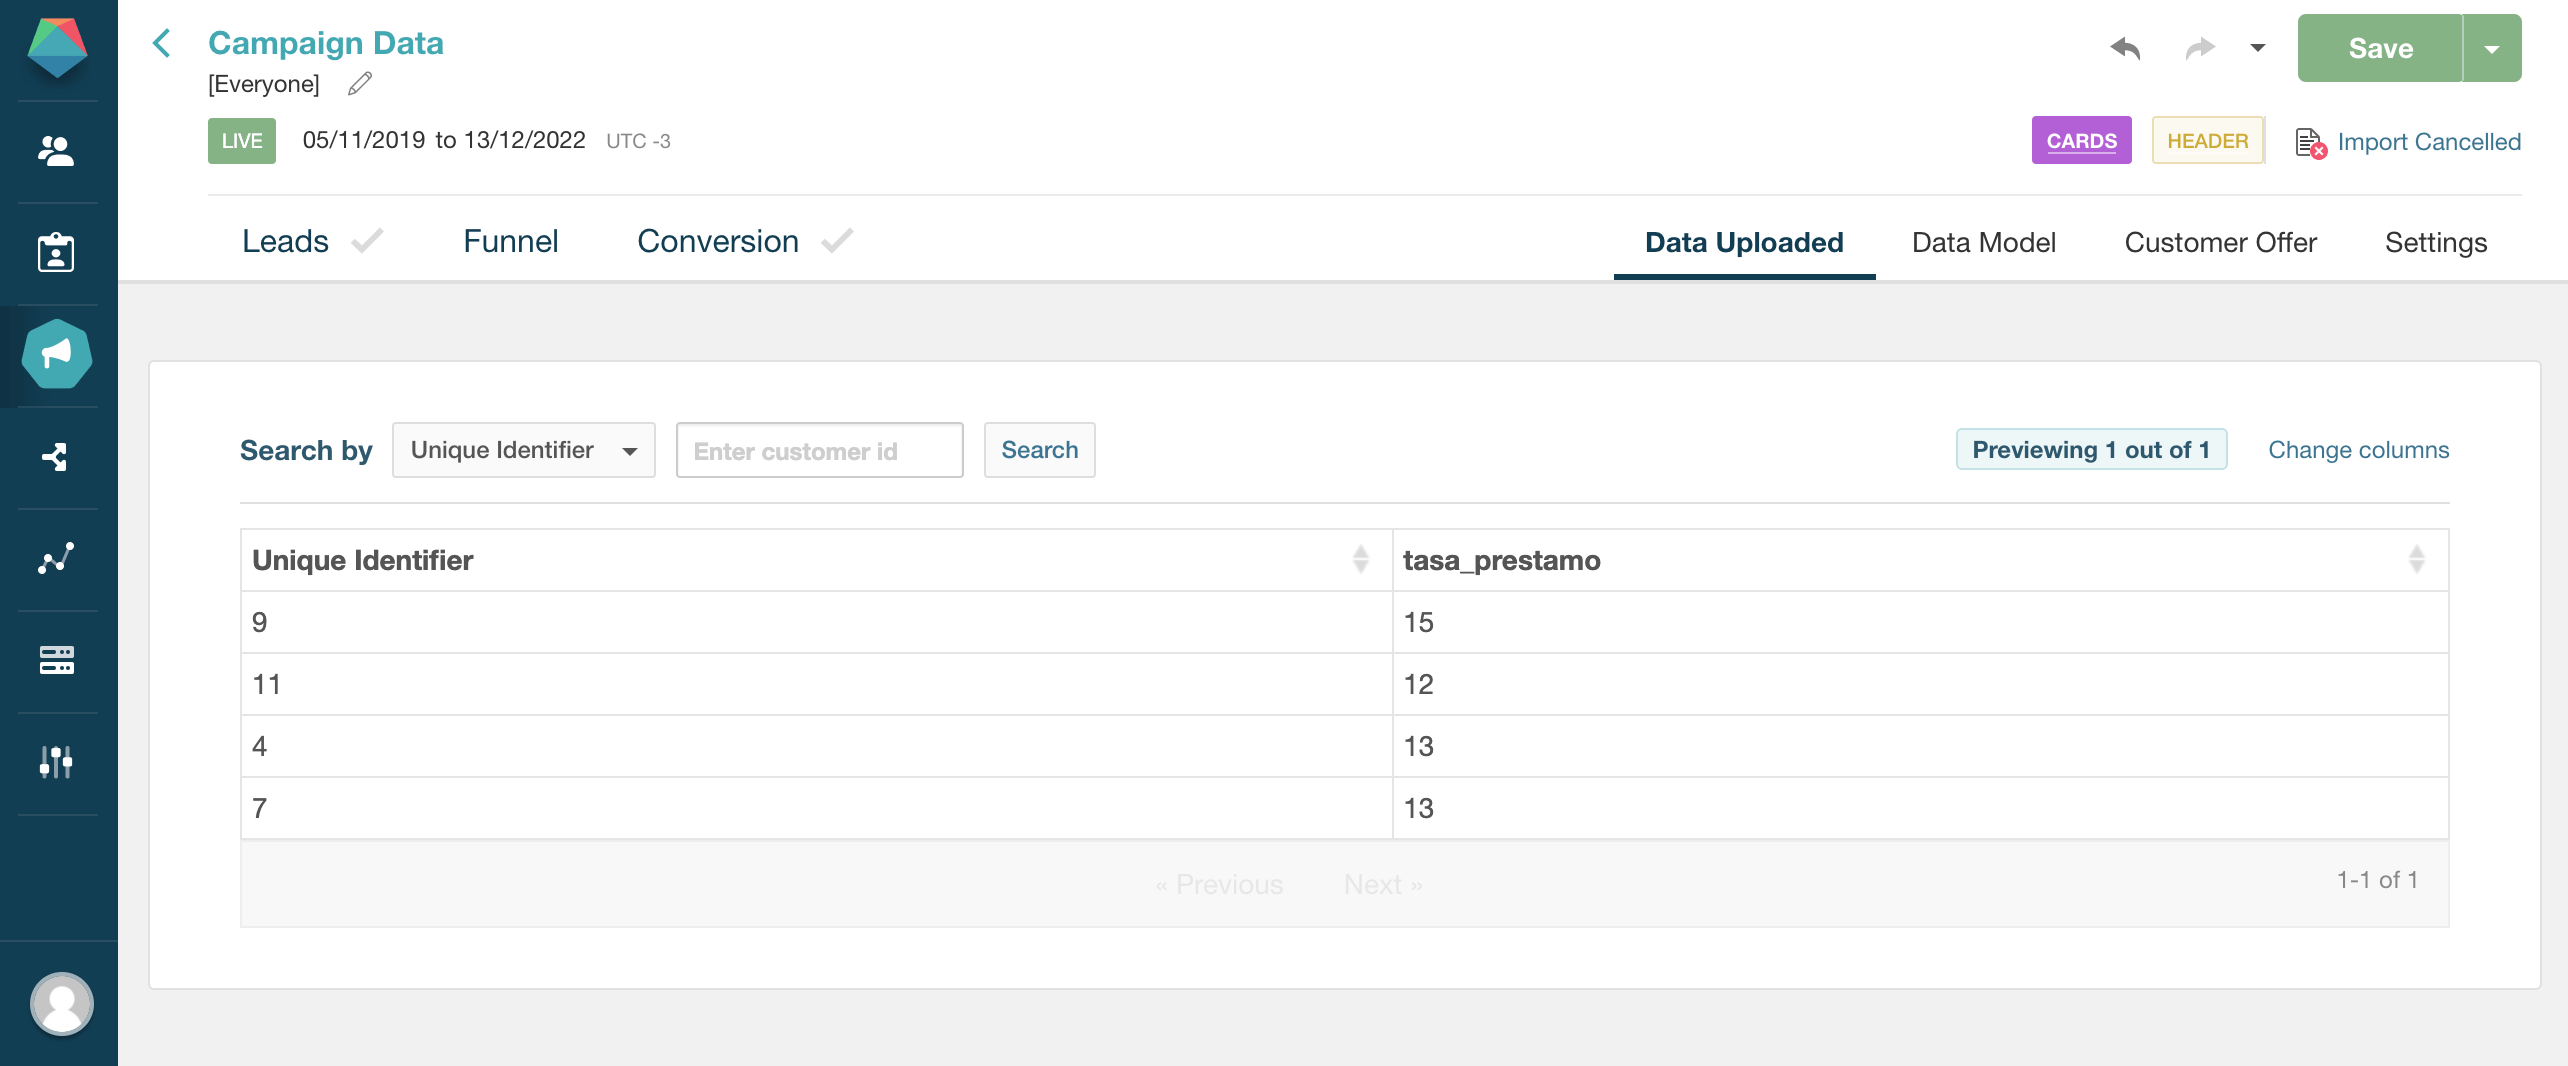

It is important to clarify that these records represent modifications that have not been published as of yet. For that reason, a reminder will be shown until the changes are published (Publish Changes) or discarded (Discard Changes).

If you want to remove previously uploaded data, click Remove Data under Actions:

Only the current campaign will have access to the fields imported during this process. Additionally, it is important to keep in mind that data captured in the funnel is linked directly to the campaign instead of the global client model. In case that the data exists in the client model, the new values take precedence over the latter - but only inside the campaign.
Advantages #
An additional advantage associated with campaign data is the possibility of using its fields in outbound communications through any of the configured channels. Thus, you can use {{customer.tasa_prestamo}} (a campaign-specific field as indicated earlier) or similar as you would do {{customer.name}} from the global client model.
The image below illustrates the body of an email communication that will be sent to all clients who qualify for a given campaign, and the resulting message received by one of those customers:
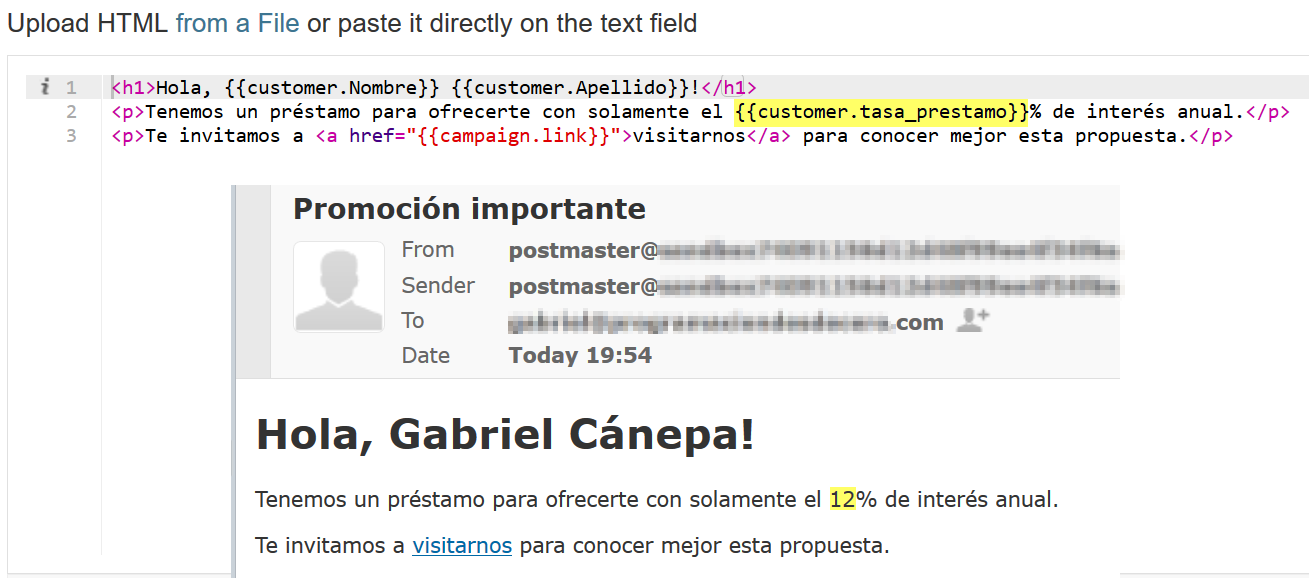
In this particular example, the value of {{customer.tasa_prestamo}} (loan rate) is 12% for that customer as you can see above.
From an structural point of view, the functionality provided by campaign data helps prevent that a given field in the client model is overridden by another with the same name in the imported file. It is important to clarify that this is also possible without the use of campaign data, but requires the creation of fields with prefixes in order to maintain data integrity. Unfortunately, the disadvantage of resorting to this option is that the client model will be affected with the creation of fields that will only make sense for a given campaign only.
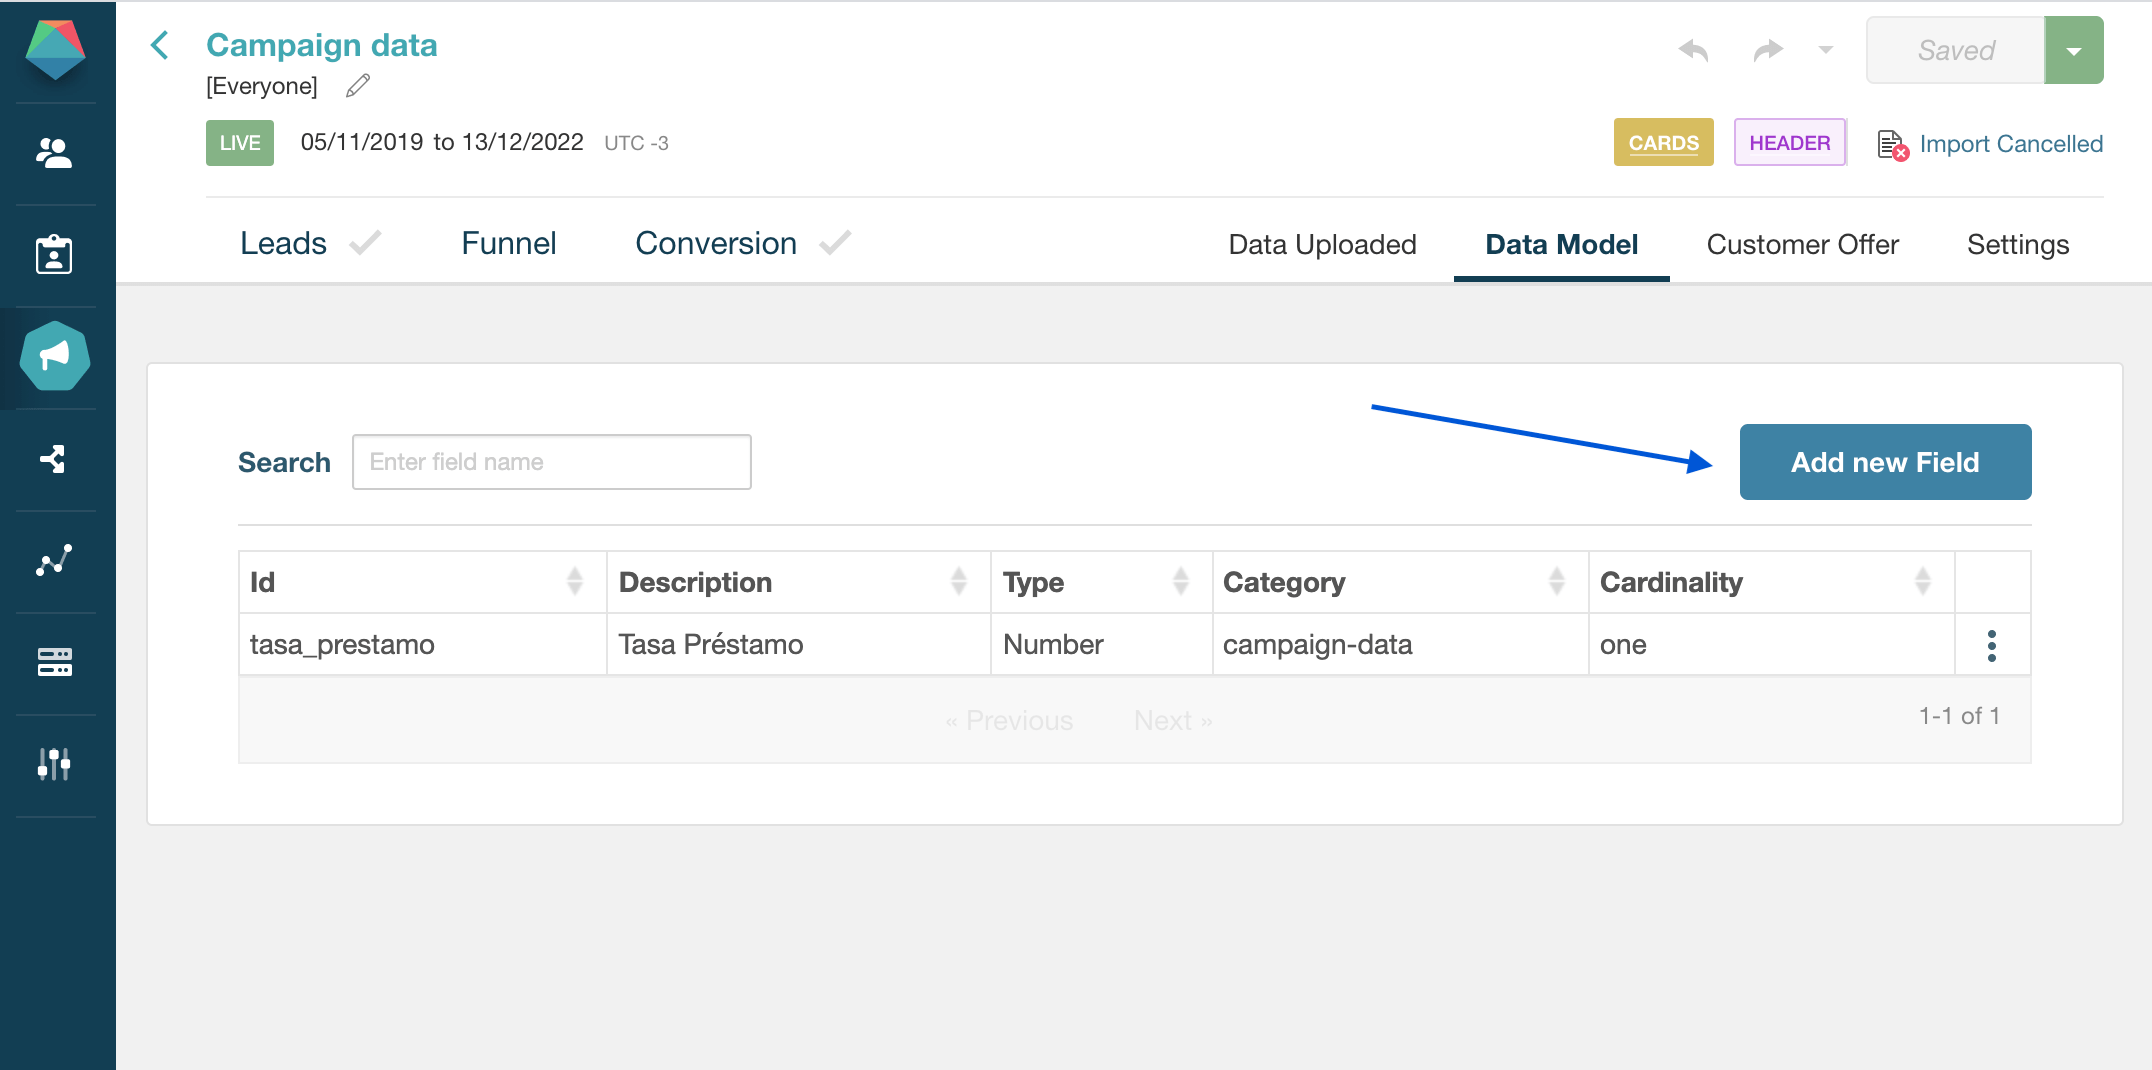
Data Model #
As mentioned above, this section includes the data that is specific to a campaign. In other words, it is the data that only makes sense and is valid within a particular campaign. To add a new field to the data model there are two alternatives:
- Create it manually by clicking on the Add new Field button and filling out the corresponding form. The image below illustrates this alternative with a new field identified as file. The description uploaded file is an indication that it will be used to store -in the Campaign Data category- a file uploaded by the client. For this reason File was chosen as the field type and One in the cardinality (only one file will be allowed instead of many).
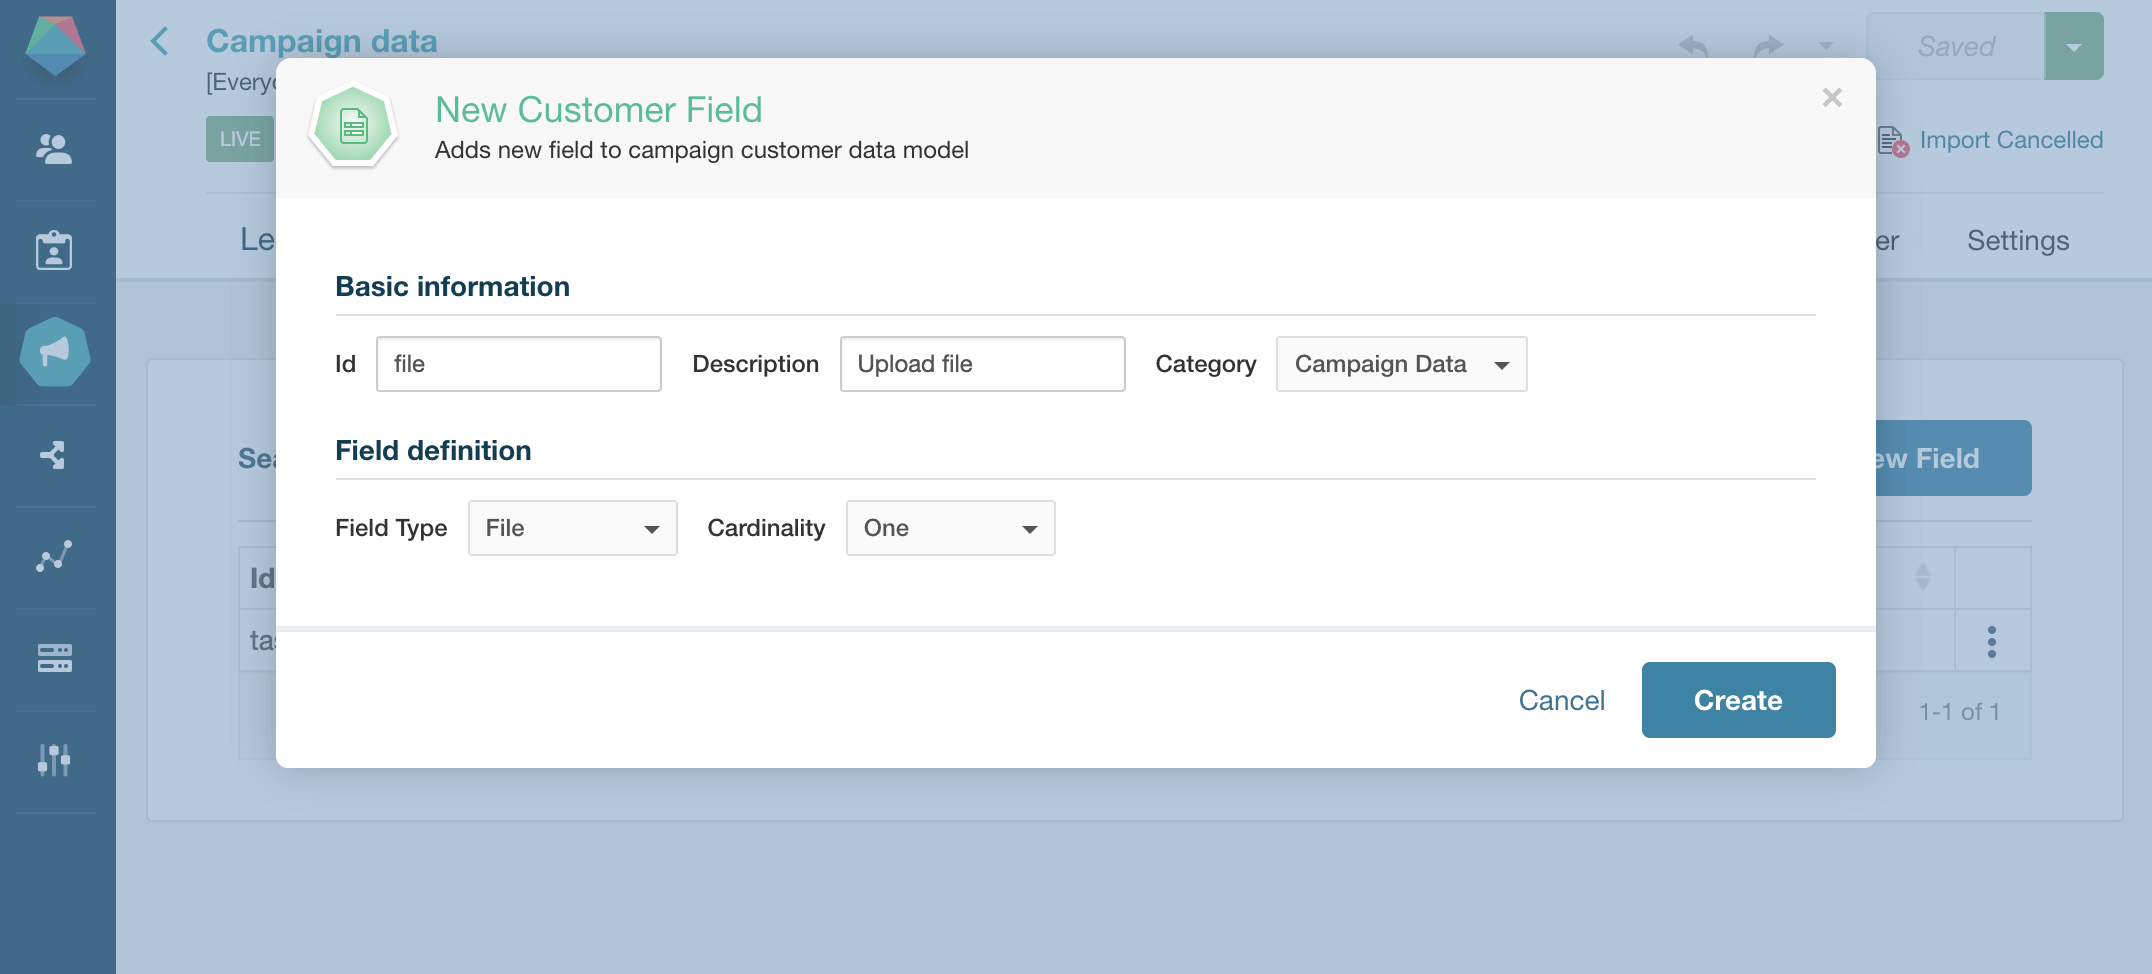
In addition to File, you can choose the field type from a list that includes primitive data (numbers, text, currency, password, dates, Boolean, etc.) and others related to customer information. In the latter group, we can mention the postal address, date of birth, gender, contact telephone number, and socio-economic level, to name a few examples.
- Generate it from the funnel as explained in Data Capture in this manual.
Fields created using any of these methods can be edited and deleted:
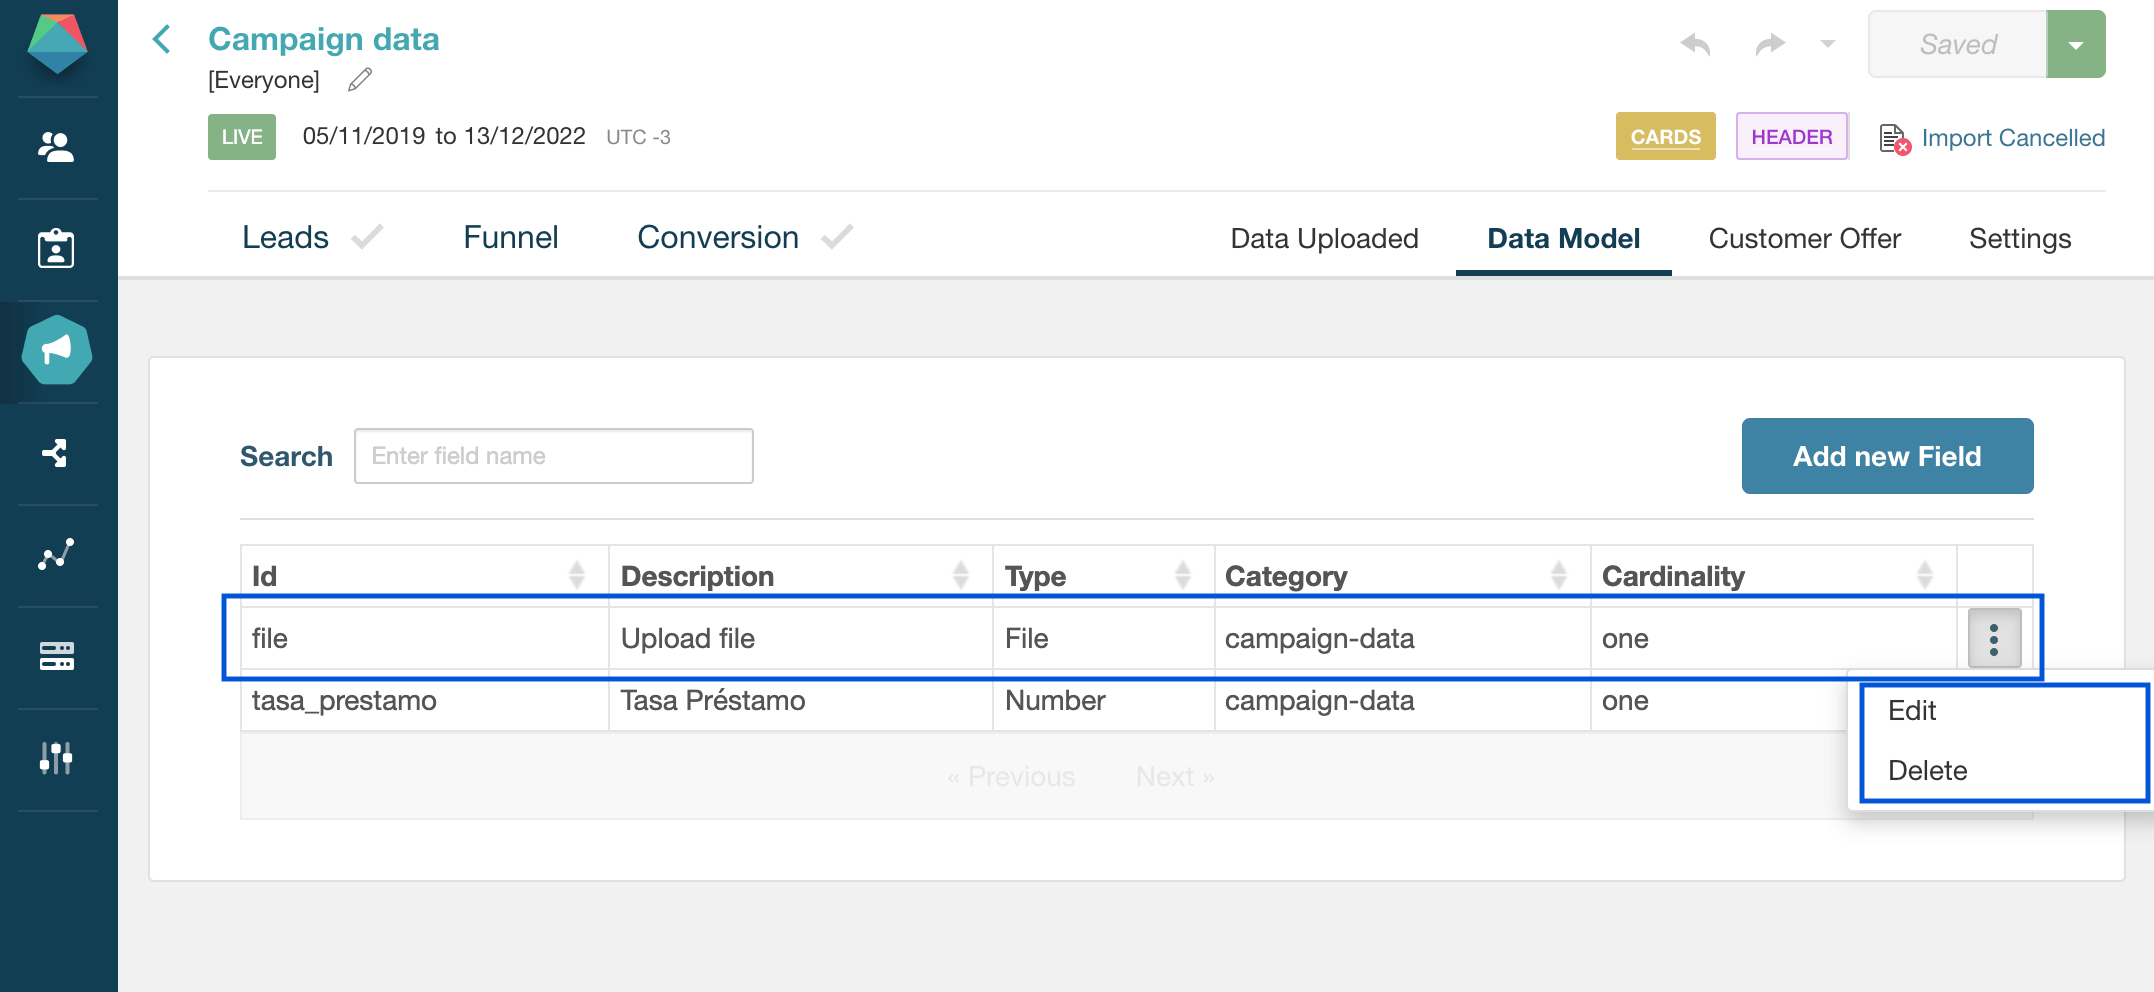
To perform one of these operations, you must click on the menu that appears in the data model table for the field in question as shown above.
Exporting Campaign Data #
Data collected from a campaign can be exported for further processing. To choose the desired fields, you need to configure the format of the resulting file through the Conversion section in the campaign settings. Next, it is also necessary to enable the Export CSV switch. In addition, you can add data as needed from several categories where Campaign Data is perhaps the most important one. As its name indicates, this category includes all fields that are specific to a given campaign.
The following image shows some of the selected fields that will be part of the export file. As you can see under Category, some of them are related to the customer profile (customer-profile), others are associated with the campaign results (results), and one called cuotas (dues) that corresponds to campaign data (campaign-data).

For more information on the available fields, see References / Export Fields.
To generate the export file, click on the Generate button within Campaign Analysis. At this point, the button text will change to Download and the file will be accessible for download during the next 24 hours. After that period, the link will be disabled. The image below illustrates this process and shows the resulting file:
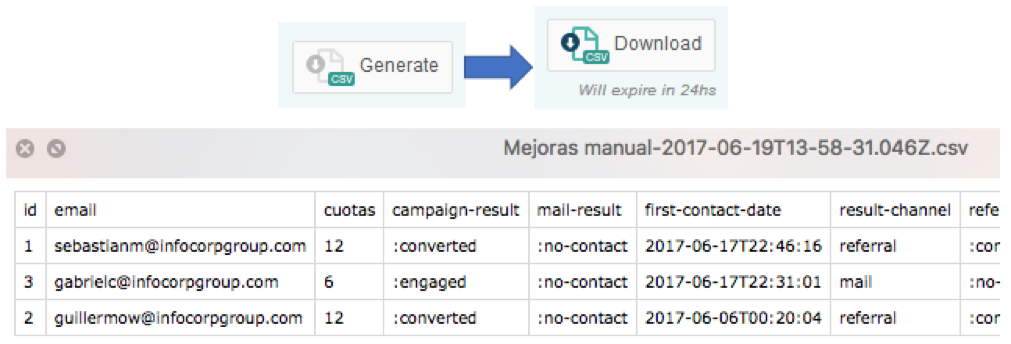
As you can see above, the columns match the fields that were previously chosen during the export.
Campaign Duplication #
Prisma Campaigns allows duplicating existing campaigns and campaign flows within the same environment. This feature is useful for creating variations of successful campaigns or using proven campaign structures as templates for new initiatives.
It is important to note that the duplicated campaign will be unpublished by default and not have any associated segments. You can publish it later when you are done with the modifications.
To duplicate a campaign, navigate to the main list and click Duplicate in the actions menu of the campaign you want to copy:

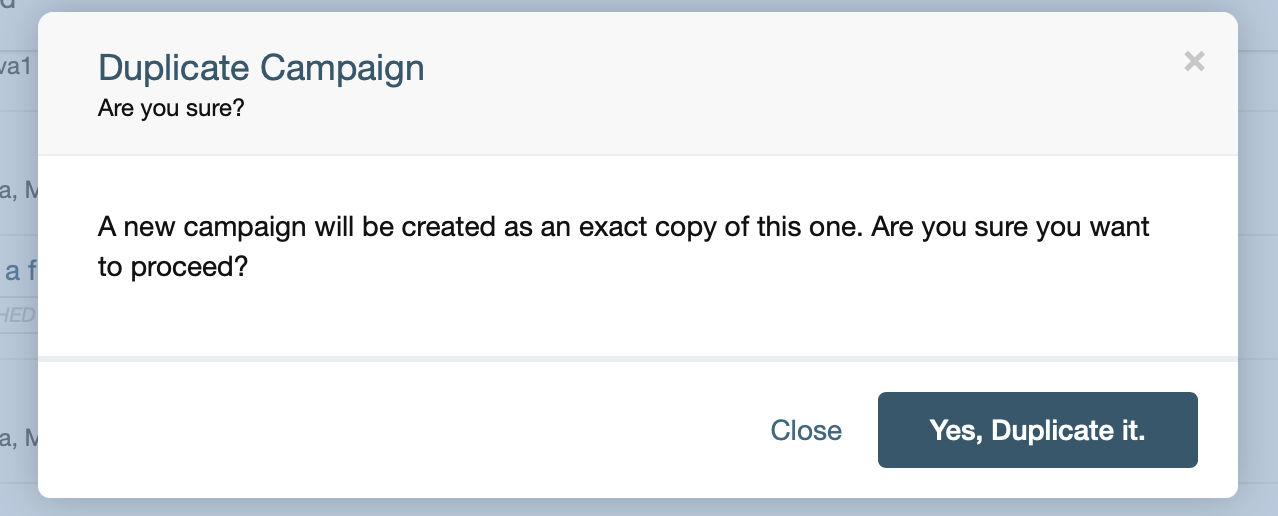
When prompted, click Yes, duplicate it to proceed:
The system will create a new campaign with all the components of the original, including:
- Campaign configuration and settings
- Funnel steps and logic
- Channel configurations (email, SMS, banners, etc.) in case of simple campaigns.
- Campaign-specific data models
The duplicated campaign will be created with a default name that includes - copy appended to the original campaign name:
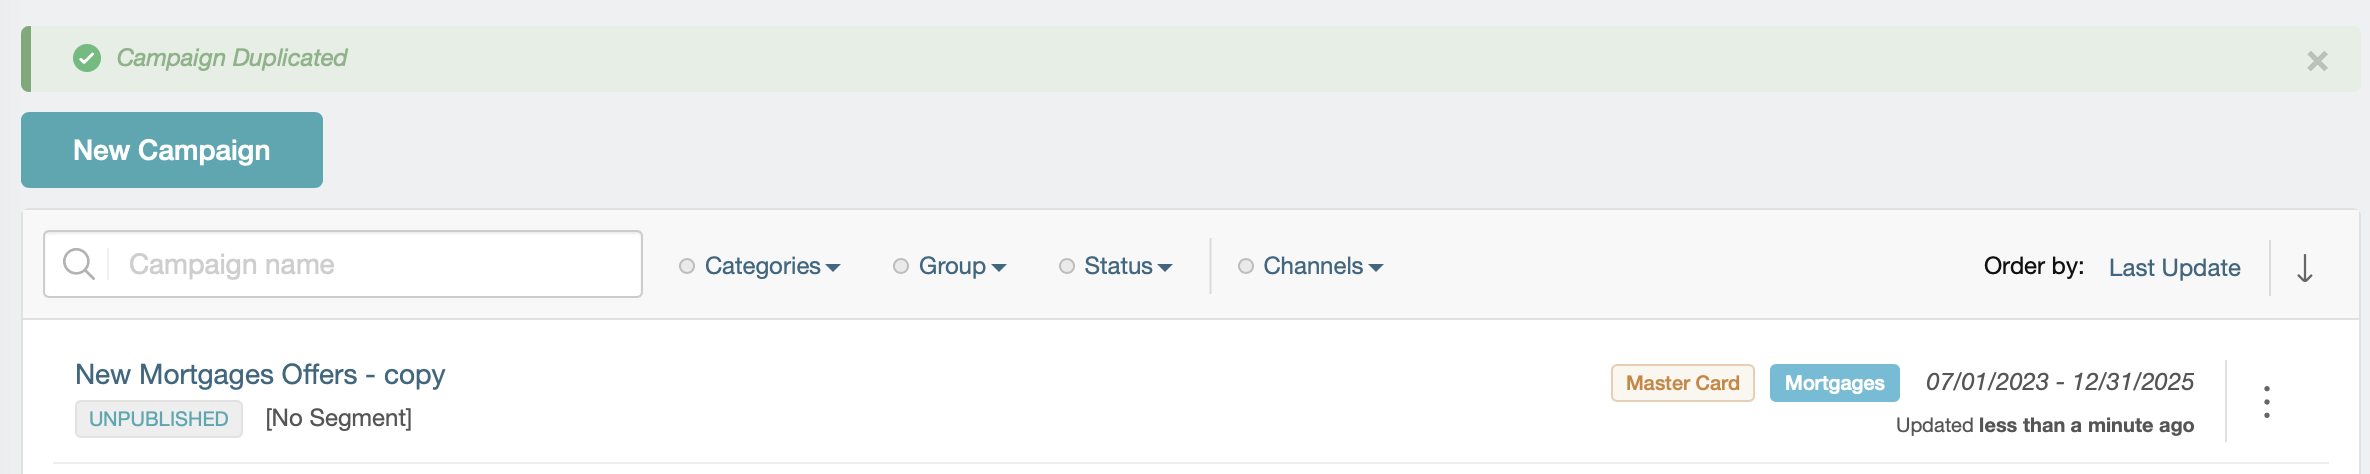
You can then modify the campaign name, settings, and content as needed for your new campaign.
Campaign Downloads and Imports #
Prisma Campaigns allows downloading entire campaigns as compressed files for backup purposes or to transfer them between different environments.
Downloading a Campaign #
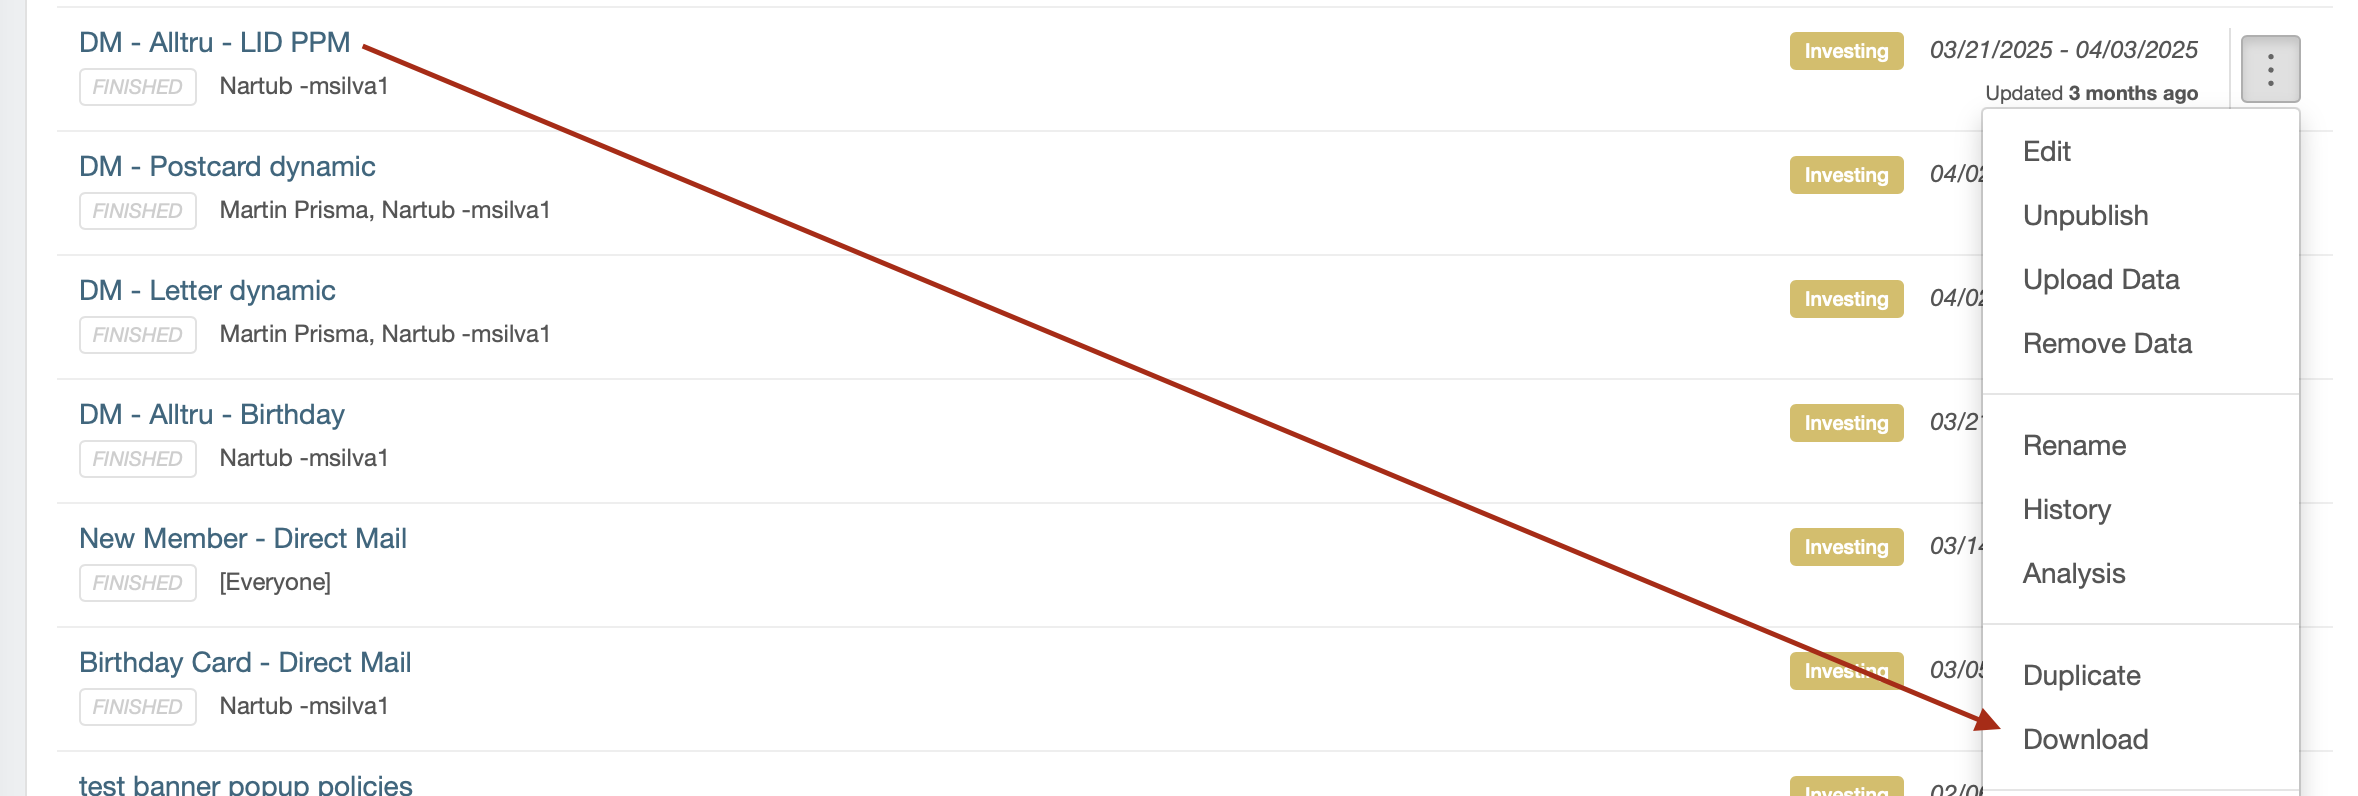
To download a campaign, navigate to the main list and click Download in the actions menu of the campaign in question:
The system will generate a compressed file containing all campaign components including:
- Campaign configuration and settings
- Funnel or flow steps and logic
- Channel configurations (email, SMS, banners, etc.)
- Campaign-specific data models
The downloaded file can then be imported into the same environment as a new campaign or transferred to a different Prisma Campaigns instance.
Importing a Campaign #
To import a campaign, it is necessary to click on New Campaign, then Import Campaigns & Flows, drop the downloaded file into the upload area, and finally hit the Import Campaign button:
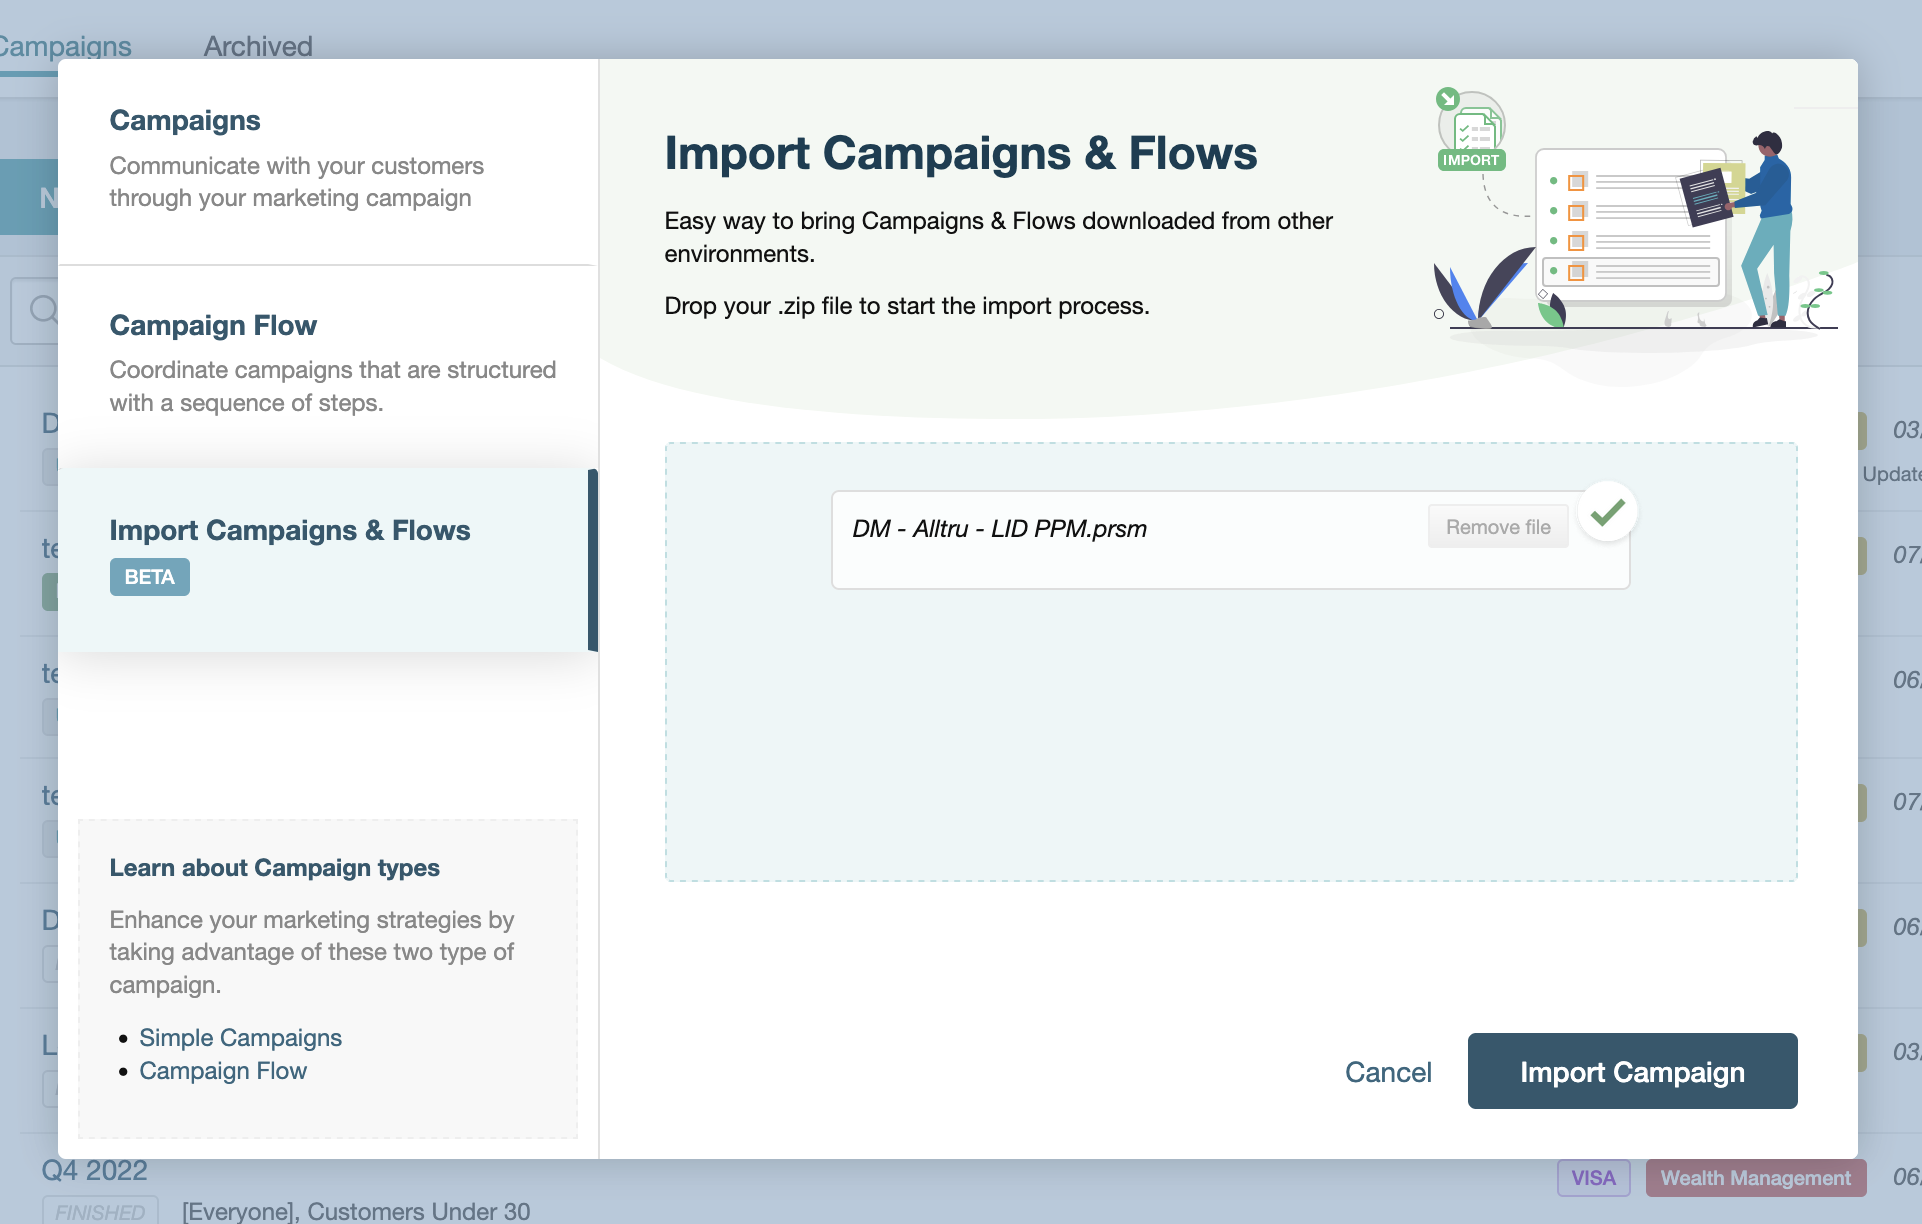
It is important to note that if the campaign uses email templates, customer fields, catalogs, placeholder definitions or other resources that don’t exist in the target environment, the import will fail. However, the system will provide options to select alternative resources or create missing dependencies.
Campaign Review #
Before publishing a campaign after creating it or making changes, it is possible (although not strictly necessary) to add a revision process, which consists of submitting the changes to an approver. Although this operation adds an additional step to the publication workflow, it also allows for a more fine-grained separation in the distribution of tasks. Thus, the approver can ensure that the features of the newly created campaign or the modifications subsequently added meet the needs and requirements of the business. At the same time, this process reduces the chances of making mistakes by providing the possibility to test and approve communication contents before publishing the campaign.
Among the modifications that are subject to review in a campaign, we can mention the following:
The campaign art design (HTML code and CSS styling, along with images or optional attachments).
Customizations (subgroups of customers that will receive different messages).
Customer or system environment variables (such as
{{customer.name}}or{{system.date}}, respectively).
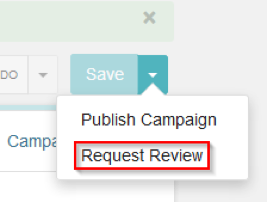
To request a review, click on Request Review in the drop-down menu next to the Save button:
Next, we need to choose the changes that we want to send for review. This can be done by checking the corresponding boxes in the tab named after each channel. At this point we will have to indicate if we want to perform a test or request a review directly. It is important to clarify that if several modifications are made and then the revision request is sent, it will include all the changes.
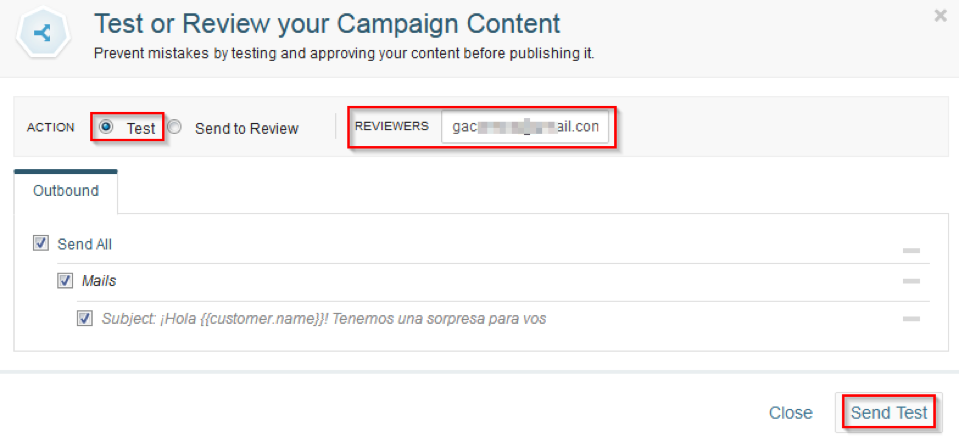
Sending a Test Message #
If you want to send a test message, choose Test, add the recipients’ email addresses and click Send Test. Since this process does not affect the campaign, you can send as many tests as needed.
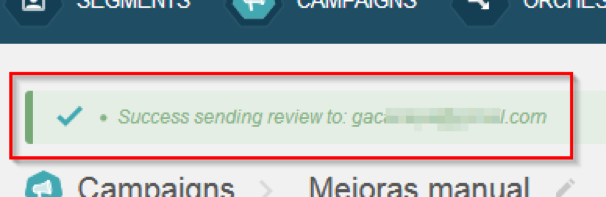
If the test submission succeeds, a confirmation message will appear when the previous window is closed:
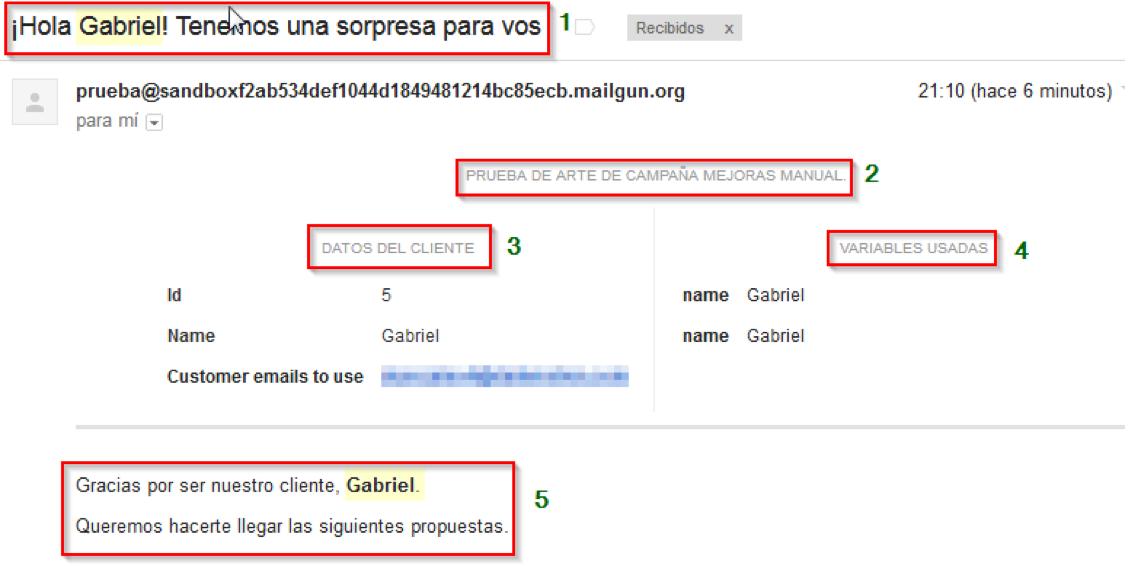
Moments later, the distribution list should receive a message that lists all the changes as shown in the image below. In the message, the following data is detailed:
Campaign name (2)
Client test data (3)
Customer variables (4) used in the communication (name). In particular, in this example name appears twice, since it is used both in the subject line (1) and email body (5).
It is worth noting that the testing process described above may be helpful to visualize what the approver would see when they receive the same message.
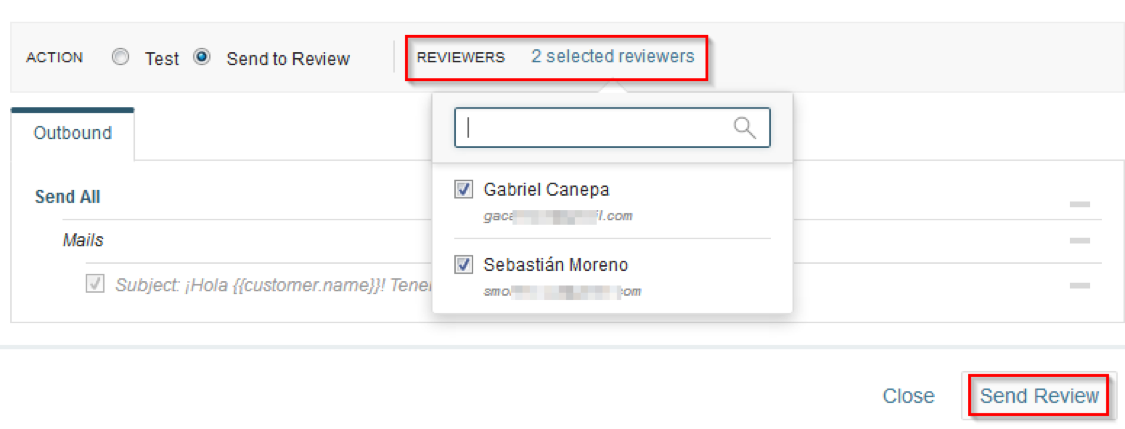
Sending a Review Request #
On the other hand, if you want to have an approver review the changes, you need to select Send to Review and then choose the persons to whom the request will be sent. If the list of potential approvers is extensive, you can enter the first characters of a name. This will cause the list to decrease in size and make it easier to locate the correct person. Last, click Send Review to finish and send the message:
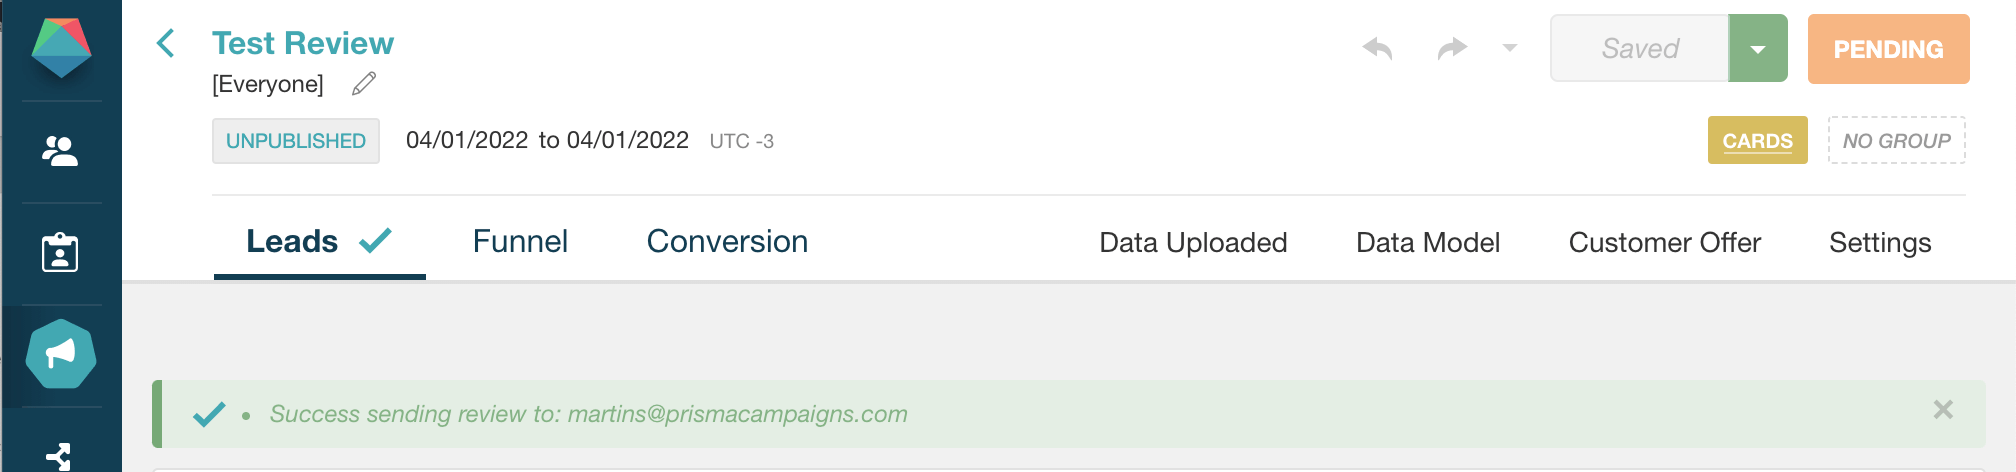
At this point, you should see a notice stating that the message was sent successfully, and a PENDING APPROVAL sign next to the campaign name indicating that there are pending changes to approve.
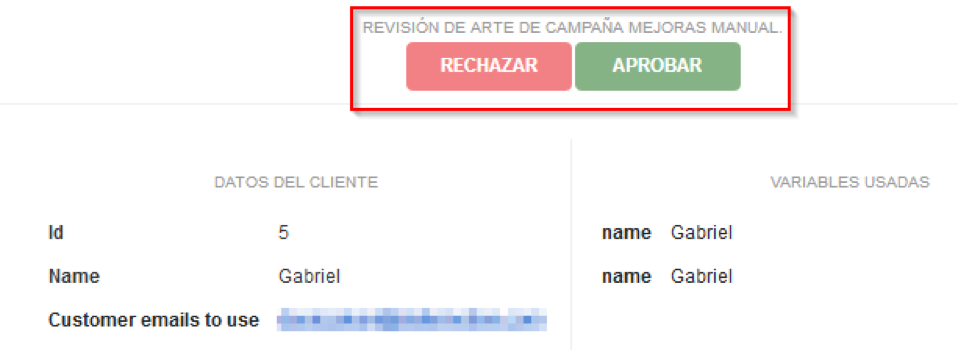
The message that the approver will receive is identical to the test that we performed previously. The only difference is the presence of the RECHAZAR (reject) and APROBAR (approve) buttons that will allow him/her to perform one of those actions:
If the approver chooses to accept the modifications, in the next step a new window will open in the web browser to ask for confirmation to carry out the action. The reviewer can cancel the operation at this stage by closing the window.
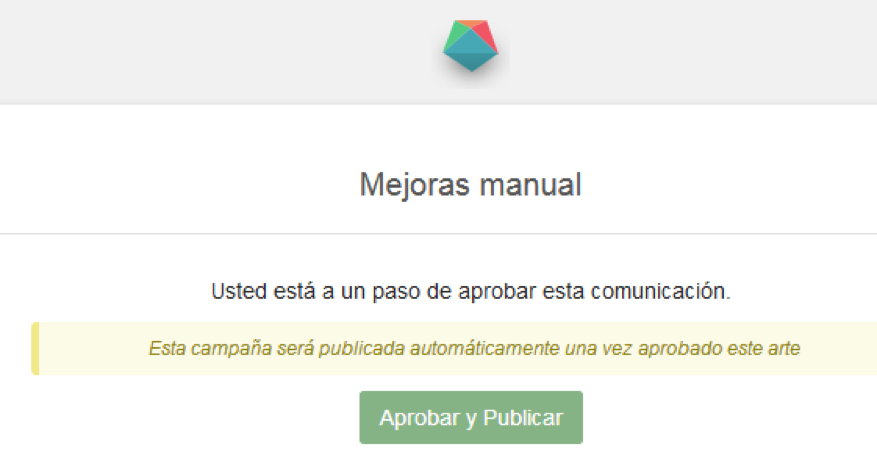
In the event that the current review is the only one pending on a given element or customization, it is possible to approve and publish the changes in the same step. The same applies in the case of a newly created campaign. Otherwise, the reviewer will be able to approve the request but will have to publish it as usual using the corresponding menu. Generally speaking, we can say that the publish option is only displayed in the last item pending approval.
Once the changes have been approved, you should be presented with the following confirmation message:
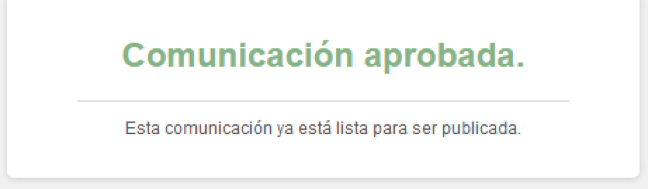
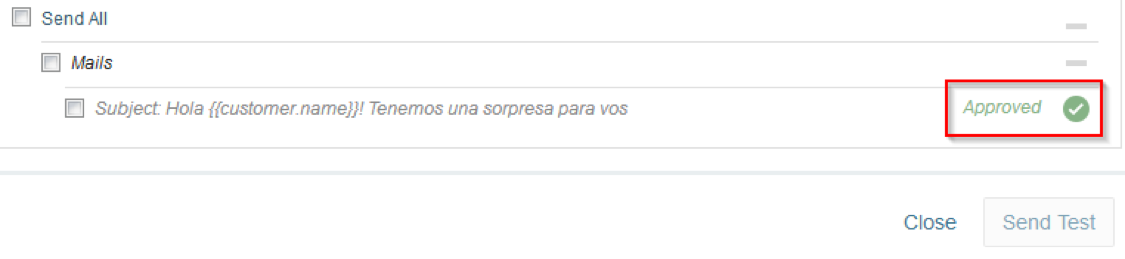
Additionally, the request will show as Approved in Prisma Campaigns:
Once a review is approved, the reject and approve buttons in the email message are no longer functional. If you click on any of them, you will be reminded that the communication was already addressed and that the decision cannot be changed:

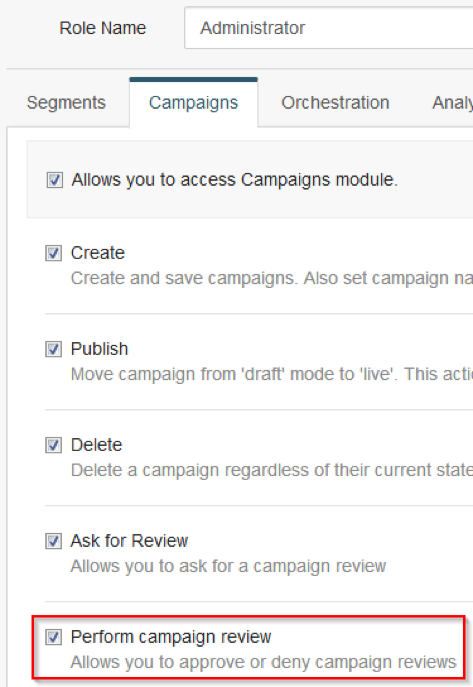
The list of user profiles that have the required permissions to carry out campaign reviews can be verified from SETTINGS –> Roles and Permissions. If Perform campaign review (within the Campaigns tab) is checked in a profile, any user with that profile will be allowed to perform that action.
It is important to remember that the list of users and the profiles currently assigned to them can also be viewed from SETTINGS –> Users.
Important Points to Consider #
While sending test messages, it is possible to select which items to include in the simulation. On the other hand, when submitting the actual request for review, all pending changes are automatically included.
If we send a new request after modifying any element or customization that is still pending approval, we can approve both changes simultaneously since the last modification. Likewise, rejecting the latest request will put the publication of all previous items on hold.
To illustrate, let us consider the following examples associated with two modifications made in order (called M1 and M2 for simplicity, respectively). Both requests include changes pending approval on the same item in Outbound/Mail. After completing M1 and M2, the corresponding review requests are sent.
Example 1 #
- M1 is approved. At this point it is still not possible to publish the campaign since M2 has not been approved.
- M2 is rejected. The publication process halts as the last modification was rejected, and it will be necessary to review the changes again.
Example 2 #
- M1 is approved.
- M2 is approved. The campaign is ready to be published using the corresponding menu in Prisma Campaigns or the browser.
Example 3 #
- M2 is approved. Since it is the last modification made, the campaign can be published as in the previous example.
Example 4 #
- M1 is approved and, before M2 is approved, the user sends another customization on the same element related to the latter. In this case M2 is pending approval and has to be reviewed again.
At the moment, campaign reviews are only available for the Outbound/Mail channels and image or HTML banners. However, it is worth noting that campaign reviews will be available for the rest of the channels in the future.
To approve modifications performed on the latter, the preview is done directly on a web browser tab instead of the email body. In that event, the message is used to send the link through which the changes can be accessed. On the other hand, for image banners the process is similar to that of Outbound / Mail (changes can be seen in the email body).
Media Library #
The Media Library is a repository for your documents and images within the platform. It provides a centralized location to manage all your media assets, making it easy to reuse them across different channels or externally.
To access the Media Library, go to Campaigns and then click on the Media Library tab located in the top navigation bar.
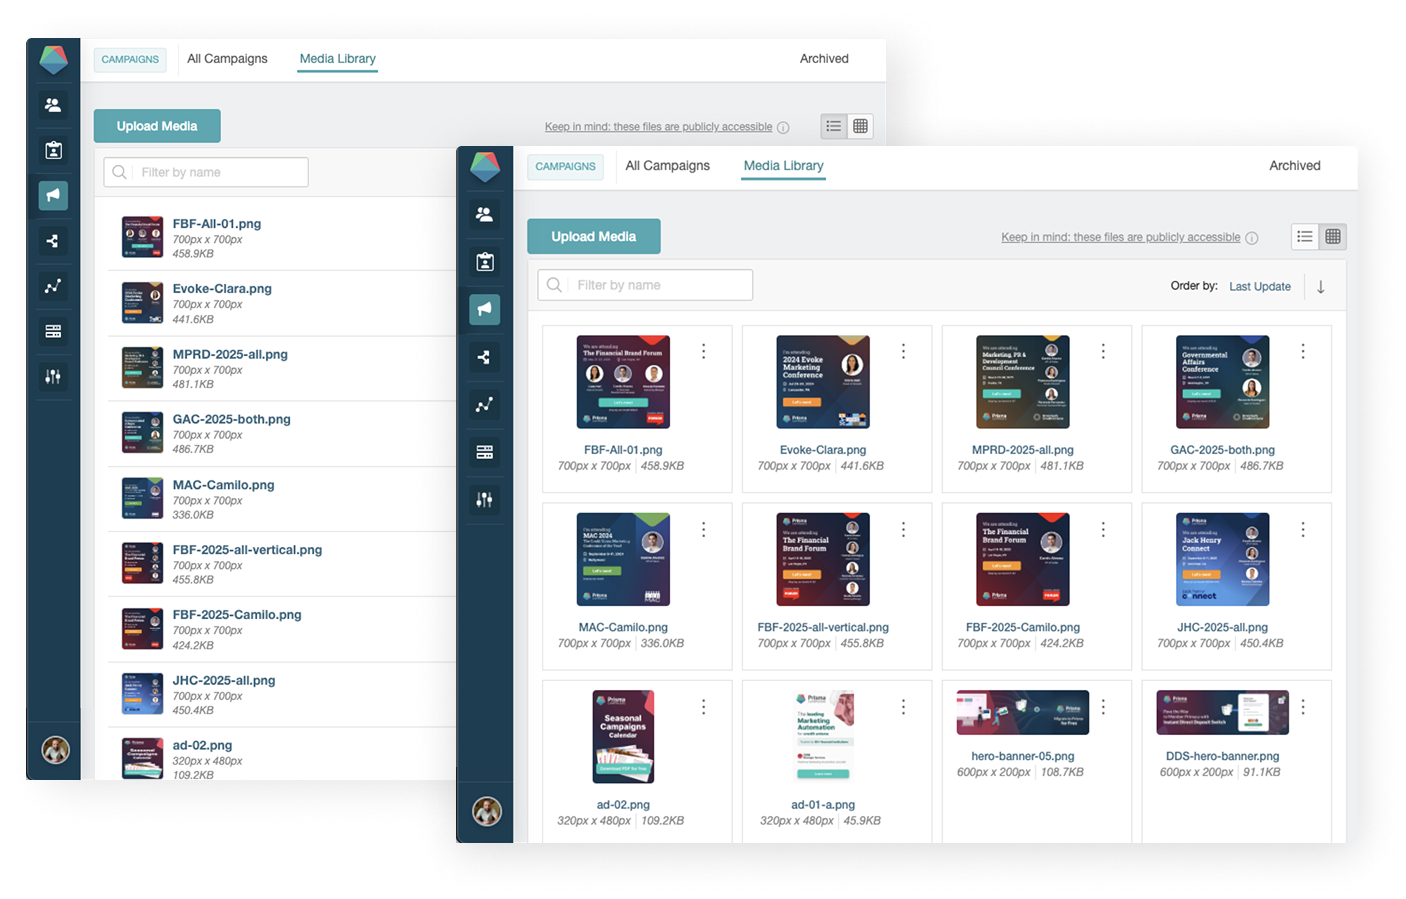
The Media Library allows you to perform the following actions on your files:
- Upload: Add new files to the library.
- Preview: View a preview of the selected file.
- Edit: Change the name and description of a file.
- Download: Download a file to your local computer.
- Share: Share a file using the public link or use it outside the platform.
- Delete: Remove a file from the library.
Files can be viewed in either a list or grid mode, allowing you to choose the layout that best suits your workflow.
Using Media Library Images #
Images uploaded to the Media Library can be used in various parts of the Prisma Campaigns platform, including:
- Designer
- Landing Pages
- Banners
- HTML Snippets
- Direct Mail
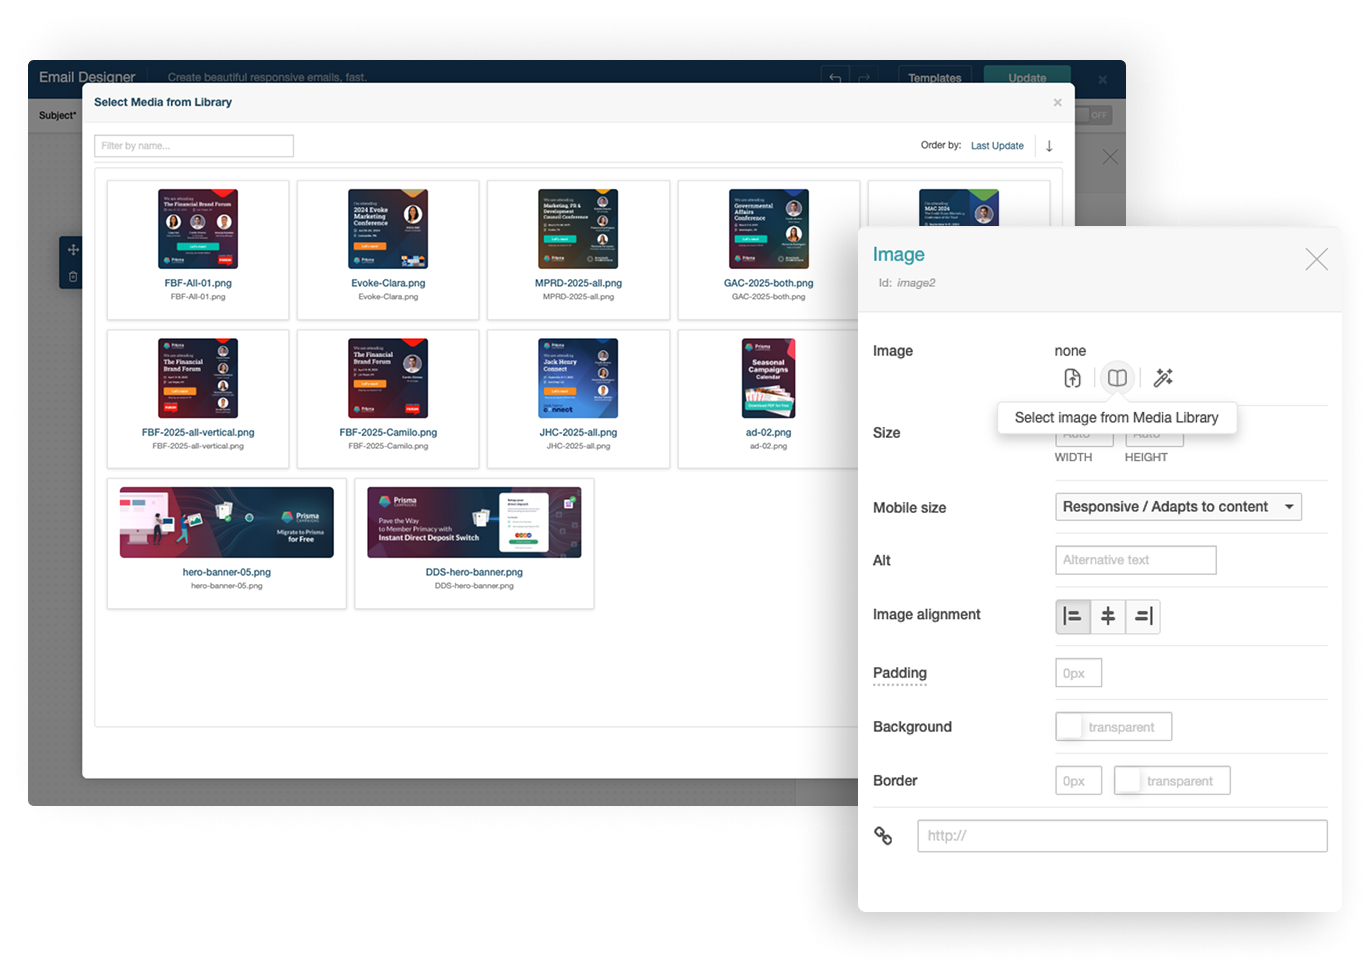
When you use an image from the Media Library, it is inserted into the content, not linked. This means that if you upload a new version of an image with the same name, it will not automatically update in all the places where the previous version was used.
Public Links #
Every file in the Media Library has a public link that can be used to share the file outside of the Prisma Campaigns platform. This is useful for sharing assets with external collaborators or for linking to files in your own websites and applications.
File Size Limit #
The maximum file size for uploads to the Media Library can be found in System Limits. This safeguard is in place to ensure optimal performance and to prevent issues with email deliverability. Large images in marketing emails can negatively impact delivery rates and user experience.
Summary #
In short, the campaign process involves the following:
- A campaign is presented to a user through one or more channels (lead creation).
- The user becomes interested in that campaign and carries out a series of determined actions (funnel).
- The user completes the purchase process, registration, or similar (conversion).
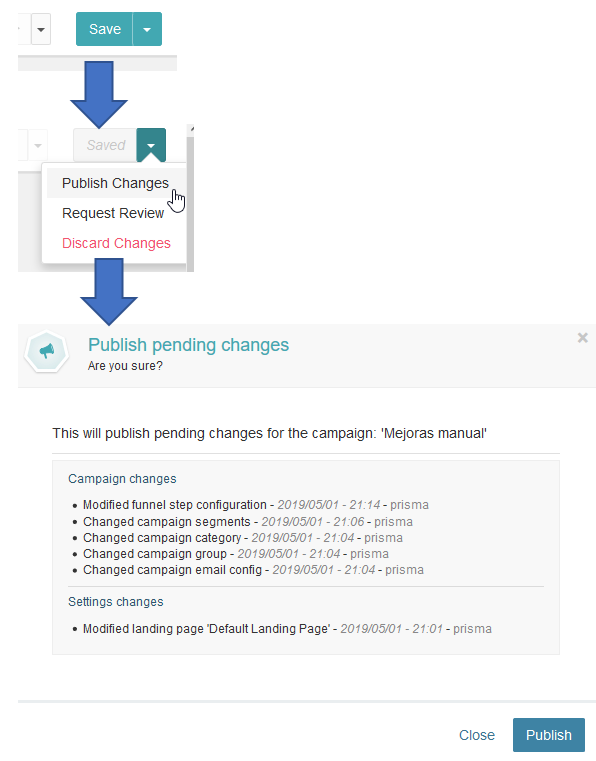
Once the campaign has been created and all the necessary changes have been saved, it must be published to see changes in the website. The same principle applies when subsequent modifications are made.
To publish changes to a campaign, we will use the Save button located on the top right corner of the campaign settings. As illustrated in the image below, the last step before the actual publish consists of displaying a list of pending modifications. This includes both those related to the campaign itself and other external changes (such as segments and other settings, to name two examples).
The above list can also be viewed at any time through the pending changes indicator, located next to the campaign name:
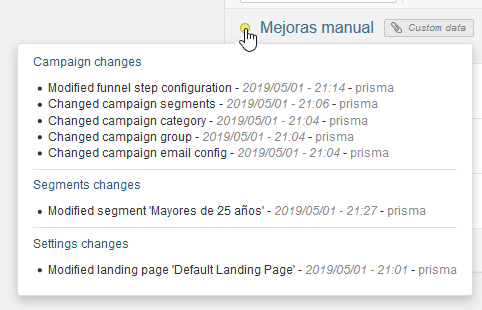
Next, click Publish Changes from the dropdown menu so that the modifications go live in the website without having to update the underlying HTML code.