 English
Customers #
Prisma Campaigns allows you to access the complete history of communications with each client from the CUSTOMERS menu. Among other things, this list includes:
- Emails sent
- Pages visited within the institution’s portal
- Banners clicked
- Pop-up windows viewed
- Conversions performed
- Channels turned on and off
- Dismisses and subscriptions cancelled
Customer Search #
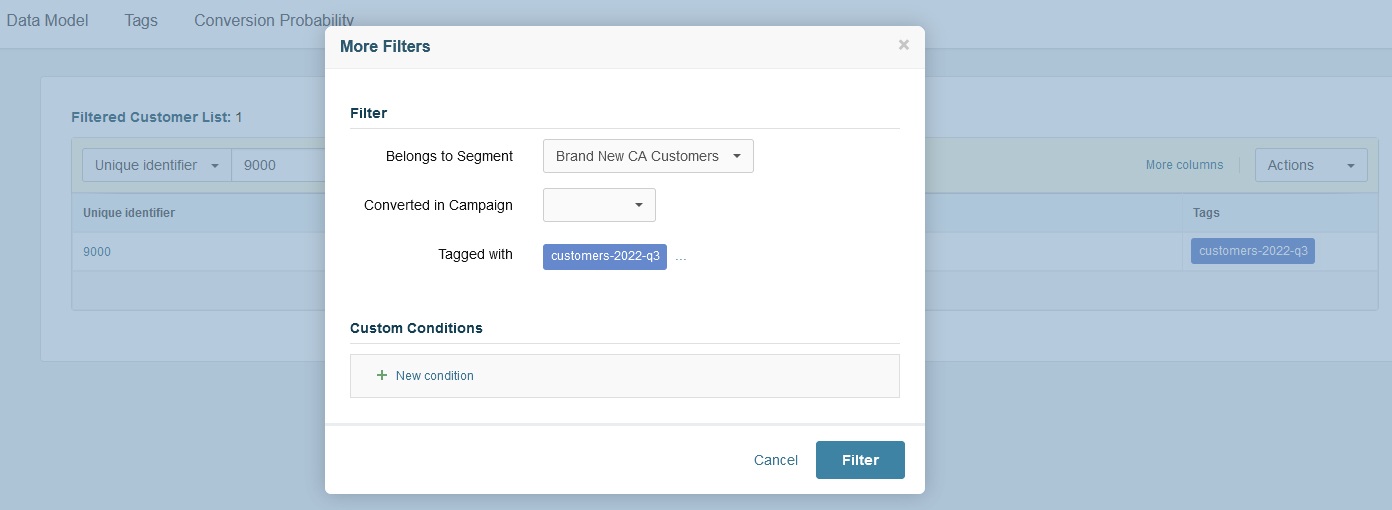
To view the history of interactions with a particular customer, use the basic search (email address, unique customer identifier, name, or another field from the data model). Additionally, you may want to combine it with advanced options (tags, segment, or campaign in which they converted) by clicking on More Filters:
After identifying the customer, click on the unique identifier in the result. You will then see the details of the interactions with the customer.
Interactions With the Customer #
After selecting a customer, you will see the following in different tabs:
- Total interactions per channel (including the resulting conversions)
- Basic profile information and tags
- List of campaigns for which he or she qualifies
- Cancelled subscriptions and dismissed communications
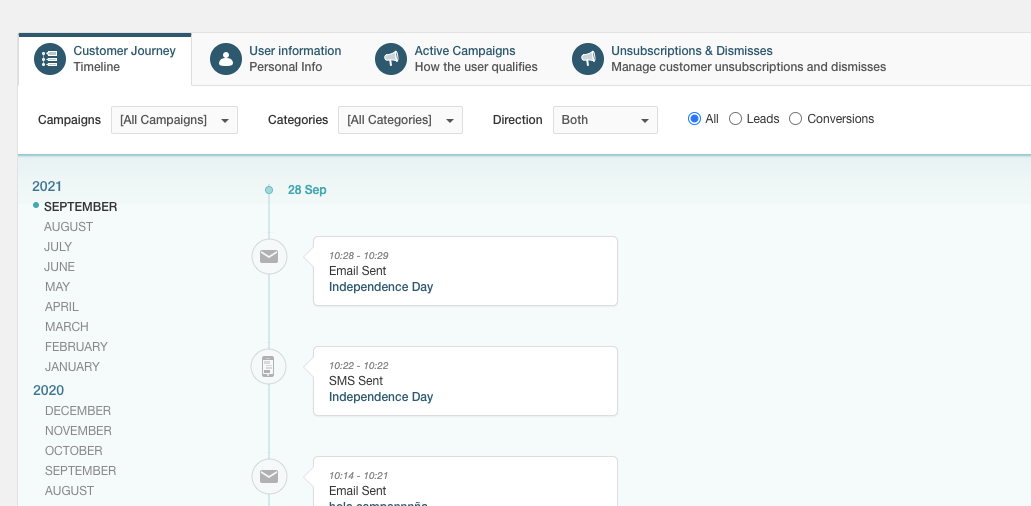
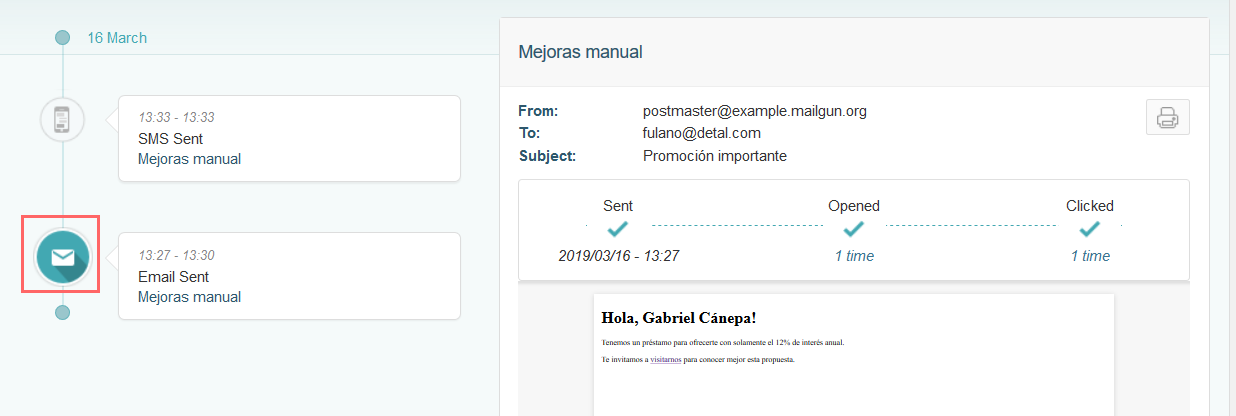
Apart from the complete history, it is possible to view a detailed background by campaign, category, and month and even distinguish between inbound or outbound communications using the available filters. In addition, you can display the date on which these interactions took place and related information by clicking on the framed icon:
Active Campaigns for the Current Customer #
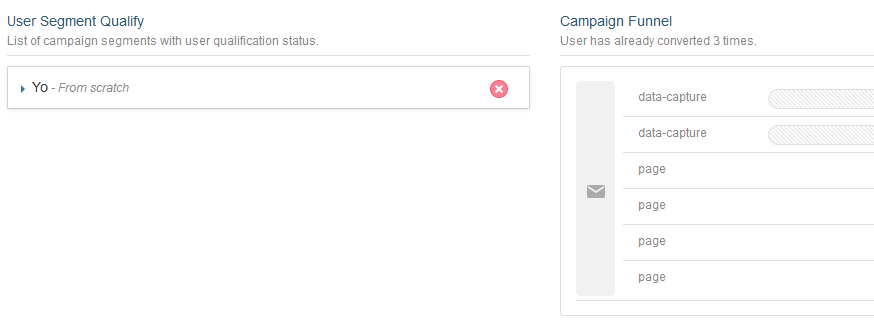
To view the active campaigns for which the client qualifies, click on the Active Campaigns tab. Among other things, this section provides a summary of the following items on a single screen:
- Selection of campaigns from a drop-down list to check if a given client qualifies for each one:
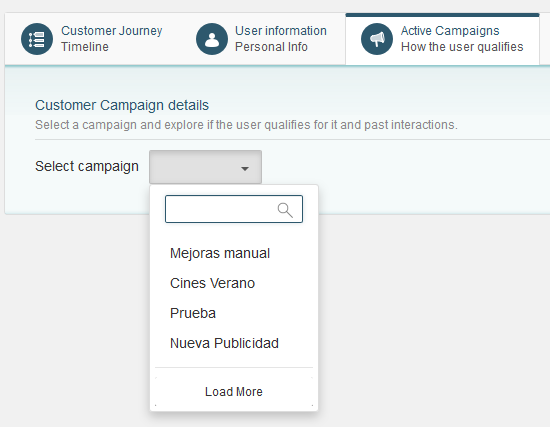
- Once you choose a campaign (Mejoras Manual in this example), the previous interactions with the customer will appear (including the funnel steps completed each time), as well as the segments involved in case the customer qualifies
Subscriptions for the Current Customer #
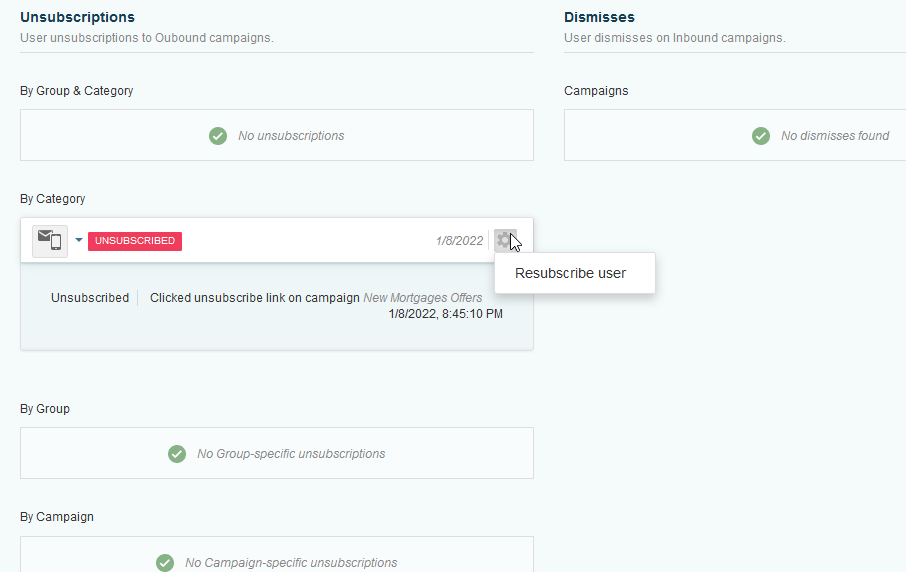
The status of the subscriptions of a given customer is available in the Unsubscriptions & Dismisses tab along with the enabled communication channels. In this section, it is possible to edit the status of the customer’s subscriptions manually, including individual unsubscriptions by campaign, category, group, and channel. For example, to unsubscribe a person from New Rewards Gold Credit Card it is necessary to select the campaign from the list and then click the Unsubscribe button:

In addition, it is also possible to enable or disable the sending of messages via email, SMS or push notifications for the customer in question. This action can be performed for one or more particular channels by showing the corresponding option or for all of them at the same time from the Enable outbound communications switch. The image shows that outbound communications are active but no messages are being sent via SMS:

To resubscribe a customer, click on the gear icon and then on Resubscribe user. It is important to clarify that this operation is feasible by group or category, by both, or by a specific campaign. In the specific case shown below, the client in question previously unsubscribed from the New Mortgages Offers campaign by clicking on the link in an email:
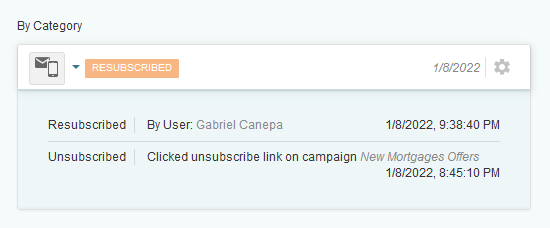
Clicking Resubscribe user will ask for confirmation before changing the subscription status. After accepting, the status will change to Resubscribed and the details will include the name of the person who made the change:
Data Model #
The Data Model tab displays the list of fields available for storing customer data. Each of them has the following attributes:
- The identifier is a name for internal use by Prisma Campaigns.
- The description is the friendly text that represents the field in segments and campaigns.
- The data type (date, text, email, number, etc.)
- The category can be demographic (gender and city of residence, for example) or correspond to the customer profile (date of registration, account balance, etc.)
- The cardinality indicates whether the field in question accepts one or more values.
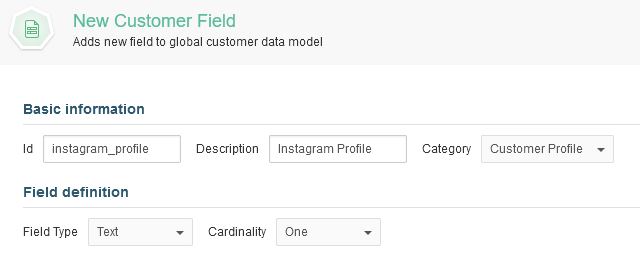
To create a new field, click on the Add new field button and enter the required values in each box. The image below shows the form that will generate a field with the following characteristics:
- Identifier: instagram_profile
- Description: Instagram Profile
- Category: Customer Profile
- Field type: Text
- Cardinality: One
Next, you can add a validation to the field to check the values you are trying to store. This optional check can include a predefined rule or a script implementing an advanced behavior. If you want to do this, it is necessary to click on Add new rule, add at least one condition, and indicate the validation message. In the case illustrated in the image below, we can see that the field requires the @ character at the beginning:
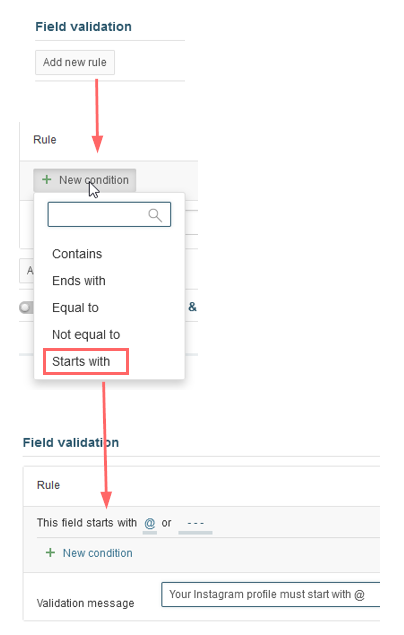
By including this field in the campaign funnel (for example, in a data capture form), the validation message will appear if a customer enters text that does not have @ at the beginning:

Customer Tags #
To manipulate customers in bulk, you can assign tags when 1) uploading new records or 2) updating segment members. This resource enables you to perform a series of actions on a group of customers simultaneously:
- Update
- Delete
- Search
You can create tags by clicking on the Tags tab in the CUSTOMERS menu. Enter a name and an optional description, and choose a background color. The preview will appear on the right-hand side of the modal window.

After you hit Create, the tag will appear in the list. You can edit or delete it by clicking on the three dots to the right of the tag name.

At this point, you are ready to either apply the tag to existing customers or use it when adding new ones.
Applying Tags to Existing Customers in a Segment #
This case assumes you have a segment of customers to whom you want to assign a tag. To do so, go to SEGMENTS and click one of them. Next, click Preview customers and select Apply Tags from the Actions dropdown. Finally, choose one or more tags and click the Apply button:
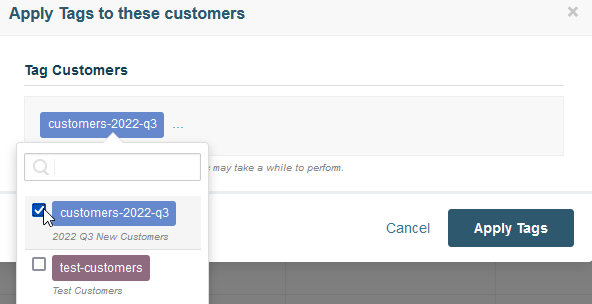
Note that tags do not become visible at the customer level automatically because they are set through a background task.
Setting Tags to New Customers #
When you create a new segment based on a spreadsheet or upload a file in the Spreadsheets tab of SEGMENTS, you can assign tags to each customer in the group:
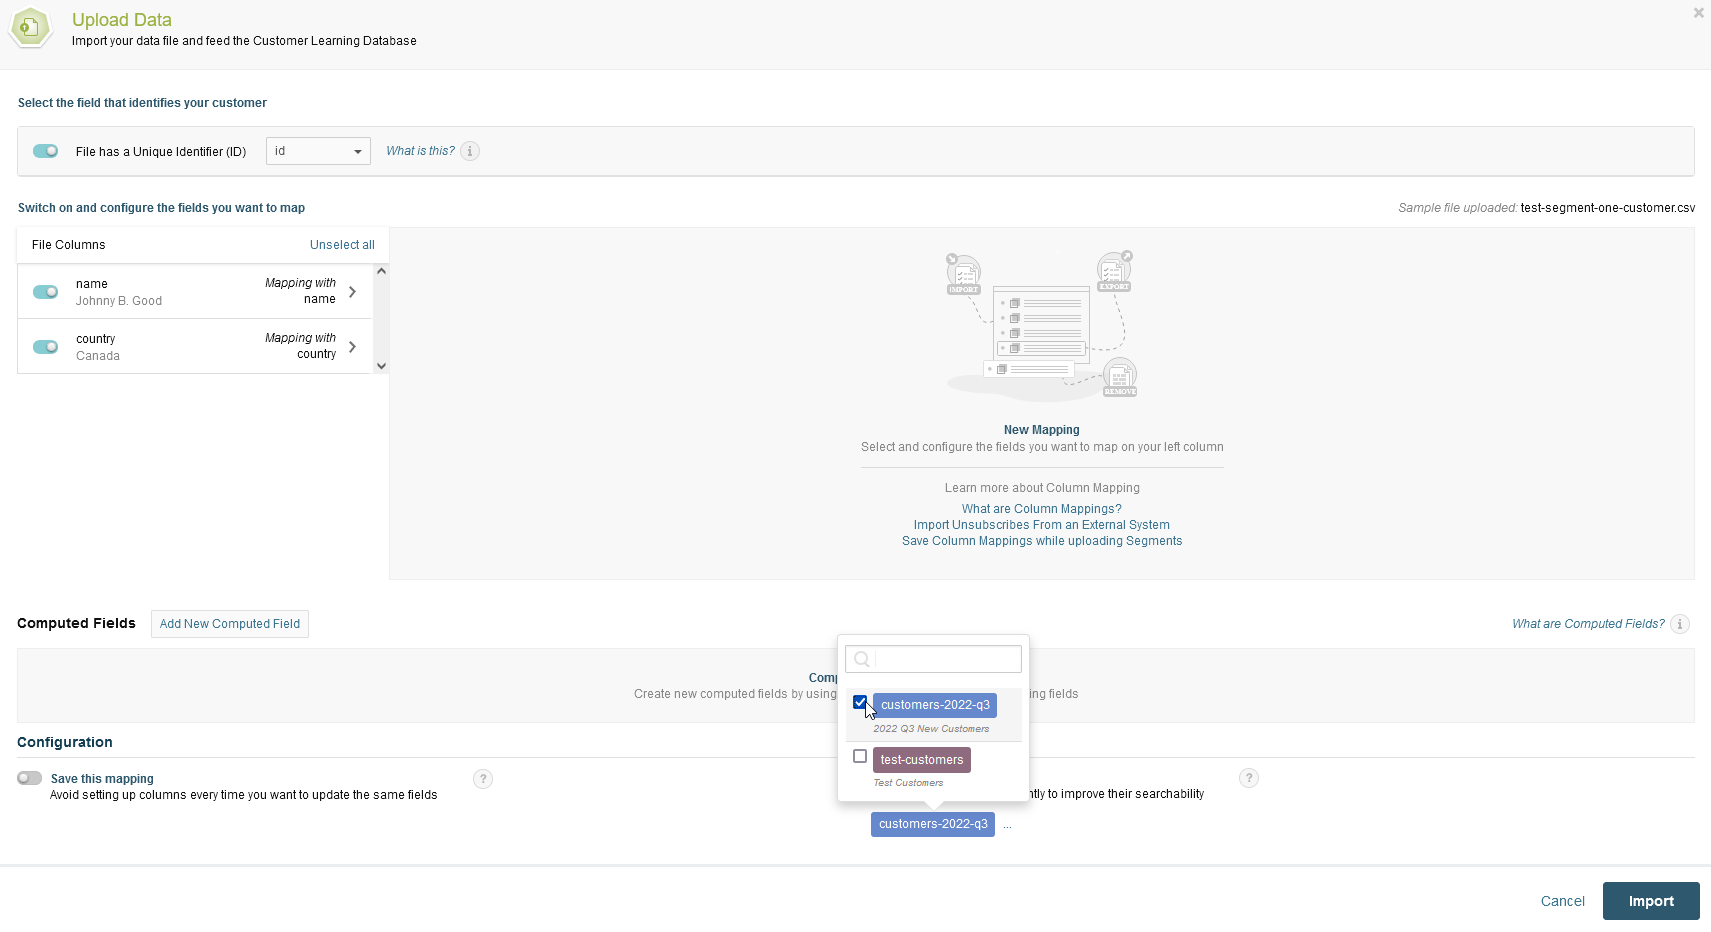
Click Import and then Save to make the changes permanent. As is the case with setting tags on the members of a segment, they will not be displayed until the background task is completed.