Segmentation #
A segment is defined as a subset or logical grouping of the total number of customers based on a series of conditions. Therefore, each segment consists of all the customers that meet a set of conditions, such as All customers over 45 with a balance of less than 1,000 in their accounts, All men under 30 years old, and so forth.
In SEGMENTS, we can create a segment based on the conditions mentioned in the previous paragraph and many others. To facilitate this task, Prisma Campaigns has three different methods:
From scratch (empty segment)
From an existing segment
From the data contained in a form (customer information file)
The process of creating a segment begins by clicking on New Segment, assigning it a descriptive name, and then choosing a method from those named above:

It is important to note that the definition of segment for Prisma Campaigns is not related to any socio-economic segments kept by the institution for each customer, and is handled separately.
Independently from the creation of a segment, you can upload spreadsheets with customer information to be stored internally. To do so, click on the Upload Spreadsheet button as shown in the below image:

The process of uploading spreadsheets also allows to create column mappings if the corresponding option is enabled. For more information, please refer to the associated documentation of SETTINGS.
The data uploaded as part of this process can later be used to create new segments. It is always possible to revert the changes made through the last import by clicking Revert Changes. If you do so, the corresponding file will show as Reverted as you can see above.
Example 1: Creating an empty segment (from scratch) #
To illustrate, we will use a segment called Men under 40. Once created, the available filter options will appear. To indicate that you wish to filter by age and sex, go to the Demographic section and click on New condition. Before adding and applying filters all the customers are contained in the newly created segment (5 in this case):

To create new filters you can choose from a variety of criteria: Age, Gender, Kids, Marital status, Social networks, and Socio-economic level - all self-explanatory.
To begin, we will click on Age and then we will apply the necessary filter (less than) along with the chosen age (40). After performing these steps, we can see that the number of people who meet the conditions specified no longer represents the total customers:

Next, we will repeat the process to add another demographic condition: the gender of the customers that should be part of this segment (Male). To save the new segment, click on the Save button, located on the bottom right of the screen.

After saving changes, Men under 40 will appear in the segments list with the indication that it is not being used in any campaign, which is normal for a new segment. It is important to clarify that you can edit the segment later (change its name and/or description) or delete it via Thrash.

Example 2: Creation of a new segment from an existing one #
In this case, we need to indicate that the new segment will be based off of another one, and specify which one. The advantage of using this method is that the process begins with the initial filtering already performed.
To illustrate, we will use a segment named Infocorp to create a new one called Infocorp Men. When you click Create, the same configuration options (as in the previous example) will be available with all conditions from the base segment already applied. At this point, additional conditions that are specific to the new segment can be added.

Another use case that highlights the advantage of using this method is the following. Suppose you defined a segment called Millenials based on the following set of conditions:
Under 25 years old
The current balance is less than 3000
Have used the web channel
If we wish to create a campaign targeted only to the men of that group, we can create a segment called Millennial Men by only adding the gender as an extra condition. Thus, creating a segment from an existing one is significantly easier since it reduces the number of conditions to set up initially.
Example 3: Creating a new segment from a data spreadsheet #
If you have a spreadsheet with customer data (in .csv format, for example) that includes a description of each field, you can create a segment by clicking Upload New File or dragging the file into the upload area. Strictly speaking, the only required field to create a segment is the unique customer identifier (usually called Id or similar).

When importing the file, you can additionally map its columns with the existing fields in the internal database of Prisma Campaigns to update existing data or add new fields. This operation allows you to map the contents of the file to columns in the database using the customer identifier or another field. When you utilize the former alternative, it must match the customer identifier that is sent through the channels integrated into the application (see reference to CUSTOMER_ID under Applications in the previous chapter).
If the customer identifier mapping is omitted, the system will automatically generate it for each record. As shown in the image below, you can add a custom field ([New Field]) to the Prisma Campaigns database if you need to leverage a field that is present in the file but does not exist in the platform by default. If you choose this option, you will create a new field in the Prisma Campaigns customer model where you will load the information of the corresponding field from the spreadsheet. Thus, the initial customer model is extended, resulting in improved recommendations when you define a segment.
The same functionality to create a custom field is also present in the campaign conversion funnels where, as part of the process, previously unknown data is requested (for example, the neighborhood where the customer resides). This also leads to extending the tool’s customer model.

After selecting all the necessary fields through the corresponding check box, we will click Import to load the data into the tool and start creating the new segment. In this particular case, we will select the risk rating variable (Risk Score) within the customer profile section (Customer Profile) and we will add an amount as a condition. For example, we will assume that Riesgo nulo will group all customers whose Risk Score is less than or equal to 10 points:

To finish, click on Save as in the two previous examples and the new segment will be created.
Points to consider #
Regardless of the creation method that we have used, it is important to note that the following types of conditions can be used in a given segment:
High-level conditions are the most commonly used and are defined by demographic data (e.g., marital status, socio-economic level, etc.), the customer profile (balance on account, credit rating, to name but a few examples), and the customer interaction history (most used channels, pages visited, etc.).
Custom conditions (Custom conditions) allow you to define filter criteria against any field of the customer model and set a threshold value to determine if the condition matches or not. For example:
All customers who live on the same street, regardless of the specific address.
All customers from the same country.
Although the series of conditions that are part of a segment filter work as a logical AND operation (all have to match in order for a particular customer to qualify for the segment), it is possible to establish alternative values, as long as they are valid. In other words, if we select (for example) Marital Status it is possible to define a logical OR operation between different values (All customers who are married or unmarried or widowers). As a result, any customer who is either married, unmarried, or a widower will match the condition.

Finally, keep in mind that if you want to consider disjoint conditions, it might be best to create two separate segments, and then indicate that the associated campaign applies to both.
File mapping errors #
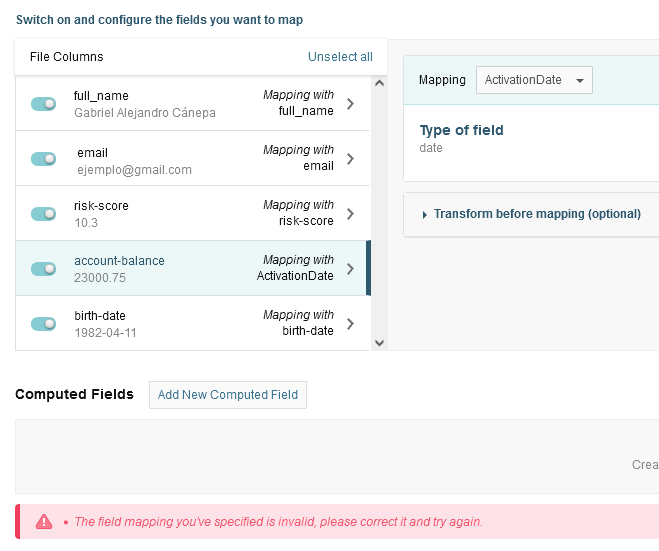
If, when mapping the spreadsheet with the Prisma Campaigns data model, a field does not match the correct data type, the import process will fail. For example, the image below shows that in account-balance (spreadsheet field mapped with ActivationDate in Prisma Campaigns) there is data that does not correspond to the expected type.

It is important to clarify that Prisma Campaigns determines the data type that can be expected in a field based on the first 50 records contained therein. If inconsistent data is found in a subsequent row, the import will be completed but will still show an error stating that such record was rejected.
Rejected records #
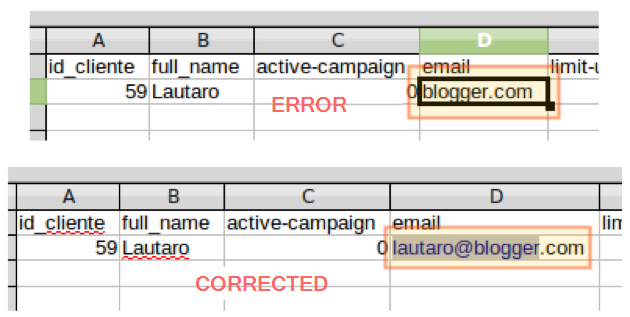
If any of the records in the imported spreadsheet has invalid data (for example, when a letter is found in an integer field, or text without an @ in Email), the number of records that failed to be imported will be shown. Additionally, the tool will allow you to download a .csv file with those records as you can see below:

The following image illustrates an example where a record under email did not have the expected format, and was corrected later:

After examining the file we can determine the reason why the error occurred, make the necessary changes, and upload the file containing the records now corrected.
As mentioned earlier, the field type that corresponds to a column is determined using a small subset of records. If we find incorrect data within the sample (for example, strings of text in a numeric field, e.g. Account balance), a notification will appear stating that the mapping cannot be performed. On the other hand, if we find invalid data on that field during the import process, the associated records will be included in the rejects file.
Impact charts #
By defining several conditions on the same segment, it is possible to observe the impact that each one causes in the overall filter. In the following example, two conditions were added to a given segment:
The customer is 40 years or older.
Account balance is equal to or greater than 10,000.
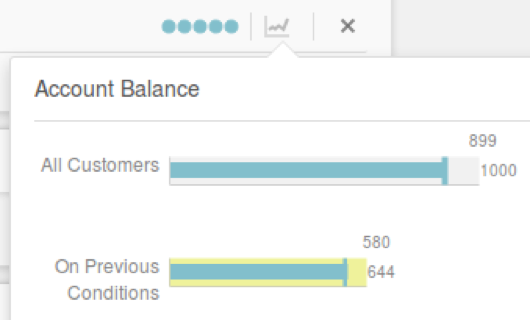
To the right of each condition, we can see the impact analysis that each condition has on the total filter. After clicking on the icon that corresponds to the second condition mentioned above, we see the chart and the analysis shown in the image below:

In summary:
The total number of customers (All Customers) is 1000.
Those who meet the condition being considered are 899.
The number of customers who meet the previous conditions is 644.
The total number of customers who meet all the conditions is 580.
The purpose of the impact charts is to show the result of a filter -considering each condition on its own- to understand what are the conditions that exclude the largest number of customers from the current segment. If after placing all the desired conditions, only a very small number of people qualify for the segment, the impact charts show which conditions would have to be updated to obtain a larger audience. Following the example above, the result is a total of 580 customers that meet both conditions.
In detail, we can see that there are 644 customers that meet condition #1 (customer > 40 years old), while those who meet #2 (> 10000 account balance) is 899. With this analysis, we might consider modifying the age threshold (for example, the customer is 30 years or older) since this condition excludes the most people in the segment.